 |
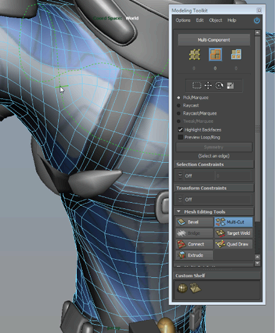
Maya now includes a Modeling Toolkit (Edit Mesh > Show Modeling Toolkit) that is designed to increase the speed, accuracy, and efficiency of your workflow. The Modeling Toolkit integrates selection and transformation tools within a single window and keeps tool switching to a minimum. Features include tools for mesh editing and creation, pre-selection highlighting, vertex locking, slide components, and fully integrated ring/loop selection. While the toolkit adds workflows on top of existing Maya modeling features, it does not diminish the capability or usability of Maya's native toolset.
|
A new Slide brush  has been added to the Sculpt Geometry Tool (Edit NURBS > Sculpt Geometry Tool >
  or Mesh > Sculpt Geometry Tool >
  ), letting you slide vertices in the direction of your stroke while following the existing shape of the surface.
When enabled, the new Preserve normals option in the Freeze Transformations Options (Modify > Freeze Transformations >  ) ensures that all transforms are oriented in the proper direction and are not flipped on negatively scaled objects.
The Convert display option in the Modeling Preferences has been renamed to Automatic vertex color display to better reflect its functionality. When enabled, this option automatically sets a number of conditions to make polygon
colors visible in your scene. Additionally, this option has been added to the Display section of the Paint Vertex Color Tool (Color > Paint Vertex Color Tool >  ).
).
You can display hard edges, normals, tangents and binormals in any color of your choice. Use MEL scripts to set your color preference.
The Normals Size editor (Display > Polygons > Normals Size) now has a range of 0.02 to 10000. For more information regarding the functionality of this editor, see the following topics. This feature is applicable to both the default work space and Viewport 2.0.
You can now align the current camera to the selected polygon face using the new Align Polygon To Camera option (View > Align Polygon To Camera).
When in component mode, the new Select Similar option (Edit > Select Similar) selects polygonal components of a similar type to the current selection. When in object mode, this option selects other objects of the same node type in the scene.
You can now set the default method for weighting vertex normals using the new Default Vertex Normal Method preference.
A new Multi-Component option (Select > Multi-Component) lets you quickly select faces, vertices, and edges without having to change between selection modes.
 Except where otherwise noted, this work is licensed under a Creative Commons Attribution-NonCommercial-ShareAlike 3.0 Unported License