Start Working with the Plug-in Wizard
In this lesson we demonstrate the minimum required steps to create a plug-in that gets loaded by 3ds Max. The IDE and compiler configurations are reviewed, and practical steps are taken to make the plug-in recognized by 3ds Max.
Please refer to SDK Requirements to ensure that you meet the platform requirements to start developing 3ds Max plug-ins. We will be using the Plug-in Wizard (AppWizard) in MS Visual Studio 2010 for the creating plug-ins. Refer to Installing the Plug-in Wizard (AppWizard) and add the 3ds Max Plug-in Wizard template to the list of installed templates for Visual C++.
Our plug-in in this lesson will be a utility plug-in, one of the simplest plug-in types. We will start with a plug-in that only gets loaded by 3ds Max and will add some very basic functionality to display a custom message in the prompt area of 3ds Max.
You can now create a new project in MS Visual Studio using the installed 3ds Max Plug-in Wizard. This will automatically set some of your project properties (e.g. configuration type of your project or additional include folders) and generate the minimum required code for your plug-in to compile and be loaded in to 3ds Max. Once you select the plug-in wizard to create your project, you will need to enter a name for your project. In the next step, set your plug-in type to “utility” for this example. This will automatically set the base class to UtilityObj in the next page. The wizard will then ask you some information about the name, category and description of your plug-in. What you enter here will not affect any functionality of your plug-in, so you can enter any string such as ‘My Utility’, ‘test plug-ins category’ and ‘My first utility plug-in’.
The last page in the plug-in wizard will ask for the path to three different folders. The first path is of the maxsdk (e.g. C:\Program Files\Autodesk\3ds Max 2012\maxsdk) to include its header and library folders. The output path is usually the \plugins folder in the 3ds Max installation folder (i.e. C:\Program Files\Autodesk\3ds Max 2012\plugins), because there is the location searched by 3ds Max for the plug-ins during the start up. The last path is the location of the file 3dsmax.exe on the hard drive. By default, that should be C:\Program Files\Autodesk\3ds Max 2012.
Plug-in Wizard's Automatically Generated Files
At this point, the plug-in wizard will create your project solution including the following files:
You will not need to make any change in the plug-in wizard generated code of most of these files (this holds true for any utility plug-in). All you need to in order to specialize your utility plug-in is to modify the file <yourprojectname>.cpp. Here we will have a quick review on all these files, with more emphasize on <yourprojectname>.cpp that forms the most important part of your plug-in project.
A .DEF file describes various attributes of a DLL file. In our case, it declares the the mandatory functions explained in Required DLL Functions to 3ds Max. You have to note that even if all those functions are implemented correctly, 3ds Max cannot find them (and consequently will not load the plug-in) unless you have listed those functions in this file. You can refer to Creating the DEF File for more information on this file.
This file includes the implementation of the functions explained in Required DLL Functions (that are also declared in the .def file), plus a DLL entry point function (DllMain()) which MS Windows requires from all DLLs. This function is called by Windows when the DLL is loaded and may also be called many times during time critical operations such as rendering. The content of this file needs to be almost the same if you are creating your plug-in manually.
This file contain windows resources needed for your plug-in. The strings you entered for the plug-in name, category and description during creating a new project are stored here as a string table. This file also defines and stores a UI panel (named IDD_PANEL by default) that will be displayed when your plug-in is selected in 3ds Max. Your plug-in will still be loaded in 3ds Max if you have not defined any UI, but there will be no visual indication that your plug-in is selected when you select it from the list of utility plug-ins.
You can manually edit the .rc file after it was created. However, remember that this file is not a requirement of 3ds Max. All you need to do is to return a string in the specific functions of your plug-in (e.g. the DLL function LibDescription() or the member function <yourclassdescriptor>:: Category()).
The dialog defined in this file will be added in the utility command panel area of 3ds Max as a rollout page by a function named BeginEditParams(). We talk more about this later in this lesson.
This file defines macros required for generating the compile-time to-do messages. You will not need this file if you are creating your project manually.
Similar to the .rc file, this file is created by the resource editor and stores the constant values used in the resource file. You will not need this file if you are creating your plug-in manually.
This file contains the include statements for your plug-in class. The important included file here is utilapi.h, which includes the definition of the UtilityObj class. You will see that the rest of the included files are almost always the same if you use the plug-in wizard to create other types of plug-ins.
There ia also a global variable and a global function (both defined in the DllEntry.cpp) that are declared in this file. The global variable (hInstance) is a handle to the plug-in DLL module in the OS memory space. This global variable will be initialized after the plug-in is loaded using the value OS provides, and will be used when the plug-in is calling 3ds Max, so 3ds Max knows where (in which DLL) it should look for the resources.
The global function (GetString()) is used to return a string from a string table whose index is given. The code generated by the plug-in wizard will store the strings you enter for the plug-in name, category and description in a string table in the resource file ( <yourprojectname>.rc) and will retrieve them using this function.
All you will need to do for this file if you are not using the plug-in wizard is to include utilapi.h that defines the UtilityObj class, and maxapi.h that defines the interface class. We need the latter one when we want to add the UI panel as a 3ds Max rollup page.
Being a utility plug-in, your plug-in will extend from the UtilityObj class. Because all the member functions of UtilityObj are pure virtual, you will need to implement all of them so your plug-in can be compiled and loaded to 3ds Max. Fortunately the plug-in wizard generates the minimum code to implement these member functions. All these functions are from only the base class UtilityObj. You will see later that plug-ins other that the utility plug-ins need to implement functions from the parents of the base class as well.
The file <yourprojectname>.cpp contains the majority of your plug-in, including your plug-in class (extended from UtilObj), the class descriptor (<yourpluginname>ClassDesc), and a global function (get<yourpluginname>Desc()) that is called from the DLL function LibClassDesc() and returns the address of a static object of the plug-in class-descriptor class.
You can have only one instance of a utility plug-in in 3ds Max (as opposed to a geometrical object plug-in, for example). This is why you will see that your plug-in uses a singleton access pattern: whenever 3ds Max calls the <yourpluginname>ClassDesc::Create() function to instantiate a new object, a pointer to the same static object is returned.
The “class descriptor” class is the primary link to 3ds Max. The plug-in wizard names it <yourpluginname>ClassDesc, but if you are manually creating your plug-in you can use any name for it. It must inherit from ClassDesc2. It describes the type of the plug-in class we are implementing, its name, its class ID, etc. It also implements a function to provide instances of this plug-in class when requested. The code for none of the functions in this class is implemented by the plug-in wizard and it is the responsibility of the plug-in developers to implement them.
Plug-in wizard automatically generates a class ID for your plug-in. However, you can refer to the topicGenerating Class IDs if you are not using the plug-in wizard.
The first custom interaction with 3ds Max
The file Lesson1a.zip is a compressed Visual Studio 2010 project created using the plug-in wizard. To demonstrate an interaction with the 3ds Max that we can observe on the screen, we print a message in the prompt bar of the 3ds Max window when the user selects our plug-in. For this purpose we have modified the function <yourpluginname>::BeginEditParams() that plug-in wizard has created.
UtilObj::BeginEditParams() is called when the utility plug-in is started and usually adds the UI panel we have defined in the .rc file to the 3ds Max window as a rollout panel. When 3ds Max calls this function, it includes a pointer to the 3ds Max main interface as an argument that we will use to access the Interface::PushPrompt() function that prints a message in to the prompt area:
void UtilitySample::BeginEditParams(Interface* ip,IUtil* iu)
{
this->iu = iu;
this->ip = ip;
hPanel = ip->AddRollupPage(
hInstance,
MAKEINTRESOURCE(IDD_PANEL),
DlgProc,
GetString(IDS_PARAMS),
0);
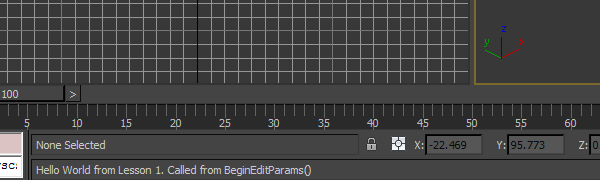
ip->PushPrompt(_M("Hello World from Lesson 1. Called from BeginEditParams()"));
}Adding the last line has resulted the following message to appear in the 3ds Max window when the UtilitySample plug-in is selected from the utility plug-in list:
However, this message will stay in the prompt area even if another plug-in is selected. We will need to pop this message from the prompt stack when the plug-in is not active anymore. We edit the function UtilObj::EndEditParam() for this purpose. This function is called by 3ds Max when the plug-in is de-activating. This function is implemented as following in the included project Lesson1a:
void UtilitySample::EndEditParams(Interface* ip,IUtil* iu)
{
	this->iu = NULL;
	this->ip = NULL;
	ip->DeleteRollupPage(hPanel);
	hPanel = NULL;
	ip->PopPrompt();
}
Adding the last line will remove the last message in the prompt area and restore it to its previous message.
A note on debugging your plug-in in Visual Studio
At one point, you will probably want to debug your plug-ins to fix the bugs, to observe the flow of the program or to observe the interaction between 3ds Max and your plug-in. Although your plug-in is not a stand-alone application, you still can take advantage of all the debugging tools in Visual Studio, such as break points, variable watch, heap or stack memory viewer and the registers display. You can refer to the topic Debugging 3ds Max plug-ins using Visual Studio for detailed information on using debugger for your plug-in.
You can also use the DebugPrint() function for logging errors, reporting values or events, and tracing information in your program. For example, you can use it in the plug-in wizard generated function LibClassDesc() in the file DLLEntry.cpp to see when and how it is called:
__declspec( dllexport ) ClassDesc* LibClassDesc(int i)
{
    DebugPrint("The LibClassDesc() was called with the input %x", i);
    switch(i)
    {
        case 0: return GetUtilitySampleDesc();
        default: return 0;
    }
}How to Create a Project without the Plug-in Wizard
The Plug-in Wizard creates the .vcxproj file to configure the project settings in visual studio and also creates the template code for your plug-in. If you are not using Plug-in Wizard, you can still create a 3ds Max plug-in from an "Empty Project" template as long as you manually configure the project settings and create the required files and codes. In the list of templates, in "Visual C++" group select "General", and then select "Empty Project". The project Lesson1b implements an utility plug-in similar to what we reviewed above, but it is created from an empty project template without using the Plugin Wizard. You will see that both the number and the content of the files are reduced in this project. Note that there is no rollout page and no string table used there. However, the following settings have been applied to the project properties.
Plug-in Wizard automatically configures the following settings for the project properties. If you are not using the plug-in wizard, make sure that you apply these settings:
In Project > [yourprojectname] Properties > Configuration Properties > General:
The information you provide to Plug-in Wizard will be used for configuring the following settings:
In Project > [yourprojectname] Properties > Configuration Properties > Linker > General:
In Project > [yourprojectname] Properties > Configuration Properties > Linker > Input:
Note: The follwing setting is accessible only after you added the first .cpp file to your project:
In Project > [yourprojectname] Properties > Configuration Properties > C/C++ > General:
Creating the files and template code
The plug-in wizard also creates the files mentioned above with a minimum code and adds them to your MS Visual Studio project. This however does not include any functionality for the plug-in. It will be up to you as a developer to complete the code of the functions or add new functions for achieving the desired functionality. You will need to refer to the relevant sections of the 3ds Max SDK Features to know what functions exist for each type of plug-in and then use those functions accoring the documentation to achieve your goals. Do not forget to use the 3ds Max class ID generator program, gencid.exe to create class IDs for your plug-ins. You can also refer to the examples provided in 3ds Max in <3ds Max installation folder>\maxsdk\howto and <3ds Max installation folder>\maxsdk\samples to see examples of working plug-ins and get ideas on how you will need to implement your plug-in.
You can also manually add one or more dialog to your project if you are not using the plug-in wizard. These dialogs will then be used as rollout pages in 3ds Max for your plug-in. You can right click on the project name in the project explorer and then add a dialog (Add > Dialog). An example procedure will be: