Import a motion-capture file. > Import dialog > Click OK. > Capture Animation dialog
The Capture Animation tool allows you to transfer animation from any hierarchy or collection of objects in Max onto a CATRig. Its purpose is to “capture” animation data from any animation hierarchy onto a CATRig. While Capture Animation is part of the import process, you can use the utility separately, externally to the motion capture process.
Capture Animation is intended primarily to facilitate importing motion-capture data, but it can work with any animated hierarchy. After you import motion data into 3ds Max, the next step is to map the data onto your character with the Capture Animation utility.
The Auto Map feature in Capture Animation is a quick way to generate a mapping between the source hierarchy and your CATRig. It tries to find bones in the source hierarchy that correlate to bones in your Skeleton and map them to each other.
When you use the motion-capture-import process in 3ds Max CAT, the Auto Map function occurs automatically. However, when you open Capture Animation as a utility, you must invoke Auto Map explicitly.
Also, Auto Map uses guesswork in attempting to align the source bones and the CATRig bones. In some cases, to obtain optimal mapping it’s necessary to refine the results.

In many cases you need to edit the alignment of the CATRig bones to correctly fit the source skeleton. Possible reasons to do so include that the CATBones use a different up axis as the source skeleton from which you are capturing animation, or because some software introduces offsets to bone rotations.
Once you have begun the mapping process, you will notice that a new layer has been added to the bottom of your CATRigs layer list. This layer uses special controllers that hold 3ds Max animation constraints. It also stores the offset, and can scale the transferred motion to fit smaller characters.
You can simply select bones and transform them to edit the alignment. Each bone does not inherit the offsets of its parent. This simplifies the process of editing your skeleton’s alignment, as you can edit each bone independently.
This edit is stored in the controller that has been assigned to that bone. When you save a Capture Animation preset file (*.CAM), all the offsets and mapping are stored also.
Mapping Bones and Hierarchy Panel Locks
The Capture animation tool uses settings on the Hierarchy panel > Link Info > Bone Hierarchy rollout to determine how bones should be mapped. If Animation Mode > Lock Local Position is on for a CATBone, then the Capture Animation tool does not constrain the position of the bone to the position of the source bone.
Likewise, if Animation Mode > Lock Local Rotation is on for a CATBone, then Capture Animation does not constrain the rotation of the bone to the rotation of the source bone.
Sometimes you might not get the desired results when you begin the process of transferring animation data using Capture Animation. This could be because your source data is not a humanoid skeleton, or it does not follow standard naming conventions, or there might be rotation offsets in the source skeleton that cause the Auto Map function not to work.
The following procedure provides some suggestions for correcting mapping problems:
However, when mapping an IK target such as a FootPlatform, which, incidentally, typically goes to the toe or foot of the source hierarchy, you might need to restore IK to see the correct orientation.
To use Capture Animation with motion-capture data imported directly onto the CATRig:
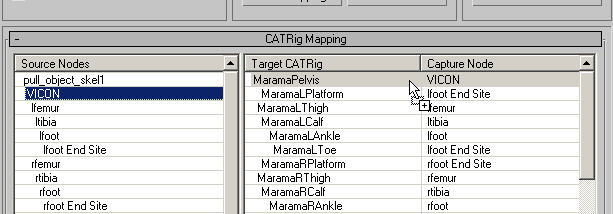
You can see both hierarchies in the Source Nodes and Target CATRig lists. The Capture Node list, which shows the source nodes whose animation will be captured by the corresponding CATRig bones, is populated by the Auto Map function. Auto Map is performed automatically during the import process.
The source rig animation plays while the animation is transferred onto the CATRig in a new (“Collapsed”) animation layer, which now also appears in the Layer Manager list.
If Delete Source On Close is on, a small dialog opens asking whether to delete the source hierarchy and remove the mapping layer. Click Yes to do so, or No to keep both. In general, click Yes.
To use Capture Animation with separately imported motion-capture data:
You can see both hierarchies in the Source Nodes and Target CATRig lists. No mapping has been done yet; thus, the Capture Node list is empty, and the Capture Animation button is unavailable.
After a short pause, the Capture Node list shows the source nodes whose animation will be captured by the corresponding CATRig bones.
The source rig animation plays while the animation is captured onto the CATRig in a new animation layer, which appears in the Layer Manager list.
If Delete Source On Close is on, a small dialog opens asking whether to delete the source hierarchy and remove the mapping layer. Click Yes to do so, or No to keep both. In general, click Yes.
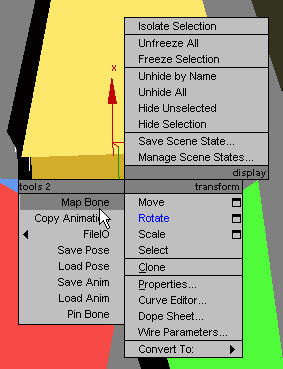
If Auto Map’s results don’t meet your mapping needs, you can map bones manually with either of the following methods:
After you release the mouse button, the source bone name appears in the Capture Node list next to the target bone to which it’s mapped.


Click to choose the hierarchy from which to capture animation. During motion-capture import this is the hierarchy created from the motion-capture data and the objects are selected automatically.
When you use Capture Animation as a utility, rather than as part of the importation process, the button label is replaced by the name of the root node of the hierarchy.
Generates an approximate mapping of your data onto the CATrig.
Automatic mapping is done automatically when importing motion-capture data via 3ds Max CAT. You need to click this button only if you’re using Capture Animation as a utility, or have changed or cleared the mapping and want to restore the automatic mapping.
The CATRig Mapping rollout comprises two lists, which you can scroll separately.
To map rig components manually, drag an item from the Source Nodes list to the corresponding item in the Target CATRig list (for instance, Pelvis to Pelvis). Thereafter, the source node appears in the Capture Node list next to the CATRig node to which it is assigned.
Alternatively, the software can perform the mapping automatically when importing motion-capture data via 3ds Max CAT or after importing motion-capture data with the 3ds Max Import function; see Procedures for details.