Chapter 20, Color Correction
| About Color Correcting | Working with ASC CDLs | ||
Chapter 20, Color Correction |
|||
 Working with the Lustre Color 3D LUTs
Film projects generally use digitized film images originating from a datacine conversion process. These high-resolution scans of film frames preserve much of a film's resolution, color depth, and grain. Digital film scan formats consist of logarithmic data, which allows for more subtlety in the lower luma ranges of an image. Linear data maps the luma range in equal intervals from black to white. Because the algorithms are optimized for linear data, a look-up table (LUT) can be used to convert the logarithmic data for a linear data environment.
A LUT is an ASCII file that describes specific pixel values used for image data conversion both on import and export. For example, you can use a LUT to convert a 10-bit logarithmic film image to a 16-bit linear image on import. Typically, you would apply the inverse LUT on export to restore the 10-bit logarithmic data, ensuring that the result film prints match the original shots. You can use two kinds of LUTs: 1D LUTs and 3D LUTs.

Before using LUTs, you should calibrate your monitor. Monitor LUTs affect the way images are displayed on the monitor without altering the image data. If you import logarithmic film scans without conversion, you need to use a monitor LUT to display the images correctly. Even when you apply a LUT to film scans on import, you may still require a monitor LUT to reproduce the gamma qualities of film--see Chapter 4, Lustre Color Calibrator in the Lustre Color Management User's Guide on the Toxik Web Portal.
A 1D LUT is generated from one measure of gamma (white, gray, and black) or a series of measures for each color channel. You typically work with a pair of 1D LUTs: the first converts logarithmic data to linear data, and the second converts the linear data back to logarithmic data to print to film.
1D LUTs can be used as import and export LUTs, and as monitor LUTs. Import and export LUTs are mainly used to convert between the logarithmic data contained in film scans and the linear data used within the application. Monitor LUTs ensure the image displayed on the monitor resembles the final output without the actual image data being modified.
You can apply a 1D LUT when importing a film clip, and then convert the image data back to logarithmic data when exporting the final output. For example, you can use a 1D LUT on import to convert 10-bit to 8-bit, 16-bit, 32-bit, or linear images for manipulation. Typically, you would then apply the inverse LUT on export to restore the logarithmic data, ensuring that the modified film print exactly matches the original shot.
Note: You can use 1D LUTs created outside the environment. However, to be recognized, the 1D or 3D LUT file must be in the correct format and be named correctly. Comment lines are permitted.
You can use 1D LUTs created in other applications as long as they are in the recognized format. All 1D LUT files must have the .lut extension. You should save all 1D LUTs in the project's LUT folder for ease of use, and so they can be archived with the setups of the project.
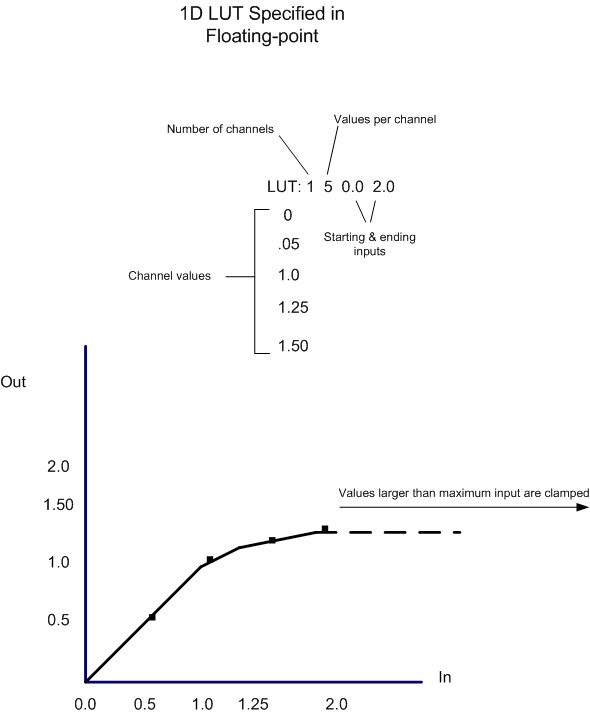
The 1D LUT file begins with a declaration of the number of tables and the number of entries per table:
LUT: <number of tables> <number of entries per table>
The number of tables in the file depends on the channel resolution required. For a LUT in which all three RGB channels are converted using the same values, just one table is required. To convert the three channels using different values, use three tables. For three channels plus alpha, use four tables. The number of entries in each table corresponds to the bit depth of the source file: 256 entries for 8-bit resolution, 1024 for 10-bit and 4096 for 12-bit. For example, a LUT operating on three 8-bit channels independently would have the following declaration:
LUT: 3 256
Each line following the header contains a single entry indicating the value to which the source is converted. For example, a table converting 10-bit logarithmic values to 8-bit linear would contain 1024 entries, corresponding to the 0-1023 intensity range of pixels in the source file. Each of these entries would be in the range 0-255, corresponding to the intensity range in the destination.
Blank lines and comment lines (starting with a number sign [#]) are ignored. Comment lines are useful for indicating the end of one table and the beginning of another, or for describing how the script or program works.
Floating point LUTs are supported and are reversely compatible in most cases. You can specify your own floating-point 1D LUT using an ASCII editor as long as it is in the correct format and is named correctly.
The following illustration represents a 1D floating-point LUT that consists of one channel of five values that fall between the range of 0.0 and 2.0.
 "Show full-size image")
LUTs are typically stored in a folder within the application or on a network, you should store LUTs created externally in the same folder for ease of use.
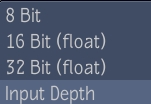
Three formats are supported:
8-bit unsigned integer
16-bit signed float
32-bit signed float
From the Tools tab, drag the 1D LUT tool from the Color Correction folder to the dependency graph in the Schematic view.
In the 1D LUT tab, click the LUT Browser button. Locate the 1D LUT you want to use and drag it to the dependency graph in the Schematic view.
Select the Input Depth.
 "Show full-size image")
Set the Exposure if required.
The 1D LUT is applied.
Note: Exposure adjustment is an animatable attribute--see Setting Keys Manually and Validating and Applying the Expression String.
You can modify a 1D LUT by changing values in its ASCII file without having to reset the 1D LUT field.
Open the ASCII file of the 1D LUT and make the necessary modifications.
Save the LUT.
Click Refresh.
The image is refreshed with the modified parameters.
Note: If you want to modify a 1D LUT that is provided with the 1D LUT tool, save the modified 1D LUT under a different file name to preserve the original LUT as is.
Lustre Color LUTs provide a wide range of generic, out-of-the-box display and conversion capabilities. There are two main types of LUTs: display and conversion.
It is important to note that the LUTs were built for generic use in production, meaning that, while delivering an accurate print film rendition, it may not match that of a particular film lab. This is expected behavior, because each lab processes film differently. However, the LUTs use 3D cubes in order to ensure the best possible match between the film output and your display while taking into accounts its physical limitations. For example, a CRT monitor cannot physically represent all of the colors available for film.
LUTs are typically stored in a folder within the application or on a network. You should store LUTs created externally in the same folder for ease of use.
For complete information on the Lustre Color LUTs, refer to the Lustre Color Management User's Guide on the Toxik Web Portal.
Display LUTs provide a simulation of the final output for a given film stock and display device without rendering. All display LUTs have an accompanying gamut warning LUT, which displays in magenta all out-of-gamut colors. That is, those colors that are not reproducible on the display device--see Applying a LUT or Color Conversion Tool to the Player.
Conversion LUTs render in effects for a given film stock and display device in order to create a new clip for use in a subsequent step in the DI process. There are several types of conversion LUTs, and many of these offer a selection of mapping methods, so you can choose the type best suited to your footage.
From the Tools tab, drag the 3D LUT tool from the Color Correction folder to the dependency graph in the Schematic.
In the 3D LUT tab, click the LUT Browser button.
 "Show full-size image")
|
The LUT Browser appears, displaying the Lustre_Color_3DLUTs folder.
Open the folder and select a LUT from the Conversion folder. Drag it to the dependency graph in the Schematic.
In the 3D LUT tab, set the Exposure, Negative Film Gamma, Cineon Reference, and Linear Reference--see Modifying Negative Film Gamma, Cineon Reference, or Linear Reference Levels.
The 3D LUT is applied.
Note: Exposure is an animatable attribute--see Setting Keys Manually and Validating and Applying the Expression String.