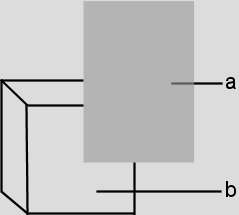
When you apply a texture, Action lines up the lower-left corner of the texture (coordinates 0, 0) with the centre point of the front plane of the geometry. For example, the following figure shows how Action initially aligns a planar texture to a cube.


(a) Planar texture (b) Front plane of 3D geometry
Because a texture is added with its own axis, you can use this axis to offset the texture from the centre of the geometry. You can also rotate and scale the texture.
The initial placement of the texture is most evident when you use planar texture mapping. You can map textures to 3D models using reflection, planar, wrap, or cylindrical mapping.
Reflection mapping mode applies the 2D texture as though the 3D model is reflecting the texture. This type of mapping uses the surface normals of the geometry to generate texture values and the texture is reflected onto the 3D model.


Reflection mapping sometimes distorts or scales the texture, since it is wrapped around the entire object. If you move the 3D model, the texture slides on the object.
Planar mapping applies the texture without distorting the front plane of the 3D model, similar to a movie projector casting an image onto a screen. All 3D coordinates of the geometry are mapped to this plane to generate the texture values. Planar mapping positions the lower-left corner of the texture on the 3D model’s axis.


When you apply planar mapping, any surfaces on the 3D model perpendicular to the front plane cause the pixels at the edge of the texture to project along the “sides” of the object.
Wrap mapping completely envelops the 3D model with the texture according to the object's texture coordinates. To use this option, you must import a model that has its own texture coordinates.


Cylindrical mapping wraps the texture around the 3D model in a cylindrical manner, starting from the lower-left corner of the texture. Use cylindrical mapping for models of cans, bottles, or other circular and semicircular bodies.


Cylindrical texture mapping is oriented counterclockwise—left-to-right—when viewed from the top of the model.


(a) Mapping box (b) Repeat Mode box
When using Wrap texture mapping mode, you can also apply UV mapping settings from the Geometry menu. See Using UV Mapping.
| Select: | To: |
|---|---|
| No Repeat | Use the texture once, without repeating it over the surface. |
| Repeat (fast) | Repeat the texture to fill the surface. If the surface is larger than the texture, or you scale down the size of the texture, the texture will repeat to cover the entire surface. This option gives a slightly lower quality result, but with faster processing time. |
| Repeat (smooth) | Repeat the texture to fill the surface. If the surface is larger than the texture, or you scale down the size of the texture, the texture will repeat to cover the entire surface. This option gives better results but with slightly longer processing time. |