Lens blur simulates the blur created by a camera lens, such as a rack defocus. Lens blur settings are displayed in the Basic menu.


The primary input of the 3D Blur node is the front clip and the matte clip. A blur effect can be created with a front clip only. However, a matte clip allows you to use the Input controls to determine how the matte is used. The Output controls determine how the input is composited in the Result view.


Divide Front ButtonEnable to unpremultiply the front clip using the matte clip. This button is active if you are using a matte.
Output boxSelect an option to determine how to composite the output in the Result view. The output can be a blurred premultiplied or unpremultiplied result using the front clip and matte clips, or a composite of the blurred front clip over a background clip. Premultiplied output is equivalent to compositing the resulting front on a black background using the resulting matte. This button is active if you are using a matte.
Use the Blur Amount controls in the Basic or Depth tab to refine and constrain the amount of blur to apply to the image and to constrain the amount of blur. Higher blur values increase processing time. You can increase processing performance by decreasing the blur quality. When you are ready to create a result clip and an output matte, you can select the highest quality blur.


Width fieldEnter the horizontal blur amount in pixels.
Height fieldEnter the vertical blur amount in pixels.
Proportional buttonEnable to constrain blur amount proportions.
Max Blur fieldDisplays the maximum total horizontal and vertical blur by the entered amount. The cumulative effect of the high blur amount (Basic tab), and gamma and gain correction applied to the Depth map (Depth tab) may result in very large values, which greatly increases the processing time. Use the Max Blur amount to clamp the value and avoid some unnecessary processing.
Blur Render Mode boxSelect fast processing of the blur or the highest quality blur. Quality mode provides accurate results, but requires more processing time than Fast mode.
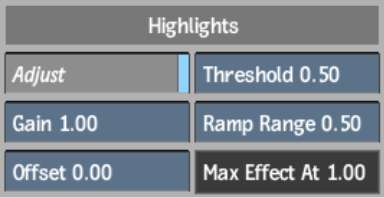
You can offset the light and colour values in the source image. Highlights are applied to the image before the blur is applied.


Adjust buttonEnable to activate highlight controls.
Gain fieldAdjust the light values of the image.
Offset fieldAdjust each colour value by this increment.
Threshold fieldDisplays the minimum colour value included in highlights.
Ramp Range fieldDisplays the difference between the Threshold value and the value at which the highlights take full effect (indicated by the Max Effect At field, which is non-editable).