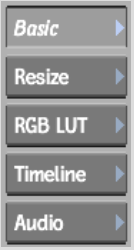
You can modify a clip at any stage while building your effect without having to exit Batch. Changes made to the clip are updated and reflected automatically throughout the process tree. Once modified, the clip is ready to be used in the Batch pipeline. To modify clips, you have access to the Basic, LUT Editor, Timeline, Audio, and Resize controls from Batch, as well as access to a clip's history.


| Click: | To: |
|---|---|
| Basic | Modify timeline and timewarp options, control clip locking and slipping, and define how missing media is displayed and processed. See Defining Missing Media Output. |
| Resize | Change the size of a clip, as well as its aspect ratio.See Resize Settings. |
| RGB LUT | Open the LUT Editor for the selected clip. From this editor, you can also change a clip to output as 8 or 12 bits.See Accessing the LUT Editor. |
| Timeline | Display the timeline of the clip selected in the schematic. Perform editing operations, such as cuts, slides, slips, timewarps, and dissolves on the selected clip. See Editing to the Timeline and Navigating the Timeline. |
| Audio | Edit the audio individually from its assigned video. See Audio. |
This allows you to enable or disable a clip change quickly without reentering the Resize or RGB LUT menu.
Modifying Clips with Clip History
Certain clips that you previously modified have clip history, which is a system for keeping track of changes made to clips. You can load these clips into Batch, which shows you, using a process tree, how the clip was modified. When you expand a clip with clip history into a Batch process tree, you can modify the clips and nodes as you would for any Batch schematic, and then process a new clip. See Clip History.
You can define how missing media in a clip is processed by a node. You may want to apply effects to a clip that includes one or more gaps, or you may want to manipulate a node with multiple inputs that is not yet connected to a required input. You can view the results of the selected options in the image window.
To define how a clip's missing media is interpreted:
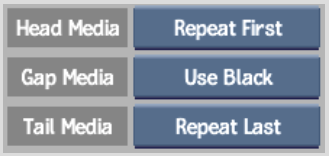
| Select: | To: |
|---|---|
| Repeat First | Substitute each frame of missing media at the beginning of the clip with the first frame of media. Applies to the Head Media menu only. |
| No Media | Not substitute missing media. Display an error message that there is no media to be processed by the node. |
| Use Black | Substitute each frame of missing media with a black frame. |
| Repeat Last | Substitute each frame of missing media at the end of the clip with the last frame of media. Applies to the Tail Media menu only. |
If an input tab cannot process missing media, most nodes that process clips set to No Media will display a warning. The BFX Output node automatically processes gaps in clips set to No Media as black frames. See Managing Missing Media Output.


