You
can trim frames from the head or tail of one or more shots. The
head is the first source frame that you specify to use in the shot.
The tail is the last source frame that you use in the shot.
You specify the number
of frames to trim from either the head or tail. If you do not want
to change the overall length of your timeline, when you add frames
to, or subtract frames from, one end of a shot, you should subtract
from or add the same number of frames to the other end.
Remember that you cannot
add more frames to a shot than the available number of handles.
Also, you cannot trim a shot completely out of existence. If you
want to delete a shot, use the Delete Shot button. See
Deleting Shots.
To trim frames at the in point for one
or more selected shots:
- Select the shot you want to trim in the
Storyboard. The selected shot's border turns red. To select multiple
shots on the Storyboard, right-click each shot. The borders turn
aqua.
NoteYou can only add
frames if your shots have available handles.
- Click Editing in the main menu, and then
click Edit.
The Edit menu appears.
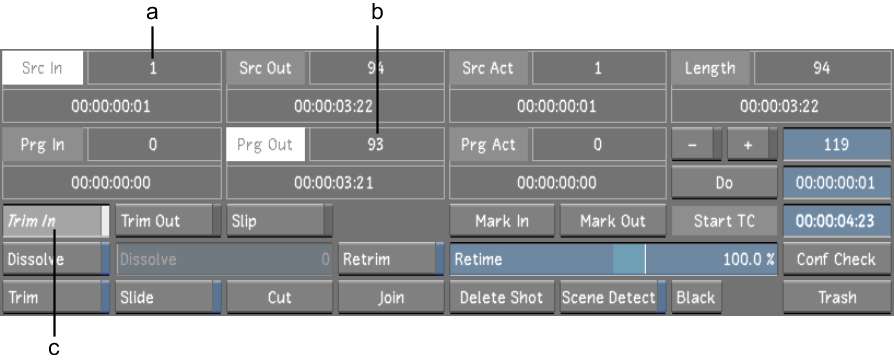
- Click Trim In to go into Trim In mode.
Src In and Prg Out are
highlighted because these values are changed by the Trim In operation.
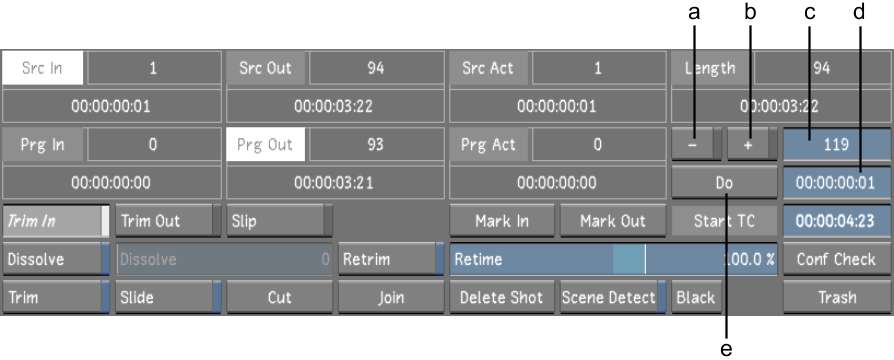
- Add frames to or remove frames from the
mark in (or head):
- Click + to add frames.
- Click - to subtract frames.
NoteIf you do not click
either + or -, the trim operation removes an absolute number of
frames.
- Do one of the following:
- Click the Do field, then click the frame
field and enter the number of frames to add or subtract by using
the numeric keypad. The frame number is converted into the corresponding
timecode value.
- Click the Do field and enter the timecode
for the number of frames to add or subtract. The timecode is converted
into the corresponding frame number.
NoteCtrl-click the field to clear it.
- Click Do.
The specified number
of frames is added to or subtracted from the shot(s). The Length
field is updated to display the number of frames now used.
To trim frames at the out point for one
or more selected shots:
- Select the shot you want to trim in the
Storyboard. The selected shot's border turns red. To select multiple
shots on the Storyboard, right-click each shot. The borders turn
aqua.
NoteYou can only add
frames if your shots have available handles.
- Click Editing in the main menu, and then
click Edit.
The Edit menu appears.
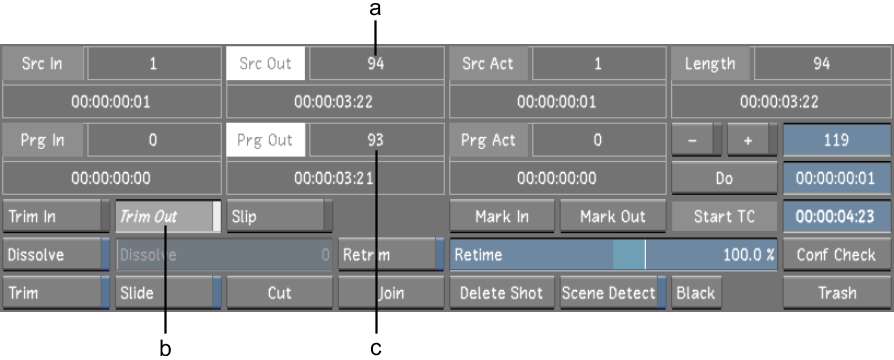
- Click Trim Out to go into Trim Out mode.
Src Out and Prg Out are
highlighted because these values are changed by the Trim Out operation.
- Add frames to or remove frames from the
mark out (or tail):
- Click + to add frames.
- Click - to subtract frames.
NoteIf you do not click
either + or -, the trim operation removes an absolute number of
frames.
- Do one of the following:
- Click the Do field, then click the frame
field and enter the number of frames to add or subtract by using
the numeric keypad. The frame number is converted into the corresponding
timecode value.
- Click the Do field and enter the timecode
for the number of frames to add or subtract. The timecode is converted
into the corresponding frame number.
NoteCtrl-click the field to clear it.
- Click Do.
The specified number
of frames are added to or subtracted from the shot(s). The Length
field is updated to display the number of frames now used in the shot.