When Lin
is enabled in the Setup Grade menu, the Colour Grading panel and
the Function panel are activated with linear colour grading functionality.
Grading in Linear Mode
Using the Colour Grading Panel
Use the Colour Grading
panel to modify lift, gain, and gamma in the low, mid, and high
levels of the image, or across the entire image.
To colour grade in Linear mode using
the Colour Grading panel:
- On the Colour Grading panel, use the
following controls.
| Use: |
To: |
| First ring |
Modify lift in the overall image. To reset, press the
F1 button.
|
| First jog ball |
Modify lift in a range of colours. To reset, press the
F2 button.
|
| Second ring |
Modify gain in the overall image. To reset, press the
F4 button.
|
| Second jog ball |
Modify gain in a range of colours. To reset, press the
F5 button.
|
| Third ring |
Modify gamma in the overall image. To reset, press the
F7 button.
|
| Third jog ball |
Modify gamma in a range of colours. To reset, press the
F8 button.
|
| F3 button |
Toggle between Master and Low levels. |
| F6 button |
Toggle between Master and Mid levels. |
| F9 button |
Toggle between Master and High levels. |
Grading in Linear Mode
Using the Function Panel
When the Grade menu is
enabled, you can use the Function panel to:
- Modify hue, contrast, gain, and saturation
values.
- Balance lift, gamma, and gain values
for the red, green, and blue channels.
- Set black and white clip and reference
values.
To colour grade in Linear mode using
the Function panel:
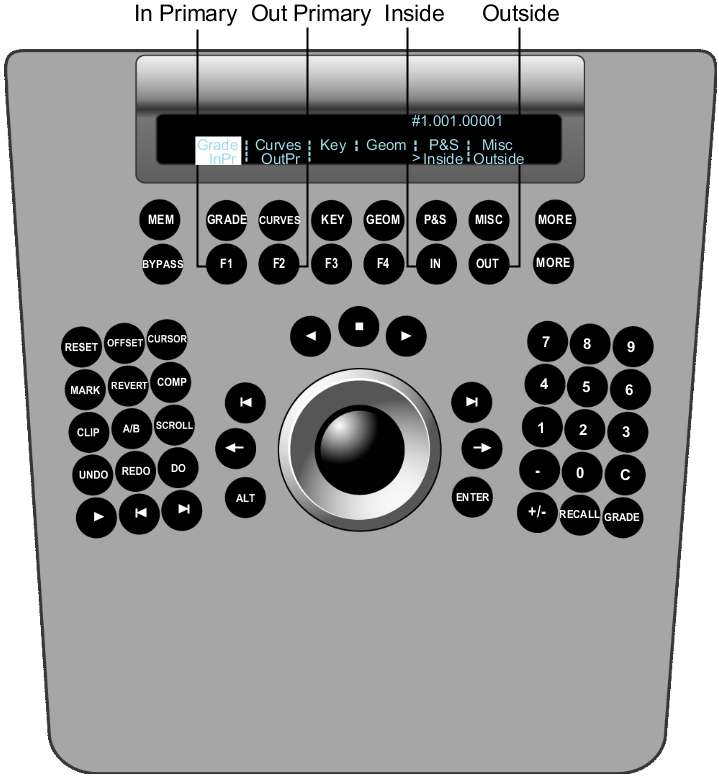
- Press the Grade button on the Navigation
panel.
The In Primary, Out Primary,
Inside, and Outside options are activated.
- Do one of the following:
- Press the F1 option button to work on
the initial primary grade.
- Press the F2 option button to work on
final curve modifications.
- If you are colour grading a secondary,
either a key or a geometry, use the numeric keys on the Navigation
panel to select and enable a secondary layer. See
Adding Secondary Layers.
- If you are accessing the Grade menu after
having created a geometry or key, do one of the following:
- Press the IN option button to grade inside
the secondary.
- Press the OUT option button to grade
outside the secondary.
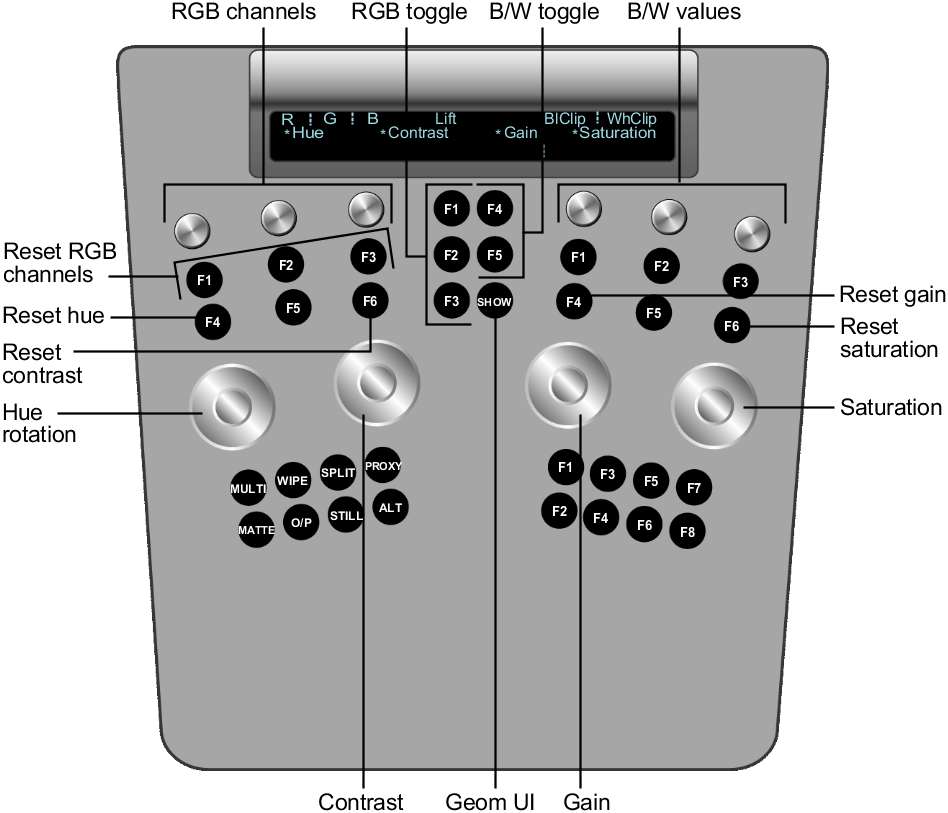
- On the Function panel, use the following
controls.
| Use: |
To: |
| Wheels |
Modify overall hue, contrast, gain, and saturation. Wheel 1=Hue Wheel 2=Contrast Wheel 3=Gain Wheel 4=Saturation To reset a wheel, press
the button above it.
|
| Knobs at top left |
Balance the RGB channels. Knob 1=Red Knob 2=Green Knob 3=Blue To reset a knob, press
the button below it.
|
| Buttons in left centre column |
Toggle the type of value to be adjusted in the RGB channels (Knobs
1-3). F1=Lift F2=Gamma F3=Gain
|
| Knobs at top right |
Define values to clamp minimum and maximum luminance. Knob 4=Black Knob 5=White
|
| Buttons in right centre column |
Toggle the type of black and white values to be adjusted (Knobs
4-5). F4=Clip F5=Reference
|
| SHOW button |
Toggle the geometry wireframe on or off. |