Chapter 15, Secondary Colour Grading
| Accessing Secondary Grading Menus | Saving and Loading Key Presets | ||
Chapter 15, Secondary Colour Grading |
|||
 Selecting Channels for a Key: Hue, Luminance, and Saturation
Setting Initial Softness and Tolerance
Modifying the Edges of the Key
Removing Stray Pixels from a Key
Excluding Keys from Secondaries
You can create secondaries by defining transparent regions in a shot, based on a specific range of colour. This process is known as keying.
When you generate a key, you can view it in the Player. Keys are based on the hue, value (luminance), and saturation of a selected colour from the original image. You define the softness range and the tolerance range by sampling the original image. When you set the tolerance range, you define which colours are fully keyed for the secondary. When you set the softness range, you define which colours are partially keyed. By softening the edge of the key, you can refine the results to integrate the secondary colour grade with the rest of the image.
Keys are, by default, based on original scans, bypassingany input primary colour grading. This allows you to modify an image upstream of any secondary without changing the key. For example, after you key a secondary, you can safely perform a hue shift from the Curves menu. The key, based on the original image colour, is unaffected. To base a key on colour corrected sources, use the SRC PRIM button.

You can base a key on hue, luminance, and saturation channels. You can use one or more of these channels. To determine which channel produces the best key, save separate keys based on each channel to the key presets. You can then toggle between them to compare the keys. See Saving and Loading Presets Using the Presets Lists and Saving and Loading Key Presets.
In the Colour menu, click Secondaries.
The Secondaries menu appears.
 "Show full-size image")
|
To select the basis of the key, do one of the following:
To generate a key based on the hue of the selected colour range, enable Hue. To exclude hue from a key, disable Hue.
To generate a key based on the luminance of the selected colour range, enable Val. To exclude luminance from a key, disable Val.
To generate a key based on the saturation of the selected colour range, enable Sat. To exclude saturation from a key, disable Sat.
To key based on processing that is happening prior to the secondary subsystem, enable Src: Prim (e.g.: Input LUT, CDL, and Input primary results).
 "Show full-size image")
To generate a key, you set the initial softness and tolerance values by sampling a pixel or an average colour in the image.
Set the view to Output. You can click the O button or press F12.
 "Show full-size image")
In the Secondaries menu, click a secondary button to enable a layer.
 "Show full-size image")
You can also use one of the following hot keys.
| Press: | To enable: |
| 1 to 9 | Secondaries one to nine. |
| 0 | Secondary ten. |
| - (minus sign) | Secondary eleven. |
| = (equal sign) | Secondary twelve. |
Hint: To toggle a secondary on or off, press \.
Click the colour pot.
The Keyer button is enabled and the colour pot is outlined in red, indicating that it is in use.
 "Show full-size image")
Hint: You can finish a colour picking operation by clicking the colour pot a second time.
Click Pixel to display the Pixel Analyser.
 "Show full-size image")
Sample the image:
To sample a single pixel, drag through the image until you locate the pixel you want to sample. As you drag, the colour of the current pixel appears in the Pixel Analyser. When you locate the pixel you want to sample, click the image.
To sample an average taken from a range of colours in the image, Alt-drag the image in the Player.
The mouse cursor becomes a colour picker when you move it over the image in the Player. When you release the mouse, the centre tolerance, and the initial softness and tolerance ranges are set for the hue, luminance, and saturation channels. The colour pot displays the sampled colour.
 "Show full-size image")
Once you set the initial tolerance and softness of a key, you can view the resulting secondary in the Player. You can view the key in Secondary view or Matte view. Secondary view displays the range of colour you define through a greyscale image. The unselected colours remain grey. Matte view displays a black and white template indicating which parts of the image are transparent (black), and which are opaque and selected (white).
To display the image in Secondary view, click M or press F11.
 "Show full-size image")
In Secondary view, you see the colours that are included in, and excluded from, the current secondary. The colours in the image that are excluded from a secondary are desaturated--they appear in greyscale. Colours included in the secondary are visible through the greyscale image.
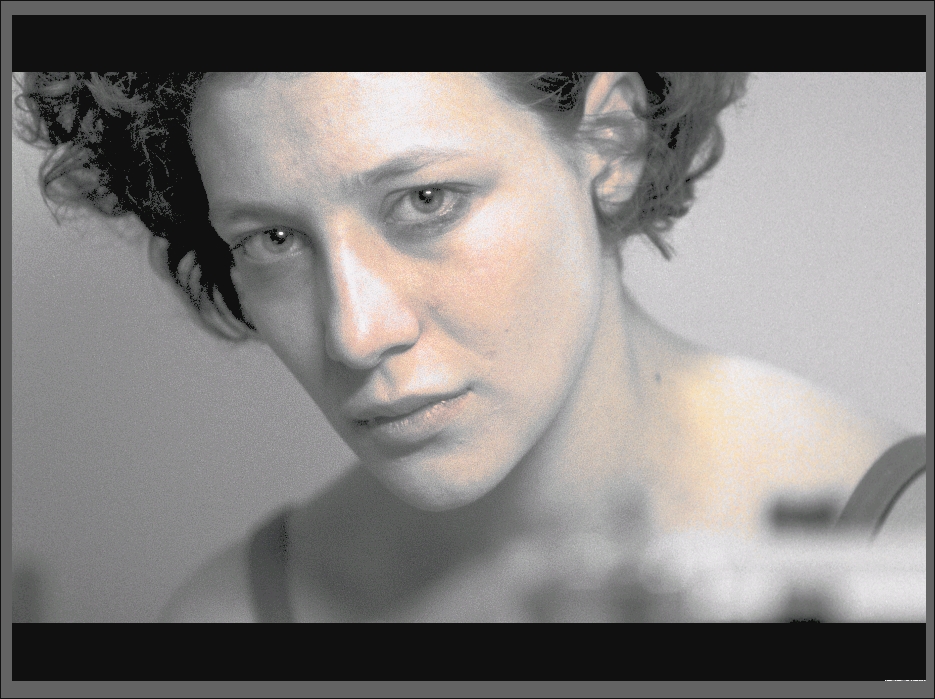
 "Show full-size image")
| Image courtesy of Hungarian Academy of Film & Theatre, 3rd year |
To toggle between Secondary view and Matte view, press F11.
In Matte view, the white parts of the matte are fully keyed and can be selectively colour graded. The black parts are excluded from the secondary. Greys indicate the softness parameters.

 "Show full-size image")
| Image courtesy of Hungarian Academy of Film & Theatre, 3rd year |
The softness at the edges of a key increases as you increase softness. Use softness to create a more natural look when applying secondary colour correction. To set the softness of a key, you can use the colour picker, the Master Softness slider, or the Softness Range indicators. With the colour picker and Master Softness slider, you set the softness range for hue, luminance, and saturation together. With the Softness Range indicators, you set the softness range for hue, luminance, and saturation individually.
 "Show full-size image")
|
|
|
View the secondary in the Player. Press F11 to toggle between Matte view and Secondary view.
In Matte view, you can clearly see the modifications you make to softness. You can toggle between Matte view and Secondary view while you develop the key.
In the Secondaries menu, enable the + or - button beside the Master Softness slider to increase or decrease softness.
Drag in an area of the image. Alt-drag in the image to select a larger area.
The softness is modified.
View the secondary in the Player. Press F11 to toggle between Matte view and Secondary view.
In Matte view, you can clearly see the modifications you make to softness. You can toggle between Matte view and Secondary view while you develop the key.
Set the softness range:
To increase softness, drag the Master Softness slider to the right.
To decrease softness, drag the Master Softness slider to the left.
When you release the slider, the softness is modified and the slider returns to its original position.
View the secondary in the Player. Press F11 to toggle between Matte view and Secondary view.
In Matte view, you can clearly see the modifications you make to softness. You can toggle between Matte view and Secondary view while you develop the key.
For the Hue, Value, or Saturation channel, set the minimum value for the softness range using the Minimum Softness Range indicator. Drag the indicator to the left to increase softness. Drag the indicator to the right to decrease softness.
For the Hue, Value, or Saturation channel, set the maximum value for the softness range using the Maximum Softness Range indicator. Drag the indicator to the left to decrease softness. Drag the indicator to the right to increase softness.
Once you define the softness range, you can set the tolerance range to fully key colours and remove unwanted greys from the secondary. The maximum and minimum tolerance values define the range of colours included in the secondary. To set the tolerance, you can use the colour picker, the Master Tolerance slider, or the Tolerance Range indicators. With the Tolerance Range indicators, you set the tolerance range for hue, luminance, and saturation individually.
 "Show full-size image")
|
|
|
|
View the secondary in the Player. Press F11 to toggle between Matte view and Secondary view.
In the Secondaries menu, enable the + or - button beside the Master Tolerance slider to increase or decrease tolerance.
Drag in an area of the image to include it in the tolerance range. Alt-drag in the image to select a larger area.
The tolerance is modified.
View the secondary in the Player. Press F11 to toggle between Matte view and Secondary view.
Set the tolerance range:
To increase tolerance, drag the Master Tolerance slider to the right.
To decrease tolerance, drag the Master Tolerance slider to the left.
When you release the slider, the tolerance is modified and the slider returns to its original position.
View the secondary in the Player. Press F11 to toggle between Matte view and Secondary view.
For the Hue, Value, or Saturation channel, set the centre tolerance value using the Centre Tolerance indicator. Make sure you place your cursor directly over the indicator and then drag it to the left or right.
When you move the Centre Tolerance indicator, the other indicators move as well--the softness and tolerance ranges are shifted.
For the Hue, Value, or Saturation channel, set the minimum value for the tolerance range using the Minimum Tolerance Range indicator. Drag the indicator to the left to increase tolerance. Drag the indicator to the right to decrease tolerance.
For the Hue, Value, or Saturation channel, set the maximum value for the tolerance range using the Maximum Tolerance Range indicator. Drag the indicator to the left to decrease tolerance. Drag the indicator to the right to increase tolerance.
You can shrink, erode, or blur a key to modify the edges. Shrink a key to remove pixels from the edge of the key. Erode a key to blend the light and dark edges. Blur a key to apply a softening filter to its edge.
View the secondary in the Player. Press F11 to toggle between Matte view and Secondary view.
Modify the edge of the key:
To shrink the edge of the key, drag the Shrink slider to the left.
To erode the edge of the key, drag the Shrink slider to the right.
 "Show full-size image")
View the secondary in the Player. Press F11 to toggle between Matte view and Secondary view.
Drag the Blur slider to the right.
 "Show full-size image")
The edge of the key is softened.
 "Show full-size image")
|
|
| Images courtesy of Hungarian Academy of Film & Theatre, 3rd year |
When you generate a key, pixels in other parts of the image may be included. You can remove these stray pixels from the key to clean it up for colour grading.
View the secondary in the Player. Press F11 to toggle between Matte view and Secondary view.
Drag the Cleanup slider to the right to apply a median filter to remove stray pixels.
 "Show full-size image")
When it is easier to key colours in the image you do not want to include in a secondary than those that you do, you can invert the key.
In the Secondaries menu, enable Invert.
 "Show full-size image")
The area of the key that was opaque becomes transparent and the area that was transparent becomes opaque.
 "Show full-size image")
|
|
| Images courtesy of Hungarian Academy of Film & Theatre, 3rd year |
You can exclude keys from secondaries. When you exclude a key from a secondary that includes a geometry, only the geometry is colour graded.
In the Secondaries menu, click the Secondary button that contains the key you want to exclude.
If a key is included with the secondary, the Keyer button is enabled.
 "Show full-size image")
Hint: You can click M in the View Mode buttons to view the range of colour defined by the key.
Disable Keyer.
 "Show full-size image")
The key is excluded from the colour grade. The whole image or the areas defined by a geometry will be colour graded by the secondary.