Appendix A, The Autodesk Control Surface
| Performing Curves Grading | Creating and Grading Geometries | ||
Appendix A, The Autodesk Control Surface |
|||
When the Key menu is enabled, you can use the Function panel to:
Generate a key from the original scan, or from the primary-graded result.
Sample the image.
Set one or more channels as the basis for the key.
Adjust the key by setting softness and tolerance levels, modifying key edges, inverting the key, and linking layers.
Press the Key button on the Navigation panel once to activate the Keyer menu, and a second time to enable the Keyer channel.
The Pick and SrcPrim options are activated.
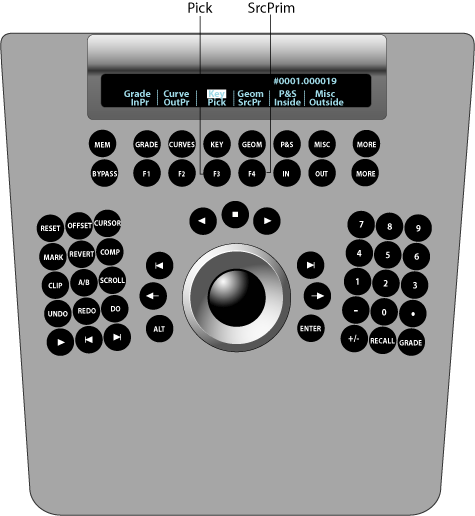
Use the numeric keys on the Navigation panel to select and enable a secondary layer. Press the number key once to select the layer, and then press it a second time to enable it. To enable layer 10, press the minus button (-). To enable layer 11, press 0. To enable layer 12, press the decimal button (.).
To sample the image, press the F3 option button. The trackball on the Navigation panel is activated as a picker, allowing you to move through the image. Press Pick again to pick the current pixel for the sample. To sample an area of the image, hold down the ALT button while in picker mode and draw a rectangular area of the image, and then release the ALT button.
To key after input primary grading has been performed and the input LUT has been applied, press the F4 option button. To switch back to the primary-graded result, press the button again.
On the Function panel, use the following controls to adjust the key for the sampled colour.
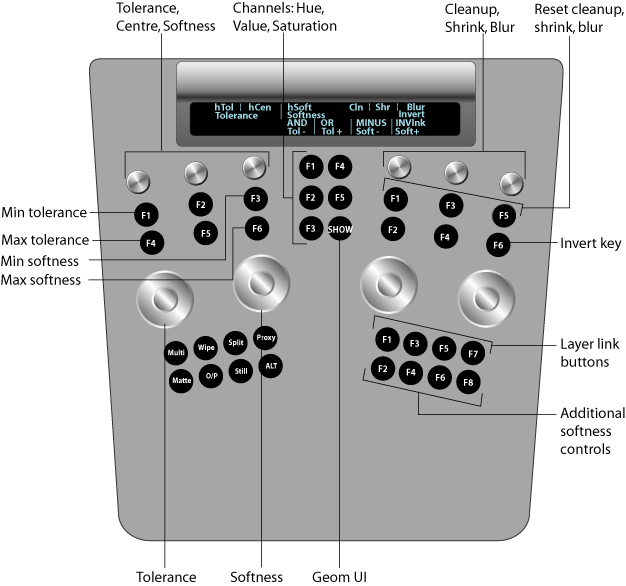
| Use: | To: |
| Wheels | Set initial tolerance and softness around the picked colour. Wheel 1=Tolerance Wheel 2=Softness |
| Knobs at top left | Adjust min/max tolerance, centre tolerance, and min/max softness.Knob 1=Min/max tolerance Knob 2=Centre Knob 3=Min/max softness |
| Upper left F1 and F4 buttons | Enable either minimum or maximum tolerance (Knob 1) adjustments. F1=MinimumF4=Maximum |
| Upper left F3 and F6 buttons | Enable either minimum or maximum softness (Knob 3) adjustments. F3=Minimum F6=Maximum |
| Buttons in centre column | Adjust tolerance, centre, and softness values separately for each of the channels forming the basis of the key. F1=Hue F2=Value F3=Saturation |
| Knobs at top right | Modify key edges and remove stray pixels from a key. Knob 4=Cleanup Knob 5=Shrink Knob 6=Blur To reset a knob, press the button below it. |
| Upper right F6 button | Invert the key. |
| First row of buttons at bottom right | Link secondary layers. F1=Add F3=Intersect F5=Subtract F7=Invert link |
| Second row of buttons at bottom right | Add or subtract tolerance and softness from the key. F2=Add tolerance F4=Subtract tolerance F6=Add softness F8=Subtract softness Press F3 to change the cursor into a picker prior to using any of the above buttons. When done adjusting tolerance and softness, press F3 again. |
| SHOW button | Toggle the geometry wireframe on or off. |

Users can toggle the on or off status of the Keyer button visible on the control surface. Users also can enable or disable any or all of the Hue, Value, or Saturation channels.
Press the Key button on the Navigation panel once to activate the Keyer menu, and then double-press to enable the Keyer channel and activate backlighting to show its enabled status.
Double-press the Key button again to disable the Keyer channel and de-activate backlighting.
On the Function panel, double-press F1, F2, or F3 to enable or disable Hue, Value, or Saturation.
