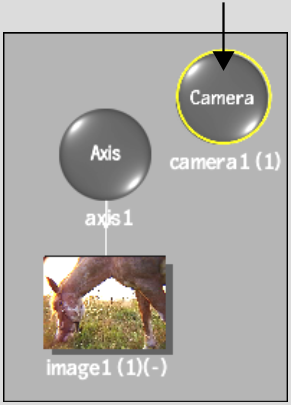
By default, a camera exists in the Action scene (you may need to pan in the schematic to see the camera node). You can add multiple cameras in order to change point of view or depth of field from one camera to another. Add and animate multiple cameras when creating compositions. You can also switch from one camera to another at any point.
To add a camera:
A new camera is added to the scene. An icon representing the camera is added to the schematic.


The result camera always appears as the first tab on the right side of the Object menu. To allow you to easily access the camera without losing your place in the scene, this special camera tab (appearing in orange) does not follow the tab population rules. If a camera node is selected in the schematic, the special Camera tab does not appear, and the normal tab population rules apply.


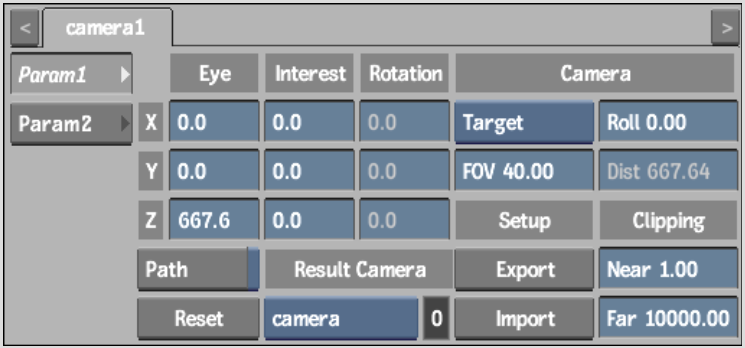
The Camera controls are described as follows.
Camera Eye X, Y, and Z fieldsSpecify the position of the camera eye on the horizontal, vertical, and perpendicular (X, Y, and Z) axes.
Motion Path buttonAnimates the camera eye on a motion path. See Moving the Camera Eye and Point of Interest.
Camera point of interest X, Y, and Z fieldsSpecify the position of the point of interest on the horizontal, vertical, and perpendicular (X, Y, and Z) axes.
Camera Rotation X, Y, and Z fieldsRotate the camera on the horizontal, vertical, and perpendicular (X, Y, and Z) axes.
Camera Type boxProvides Free and Target Camera options.
Free Camera views the scene in the direction that you aim the camera. Free cameras are easy to use because you do not have to manipulate the point of interest. You can simply animate the camera rotation or camera tilt as though it were on a tripod. Use the Distance field in conjunction with Free Camera.
Target Camera ensures the camera is specifically aimed at a target object in the scene because you specify the point of interest. Use the Roll field in conjunction with Target Camera.
Roll fieldSets the amount of camera roll. This field is available with the Target Camera.
Field of View fieldSpecifies the camera field of view, measured in degrees.
When PhysicalCam is disabled, use the field of view angle in the Y direction to adjust the width of the camera frustum. When PhysicalCam is enabled, use the focal length for the same purpose.
Distance fieldSpecifies where the camera's focus is. This parameter affects the depth of field (when enabled in the Action Setup menu).
Near and Far fieldsSpecify the position of the near and far clipping planes. See Moving the Clipping Planes.
Export Camera buttonExports camera path information from Action to 3ds Max format.
Exported data includes Eye X, Y, and Z; Poi X, Y, and Z; Fov; Roll, Target or Free Camera; motion path and explicit keyframe camera animation. See Importing and Exporting Cameras.
Import Camera buttonImports 3ds Max camera path information. Select the camera path file that contains the data you want. See Importing and Exporting Cameras.
Result Camera boxSpecify which camera is active. The active camera is the one that will be used when processing/rendering your scene. The field displays the active camera number. A value of 0 indicates that you are viewing the scene through the default camera.
Reset Camera buttonResets the Camera menu to its default settings.
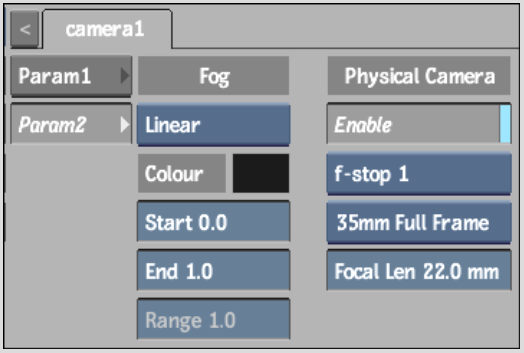
Physical Camera and Fog options are located in the Camera Param2 tab.


Fog boxSelect the fog type to use. See Applying Fog to the Scene.
Fog colour potUse the colour pot to select the fog colour.
Start fieldSpecify the distance at which Linear type fog should start.
End fieldSpecify the distance at which Linear type fog should end.
Range fieldSpecify the range or distance from the camera for Exponential type fog.
Enable button Activates the physical camera, which simulates a manual camera. Use the physical camera fields to adjust the field of view for the camera.
F-Stop boxAdjusts the depth of field. F-stop is the ratio between the focal length of the lens and the diameter of the aperture. For example, the F-stop value for a 100mm lens with a 50mm full aperture is 2 (or f/2).
Large F-stop values correspond to smaller apertures. The depth of field for your physical camera increases as you increase the F-stop value. In Action, you can select standard F-stops.
Film Size boxDisplays the standard film size. As the film size increases, the focal length also increases and the focal point moves further away from the camera eye. Changing the film size also increases the focal length.
Focal Length fieldAdjusts the field of view. Changes you make to the Focal Length automatically update the field of view (based on the film size) and vice versa.
As the focal length increases, the field of view decreases. As the focal length decreases, the field of view increases.