The combination of a cluster and blend shape is ideal for facial animation because it lets you tune various subtle deformations.
A few common techniques follow.
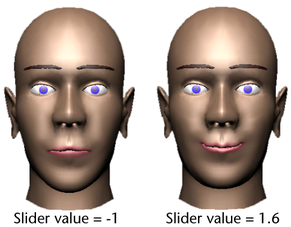
- In the box below the slider of the editor, you can enter a numerical value below 0 to invert the deformations, or above 1 to amplify the deformations. For example,
-1 creates a frown, while 1.6 creates a brimming smile:
- With or without changing the slider, you can move, rotate, and scale the cluster handle to modify the blend shape. The following figure shows some examples.
The face you created will be slightly different because your original smile is different.
- You can use the tool again to change cluster weights when the cluster and blend shape editing deforms certain regions undesirably or doesn’t
give the exact look you desire. You can also use Ctrl-z (Windows and Linux) or Control-z (Mac OS X) to undo any undesired
changes.