Setting up the curtain scene


In these steps, you model a 2D curtain rod from a plane and attach hair to it. You create and keyframe a polygon sphere, which you then convert to a passive collision object so that it collides with the curtain.

To create the curtain using nHair

  1. Turn off the Interactive Creation option for NURBS by selecting Create > NURBS Primitives > Interactive Creation (no check-mark).
  2. Create a NURBS plane by selecting Create > NURBS Primitives > Plane > .

    The NURBS Plane Options window appears.

  3. In the NURBS Plane Options window, select Edit > Reset Settings.
  4. Set Width to 1.4 and Length to 14.5.
  5. Click Create.
  6. With the plane selected, select nHair > Create Hair > .

    The Create Hair Options box appears.

  7. In the Create Hair Options window, select Edit > Reset Settings.
  8. Set the following:
    • Output to NURBS curves
    • U count to 1, V count to 20
    • Passive fill to 0
    • Randomization to 0
    • Points per hair to 12
    • Length to 10
    • Turn off the options Create Rest Curves, Edge Bounded and Equalize
    • Ensure that Dynamic is turned on.
  9. Click Create Hairs.

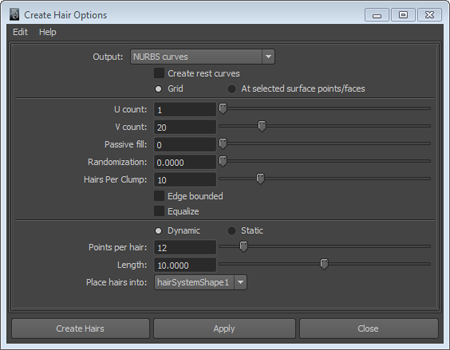
    Hair is created and attached to the plane.

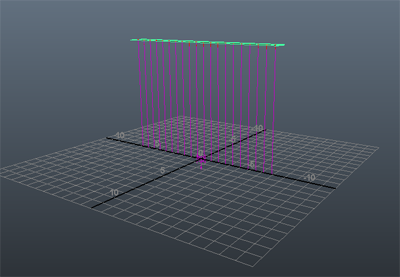
    You may need to orbit the viewport so that the sene is positioned like the image below.

  10. In the Outliner (Window > Outliner), select the NURBS plane.
  11. Open the Channel Box by clicking the icon.
  12. In the Channel Box, set Translate Y to 10 and Rotate X to 180.

    The bottom of the hair should almost touch the ground plane.

To create and animate the colliding sphere

  1. Turn off the Interactive Creation option for polygons by selecting Create > Polygon Primitives > Interactive Creation (no check-mark).
  2. Create a polygon sphere by selecting Create > Polygon Primitives > Sphere > .

    The Polygon Sphere Options window appears.

  3. In the Polygon Sphere Options window, select Edit > Reset Settings.
  4. Set Radius to 1.5.
  5. Click Create.
  6. With the sphere selected, set the following values in the Channel Box:
    • Translate X to 9.5
    • Translate Y to 1.5

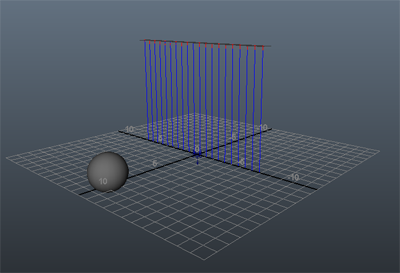
    The polygon sphere is now level with the bottom of the curtain. You can now animate the sphere so that it passes through the curtain.

  7. To animate the sphere, set keyframes by doing the following:
    • Go to frame 1 on the Time Slider.
    • In the Channel Box, - click Translate X and select Key Selected.
  8. To set the keyframe for the sphere and move it through the curtain, do the following:
    • Go to frame 100 in the Time Slider.
    • In the Channel Box, set Translate X to -9.5.
    • -click Translate X and select Key Selected.
  9. Rewind the Time Slider to 0 and play the animation.

    The sphere passes through the curtain as though the curtain weren’t there. In the next steps you set the sphere as a passive collision object so that it collides with the hair.

    In the next section of the lesson, you convert the polygon sphere to a passive collision object so that it collides with the curtain.

Creative Commons License Except where otherwise noted, this work is licensed under a Creative Commons Attribution-NonCommercial-ShareAlike 3.0 Unported License