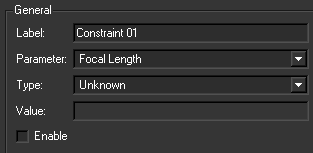
Constraints are listed the Cameras folder with the enabled constraint name in bold type. Constraints with no frames are shown as dimmed and with “empty” next to their name, to show the user that these are useless. Don’t forget to add frames to your constraints!
With the camera focal length parameter set to Variable, it is possible to set a “constant” constraint on the focal length that can be applied to a part of your sequence.
The focal length camera constraint can be of three types:
When using a focal length constraint there are three main steps. First you create the constraint, and then you edit the constraint providing MatchMover with information on its type and value. Finally, you decide which frames use this constraint for the tracking process.
The nodal pan constraint fixes the optical center of the camera and limits the camera movement to rotation only. All nodal-only features (2D tracks that have no keys out of the nodal pan) are reconstructed with a median default depth.
The dolly constraint fixes the camera motion in one direction only, either along the X-, Y-, or the Z-axis.
The planar constraint fixes the camera motion in two directions, either along the XY, XZ, or YZ planes.
Creating and enabling a constraint
You can create as many constraints as you like and toggle them by using the enable/disable check box in the constraint Parameters Window.

The frames to which the constraint applies are shown by a colored rectangle in the Track window. The enabled constraint appears in bold in the Project window and the Track window.
On creation, a constraint is not applied to any frames and you have to add frames to the constraint and enable it. MatchMover can only use the constraint when you have provided information concerning the frames to which the constraint is applied.
To do this, configure MatchMover to use the constraint on specified frames by creating a time range and adding or removing frames that use the constraint in the camera solving process.
The frames within the selected time range now have the camera constraint applied to them and MatchMover uses this information in the tracking process.
The constraint label appears in bold in both the Project window and Track window to show that it is enabled and it applies to the current time.
If another constraint already exists for the added frames, it is disabled automatically.
For example, you have a sequence of 400 frames and you know that there is a fixed zoom for the first 300 frames and a variable zoom for the last 100 frames. In the camera Parameters Window, set the Focal Length to variable and initialized.
You create a new focal length constraint and then define a time range from frames 0 to 300 in the Track View or in the Time Line. Using the function Add Frames, you apply the constraint to the frame sin the range. Finally, you set the Type according to your knowledge of the focal length in the constrained time range.
Deleting frames from a constraint
To delete a constraint select a constraint in the Constraint folder in the Project window or the Track window and either: