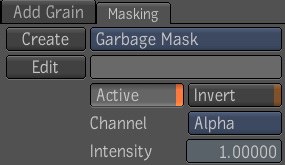
The masking parameters are in a separate tab in the Tool UI. This tab is immediately to the right of the tool tab the mask will originate from.

| Select: | To: |
|---|---|
| Create | Create an instance of a masking tool selected from the pull-down list. The tool is created in the current composition and its output is connected to the Mask input of the current tools. The list is editable in the user settings tab under Masking Menu Tools. |
| Edit | Return to the tool UI to change its parameters. |
| Active | Determine whether masking is enabled or disabled. By default, masking is on. |
| Invert | Invert the mask prior to using it in the blend operation. By default, Invert is off. |
| Channel | Select one of R, G, B, A. This is the channel of the Mask image to be used for masking. By default, Channel is A. |
| Intensity | Scale the mask (after optional inversion) prior to using it in the blend operation. By default, Intensity is 1 (full intensity). |
The list of tools in the masking tool menu contains all plug-in tools that describe they can act as masks. The most recently used masking tool becomes the default selection in the menu, for all maskable tools. This most recently used masking tool is stored as a user setting.
When you add a masking tool from the masking tool input menu, it is added to the dependency graph and its output is connected to the masked tool's input. If there is already a tool connected to the masking input, there are two behaviors:
A masking tool with no image input, such as a mask generator, takes its output format and resolution from the composition settings.
The Active, Invert, Channel, and Intensity controls in the masking tab correspond to the Masking structured input. The Image text field shows the name of the node connected to the masking input (if any).