Since MatchMover automatically assigns a new camera for each loaded image or sequence, you usually do not have to create a camera. However, there are a few situations where you should create a new camera. For example, when you load a number of helper images, MatchMover assigns the same camera to all of the images. If you know that a different camera was used for one of the helper images, you should create a different camera for that image.
To create a new camera, do one of the following:
MatchMover creates a camera label in the Project window and Track window.
Assigning the camera to a sequence
Once you have created a camera, you can assign it to a sequence. Click a sequence and in the Parameters Window, choose the camera that you want to assign to the sequence from the Camera drop-down list.
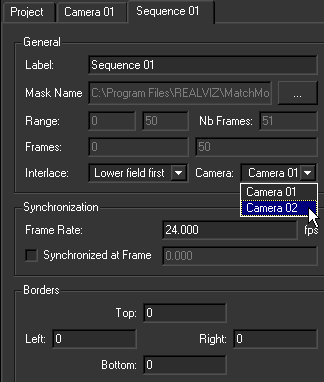
Notice that the enabled camera is shown in bold in all the tree views.
Click the camera to view its properties in the Parameters Window. Note that computed camera values are grayed out in the Parameters window if they do not correspond to the current camera.
If needed, select a time range. Using a time range is needed when you want to tweak a parameter over a given time interval. For example, you know that the focal length between frames 20 and 30 is fixed.
The camera parameter window time range is synchronized with the time line: when you move to a new frame, it automatically switches to this frame. When you select an interval, it switches to "Use Selection" with this interval. You can also simply select "Global Time" to apply your changes to all the frames.
For example, selecting Type PAL gives you a camera with the principal point in the center of the image; a pixel aspect ratio of 1.06667, a focal length initialized at 50 mm and a non-linear distortion set to 0. If you set Type to User in the camera Parameters Window, you can define your own parameters for the camera.
There are five different camera parameter types as explained in the following table. When you create a new camera, by default the three intrinsic (or internal) camera parameters-- principal point, pixel aspect ratio, and non-linear distortion-- are of the type fixed. The focal length is of the type "constant initialized".
#This option is only available for the focal length parameter
All these types are in fact a combination of two settings. One controls the way the parameters vary over time: is it constant
 or variable
  . The other one controls the way the computation starts: unknown
  , initialized
  , or fixed
  .
.
These two settings are easily set though simple push buttons in the camera parameters window.
Not all the parameters can use all the settings combination.
Intrinsic and Extrinsic parameters
Each camera has four intrinsic (or internal) parameters: focal length, radial distortion, pixel aspect ratio, and principal point, and some extrinsic parameters: translation (or optical center position), and rotation angles.
Intrinsic parameters are, by default, given by the camera type (shown by a little camera icon at the end the row). These parameters
can simply be overridden by changing their default value or their type. for type They can also be "motion controlled" by providing
a valid range for each (then shown with the icon  or
or  ). See Camera parameter types.
Extrinsic parameters are, by default, undefined (it’s what we want to find in MatchMover!). So they’re basically user defined
as variable unknown (shown as ).
As intrinsic parameters, each of them can be "motion controlled", either directly by the user or by importing motion control
file (shown with an icon ). See Importing motion control data.
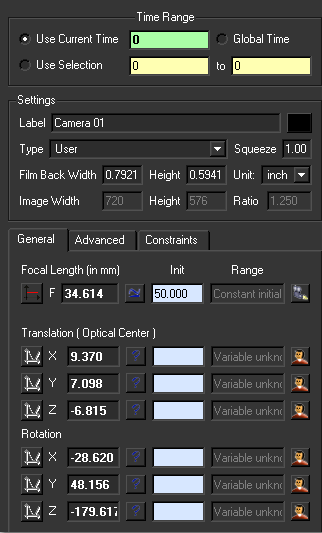
The General tab shows the information for the Focal Length and all the camera extrinsic parameters (translation, a.k.a optical center position, and rotation angles).
Click the first row button to define if the corresponding parameter is constant or variable over time. For example in shots where the zoom does not change throughout the sequence, set the Focal Length to fixed or constant. If you change the focal length parameter type to variable, you can then define constraints for this
parameter.
, or its computation can starts with an initialization value , or it can be fixed to a given value .
Clicking on it toggles through initialized to fixed. Just empty the initialization value for "unknown" status.
 , from the user , or from on externally imported file . Depending on the current parameter configuration, clicking on it will enable following actions:
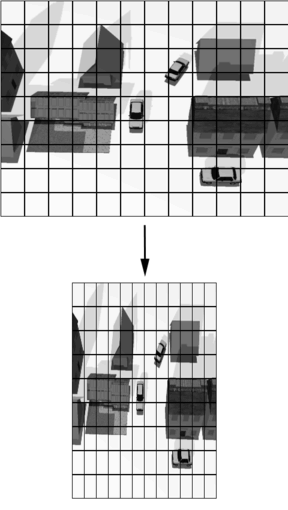
The Lens Squeeze Factor changes the image or sequence shown in the 2D View. The following image shows the default image (top) the effects of applying a smaller lens squeeze factor that the default setting (bottom). This can be used in the case of anamorphic lenses.
To delete a camera, do one of the following:


