The Track window contains two separate panes; each pane reacts in synchronization with the other, and shows the time variable elements that MatchMover can manipulate within your project.
Scroll through the Track View, the Graph Editor, and the Track Status View by clicking on the tabs at the bottom of the window, just above the Time line. See User Interface overview.
Click close the Track window. To restore the view, select Window > Track Window.
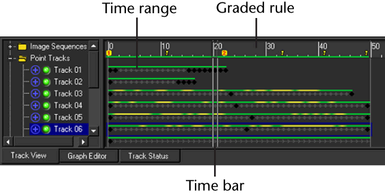
The Track View is used mainly for supervised 2D tracking. See Supervised 2D tracking. The left pane is a sub section of the Project window showing the elements contained in your project in relation to time. See Project window. Within the right pane of the Track View, symbols are used to give a graphic representation of the elements and their state.
 and
and  or a keyframe
 .
.


 , the keyframes are automatically generated and unlocked; otherwise, they are locked.
The graded ruler also shows information about the 3D solving status of each frame. A lock icon is displayed on the right-end
of the graded ruler that enables easy keyframes locking/unlocking .
.
The shape of a point indicates whether the point is a key point or a computed point, and the type of tracking generated. See Editing a key point type.
The horizontal zoom is available by pressing Ctrl+Alt+click and you can fit the entire sequence if possible (one frame has a one pixel minimum width). Just do it by selecting View > Fit To Viewport ("=" is the default shortcut).
Click a track in the Project window and select Sequence > Track Begin or End (or press Ctrl+Shift+up or down) to move to the beginning or the end of a track. Panning in this view is done in the same way as any other view (using Alt+mouse drag), or just by using the horizontal slider.
The right pane is divided into several rows, each one corresponding to an item in the left pane tree view. If an item in the tree view is selected, its corresponding row in the right pane is surrounded by a colored rectangle.
Hard tracks (manual tracks) are defined by a circle with a cross.
Soft tracks (automatic tracks) are defined by a cross.
See also Creating a new track for a definition of the symbols used for the track reconstructuon status.
The Graph Editor displays a graphical representation of computed camera parameters as well as providing options to edit the results. Depending on the type of camera motion (hand-held, stabilized, motion-controlled) and the quality of the 2D tracks, it may be useful to smooth some or all of the computed camera parameters. Smoothing can be done by hand, or by using a post filter. See Filtering the results.
The Track Status View provides read-only information on the computation of track points.
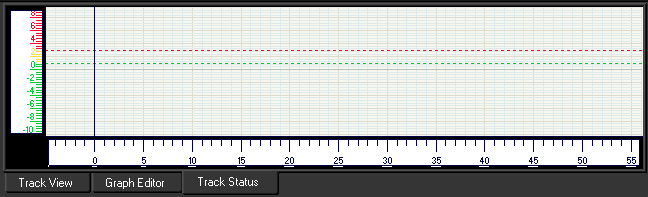
Use the Track Status View to survey the quality of pixel residuals for each track.
Click  to close the Track Status View.
To restore the view, select Window > Track View.
To fit the graph to the viewport, select Graph > Fit or right-click in the Track Status View and select Fit from the pop-up menu.


