Before launching the tracker you can configure the parameters to aid the tracking process. When you have a sequence with particular
characteristics, such as zoom or rapid movement causing blur, you set the tracker’s parameters to aid the tracking process.
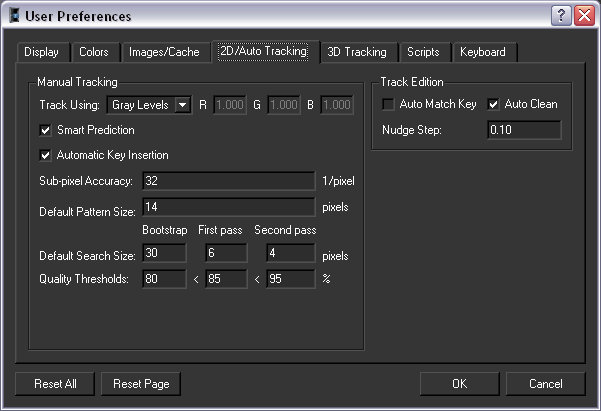
Select Edit > Preferences and select the 2D/Auto Tracking page.
Choose the desired options. By default the options Gray Levels, SmartPrediction and Automatic Key Insertion are selected. These options apply to all key points.
- Track using - Use Color where the contrast between two colors is low. For high-contrast colors, use Gray Levels. The Gray Levels option is faster, but less accurate than the Color option. See Color Tracking.
- Auto Match Key - Toggles the use of automatic key placing. This decreases the possibility of error by placing the key using the position
of the neighboring key.
- Auto Clean - toggles the automatic removal of all tracked points when editing the originator key. It is enabled by default.
- Smart Prediction - predicts the position of a point in the successive image and reduces the tracking time by a factor of 10. Smart Prediction works in smooth sequences so if you have a "shaky" camera sequence toggle the Smart Prediction option to off. If there is a smooth camera movement, use the option.
- Nudge step - sets the number of pixels for each arrow-key press when editing keys. The value can be less than one pixel.
- Automatic Key Insertion - places automatic keys when the quality falls below a certain threshold caused by factors such as camera zoom (the pattern
followed by the tracker changes size and resembles less and less the original pattern, causing the quality to decrease).
- If you do not use Automatic Key Insertion under these circumstances the tracker halts. You may notice that in some situations the position of an automatic key deviates
from the point to track, if this is the case toggle Automatic Key Insertion to off.
TipYou want to track a point from image 20 to image 40. If you know that within this sequence there is a zoom, use Automatic key insertion. By using the Automatic key insertion option the tracker is able to follow the point, despite the zoom.
The other options in the User Preferences window refer to the default settings of the key points. Any changes made here affect all new key points. The settings for
current key points do not change.
To change values for a single key point, use the Parameters Window. See Setting the parameters of a single key point.
- Default Pattern Size defines the area to search for in the adjacent image. The default value of 14 means that the Pattern Size is 7 pixels to the left of the point and 7 pixels to the right.
-
Default Search Size
- Bootstrap - Defines the search area in pixels used by all the key points when Smart Prediction is not used. Increase this value if you find that the pixel motion of the point you are tracking moves substantially. If
Smart Prediction is used the Bootstrap value is used up to the point where the prediction process starts.
- First Pass - Defines the search area in pixels when Smart Prediction is selected. The tracker starts with the Bootstrap value then changes to the First Pass value when the Smart Prediction process starts. When the sequence is not as smooth as you would like and you still want to use Smart Prediction, increase the First Pass value.
- Second Pass - Defines the search area in pixels and is only used in a bi-directional tracking. If you have already tracked in one direction,
the tracker uses this value for the opposite direction track. The tracker uses the results from the direction already tracked
and therefore the search is more localized, the search area is smaller and the tracking process is faster.
- Sub-pixel Accuracy - Defines the search precision. For example, a value of 8 means the maximum search distance of the pixel match is 1/8th of
a pixel. The tracking process is slightly longer when there is a high accuracy value.
- Quality Thresholds - Stop defines the minimum quality value. There are two possible situations. If Automatic key insertion is not selected and the quality falls below this value, the tracker stops. If Automatic key insertion is selected and the quality falls below this value an automatic key is inserted.
For display purposes the Poor and Good values determine the on-screen appearance of the points in the Track window. They have no effect on the tracking process
itself.
A quality value between the Stop and Poor values is shown as red. A quality value between the Poor and Good values is shown as yellow. A quality value above the Good value is shown as green.