MatchMover provides you with the ability to open different views within the Workspace window to study and manipulate the image sequence and the results of the tracking process.
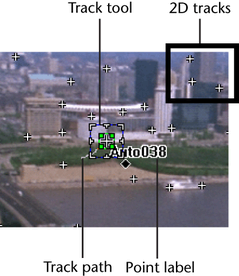
When you load a sequence, the default view is the 2D View. The 2D View is designed to display single images, image sequences and tracking information to help in your 2D tracking task. The following list shows all items that are drawn in the 2D View:
To change the Track Path length, select Edit > Preferences, click the Display tab, and in the Track Path Length text field, enter a number. MatchMover defines the maximum number of frames in which the Track Path is shown from the current time. A value of 100 shows the Track Path for 50 frames before and 50 frames after the current frame.
Displaying the 2D View attributes
You can display or hide points’ attributes by either:
For the Masks and Anamorphism options, a check mark beside the option indicates that the option is active. Clicking the option again hides the check mark and deactivates it.
For other attributes, a single diamond  shown beside the attribute in the menu defines that the attribute is displayed for the selected point.
If you click again, two diamonds  appear beside the attribute defining that the selected attribute is displayed for all points. No diamonds means this feature
is not displayed. By default the Point Label, Track Path, Tracker Tool, and Tracking Score are only displayed for the selected key point or computed point.
appear beside the attribute defining that the selected attribute is displayed for all points. No diamonds means this feature
is not displayed. By default the Point Label, Track Path, Tracker Tool, and Tracking Score are only displayed for the selected key point or computed point.
Changing the time in the 2D View
The 2D View shows an image at a given time. The current time is shown in the top left corner of the viewport.
 .
.
To hide the current time, select Edit > Preferences > Display and click in the Show Current Time in Viewports check box to disable the option.
By default, time changes in the Time Line or other 2D views are always synchronized with current time. However, when you "freeze" the 2D View, changing the time in other views (the Time Line, the Track window or other 2D Views) does not affect the time in the frozen view. Other views are not synchronized with current time.
If you change the time in the frozen view, other views are synchronized with the current time in the frozen view.
The Freeze Time mode is useful if you need to study frames at different times, for example, when you have multiple 2D views and need to see them at a certain time, for instance when editing tracks in a helper frame.
The shortcuts Ctrl+left arrow or right arrow change the time in the frozen window only if the window is active (blue surround).
To freeze the time in the 2D View, do one of the following:
 in the Workspace.
To reset the current view, select Window > New View > New 2D View or press Ctrl+2 (default shortcut).
You can access the navigation options in the View menu. Alternatively, use the following shortcuts and drag the pointer in the 2D View, Track View, Graph Editor, and Track Status View
#Pan horizontally only in the Track View, Graph Editor, and Track Status View
 in the Navigation toolbar at the bottom of the window and drag the pointer to perform the navigation.
 to scroll through the images.
 to easily pan in the image. A popup window of the entire image appears with a rectangular guide to orientate you in the image.
In addition to the navigation options shown in the previous table, you can right-click in the 2D View and select the following options from the pop-up menu.


 in the Toolbar.icon.