In
this scenario a dynamic spline IK chain is created and used on a
dragonfly-type bug model. As the dragon bug moves about, its tail
wiggles slightly.
To play the animation,
click the link below.
dragonbug.mov
To create a dynamic spline IK chain
- Create a new scene and switch to the Side orthographic
view.
- In the Animation menu
set, select
Skeleton > Joint Tool.
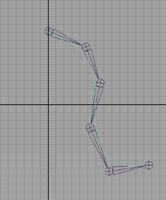
- To draw a tail in a rest position, as
shown in the image below, click near the top of the Y-axis and then
click to create joints as though they were along the tail. At the
last joint press Enter.
- Select
Create > CV Curve Tool and
trace a curve over the joints, clicking at each joint to create
a CV. Press Enter at the end of the last joint.
- With the curve selected, in the Dynamics menu
set, select
Hair > Make Selected Curves Dynamic.
- Select
Hair > Display > Current
Position.
- To attach the curve into the chain, in
the Animation menu set, select
Skeleton > IK Spline Handle Tool >
 .
.
- In the IK Spline Handle Settings editor,
turn off Auto Create Curve.
- Follow the instructions in the Help
Line, which are:
- Click the start joint.
- Click the end joint.
- Click the Current Position curve.
- To select the follicle, do the following:
- Select the curve.
- Select the follicleShape in the Attribute
Editor.
- Click the Select button
at the bottom of the Attribute Editor.
- In the follicleShape, set Point
Lock to Base.
- To play the simulation, select
Solvers > Interactive Playback.
- To stabilize the dynamic curve’s behavior,
adjust the Stiffness value and the number
of Iterations in the Dynamics section
of the hairSystemShape of the Attribute Editor.