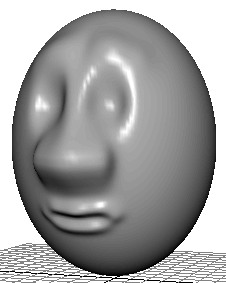
With the 30 Sections
and 30 Spans specified for the original sphere in this lesson, the
large space between isoparms in the mouth region makes it impossible
to create a subtle shape for the lips.
To overcome this problem,
you must insert isoparms in the mouth region before sculpting.
To insert additional isoparms
- Right-click Egghead and select Isoparm from
the marking menu.
- From the Toolbox,
choose the Select Tool.
- Click the horizontal isoparm below the
nose and shift-click the next two below it so they become yellow.
- Select
Edit NURBS > Insert Isoparms >
 . In
the options window, turn on Between Selections,
enter a value of 2 for # Isoparms to Insert,
then click Insert.
This inserts two extra isoparms between each
pair of selected isoparms, for a total of four extra isoparms. This
provides enough CVs to create subtlety in the mouth.
You might want to add
vertical isoparms at the lips in a similar way. The extra isoparms
would also be useful if you were to later enhance the shape of the
nose. Insert isoparms only where needed. More isoparms means slower
processing speed.
In any case, do not change
the number of isoparms by editing the original number of Sections
and Spans in the makeNurbSphere history node. This will
reshape your sculpted surface undesirably.
To sculpt a mouth for the character
- Select the Sculpt Geometry Tool again.
- Select the Push operation.
Enter 0.2 for Radius(U). In the Stroke tab,
make sure Reflection is turned on.
- Starting at the center of the area appropriate
for the indentation between the lips, stroke outward from the center.
It’s best to start the stroke with the dual icons on top of one
another (in other words, only one icon is displayed).
- Select the Pull operation
and set the Radius(U) to 0.3. Using a similar
technique as for the prior step, stroke the upper lip. Repeat for
the lower lip.
NoteIt might be easier
to push or pull the lips with the Ref. Vector set to Z Axis. This
moves the region you stroke in the world Z-Axis direction. The default
Normal setting moves the region in a direction normal (perpendicular)
to the surface. Because the normal direction on a lip might be up,
down, or straight out, depending on the part of the lip you stroke,
there’s more possibility of undesired results when you use the Normal
setting.


 . In
the options window, turn on Between Selections,
enter a value of 2 for # Isoparms to Insert,
then click Insert.
