Lets you use the Paint
Scripts Tool to paint MEL scripts. For more information,
see
Script paint.
See also
How Artisan brush tools work.
Modify > Paint Scripts
Tool > 
Use this to specify the
settings for the Paint Scripts Tool in the Tool
Settings editor.
For information about
the settings in the other sections, including the Setup section,
see
Artisan Tool Settings.
Paint Attributes
These are the settings
in the Paint Attributes section of
the Tool Settings editor for the Paint
Scripts Tool.
Paint Operation
Notice that the brush
stamp changes to indicate which operation is selected.
To remove the letters
and gradient marking from the brush stamp, open the Tool
Settings editor, click the Display tab and
turn Draw Brush Feedback off.
- Replace
-
For
the geometryPaint and spherePaint scripts, replaces the values you
paint over with the specified Value and Opacity.
For the emitterPaint
script, replaces the values for the selected attribute of the painted emitter
with Value and Opacity settings
and replaces the painted emitters with emitters that have these
new attributes. For example, if the selected operation is to Modify the Speed emitter attribute,
the emitter speed is replaced by the Value and Opacity settings.
- Add
-
For
the geometryPaint and spherePaint scripts, adds the specified Value and Opacity to
the current values you paint over. If the Paint Offset is
negative, the value actually decreases.
For the emitterPaint
script, adds to the values for the selected attribute of the painted emitters
by the Value and Opacity factors.
- Scale
-
For
the geometryPaint and spherePaint scripts, scales the current values
you paint over by the Value and Opacity factors.
For the emitterPaint
script, scales the values for the selected attribute of painted emitters
by the Value and Opacity factors.
- Smooth
-
For
the geometryPaint and spherePaint scripts, changes the values to
be the average values of the surrounding vertices.
For the emitterPaint
script, changes the values for the selected attribute of the painted emitters
to be the averages of the values for the surrounding emitters.
- Value
-
Set the value
to apply when you perform any of the script painting operations.
The value has a different meaning depending on the script.
For the geometryPaint
and spherePaint scripts, Value refers
to the size of the geometry when the Control is
set to Scale. The original geometry
size has a value of 1.
For the emitterPaint
script, Value refers to the percentage
of the selected script operation.
- Min/Max Value
-
Set the minimum
and maximum possible paint values. By default, you can paint values
between 0 and 1. Setting the Min/Max Values you
can extend or narrow the range of values. Negative values are useful for
subtracting weight. For example, if you set Min
Value to -1, Value to
-0.5, and select Add for the operation, you would subtract 0.5 from
the weight of vertices you paint. Positive values are used as multipliers.
- Clamp Lower, Clamp Upper
-
Select whether you want to
clamp the values within a specified range, regardless of the Value set
when you paint. You can set clamping to Lower, Upper,
or both.
For example, if you clamp Lower and
set the lower Clamp values to 0.5, the values
you paint will never be less than 0.5, even if you set Value to
0.25. Similarly, if you clamp Upper and set
the upper Clamp values to 0.75, the
values you paint will never be greater than 0.75, even if you set Value to 1.
geometryPaint sample script
settings
- Geometry
-
Type the names of the objects
you want to paint, separating each with a space. The objects must
be in your scene at the origin. If you type more than one object
name, Maya paints them randomly.
- Identifier
-
Type a name to identify the
layer the painted objects belong to. By painting on different layers,
you can modify the objects on one layer without affecting the objects
on a different layer. For example, if you type Layer1 in this box
and paint cones, then type Layer2 in the box and paint spheres,
when you go back to Layer1 and paint, the spheres in Layer2 will
be unaffected.
If you cannot remember
a layer name, or identifier, open the Outliner and
select an object belonging to the layer. The identifier name is
part of the object name.
Operation
Select from one of the
following operations.
- Create/Modify
-
Creates new
objects, and modifies the objects you paint over using the settings
in this window and on the Paint Scripts tab.
- Modify
-
Modifies the
objects you paint over using the settings in this window and on
the Script Paint tab.
- Remove
-
Removes the
objects you paint over.
- Grid
-
Turn Grid on
to use the grid you set in the U Grid Size and V
Grid Size boxes to place the geometry. If you do not
turn Grid on, Maya uses the vertex
position to place geometry.
For each surface you
paint, do not change the grid size. Changing the grid size while
you paint produces undesirable results.
Also, keep in mind that
your grid settings are interpreted in part by the UV mapping technique
used on the surface. Make sure the UVs are correctly projected on
the surface.
Jitter Grid
Turn Jitter Grid on
to randomize the position of the painted objects on the grid.
- U Grid Size, V
Grid Size
-
Select the desired U and V Grid
Size. Artisan paints the geometry on the grid point of
the U and V grid you specify here, regardless of the isoparm density
you set for the surface. The larger the grid size, the denser the
geometry.
In the following example,
the isoparm density of the surface is 10, but the U and V Grid
Size are both set to 5 in the Geometry Paint Settings window.
Control
These controls define
how painted objects are transformed. Do not select both scale and
rotation controls at the same time.
- X, Y and Z Scale
-
Scales object values
by the factor set in the Value box
of the Script Paint tab.
- X, Y and Z Rot
-
Rotates objects based
on the Value set in the Script
Paint tab. A Value of
1 rotates objects 360 degrees.
- X, Y and Z Trans
-
Moves objects along the surface
in the X, Y, and/or Z direction based on the Value set
in the Script Paint tab. A Value of
1 moves objects 1 grid position.
Options
Select from one of the
following options.
- Proportional
-
Distributes changes proportionally
across all painted attributes rather than replacing them all with
the new value.
- Attach
-
Attaches the objects
to their position so they move with the surface when you modify
the surface (for example, when you sculpt or translate it).
This option works only
on NURBS surfaces.
- Duplicate
-
Creates copies rather than
instances of the original objects.
- Group
-
Groups the painted objects
together on one identifier, or layer.
- Isolate
-
Isolates scale, rotate,
and translate transformations, so they remain independent of each
other. With Isolate turned on, you can
return objects to a base position by selecting the control and flooding
with a Value of 0 for rotation and
translation, or 1 for scale.
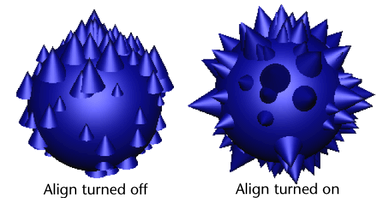
- Align
-
Aligns objects along
the surface normal.
- Jitter value
-
Enter a jitter value
to apply to the selected controls when Jitter Grid is
turned on, where 0 results in no jitter, and 1 results in maximum jitter.
emitterPaint sample script
settings
- U Grid Size, V
Grid Size
-
Select the desired U and V Grid
Size. Artisan paints the emitters on the grid points
of the U and V grid you specify, regardless of the isoparm density you
set for the surface. The larger the grid size, the denser the emitters.
Grid Options
Select from one of the
following options.
- Jitter
-
Randomizes the position of
the painted emitters.
- Dither
-
Concentrates emitters
at the center of the brush stamp, with few emitters at the edge.
If you do not turn this option on, the emitters concentrate uniformly
on the stamp.
Operation
Select from one of the
following operations.
- Create
-
- Remove
-
- Emitter Attr. Modify
-
Changes the value of
the selected attribute (Rate, Spread, Speed, Min
Dist, or Max Dist) to
the value set under Creation Options.
- Modify Particle Attr.
-
Changes the value of
the selected attribute (Lifespan, Opacity, Point
Size, Line Width, Tail
Fade, Tail Size, Radius, Multi
Count, Multi Radius) to the value
set under Stamp Profile on the Script Paint tab.
- Modify Render Type
-
Changes the particle render
type to the selected type (Multi-Point, Multi-Streak, Numeric,
Points, Spheres, Sprites, Streak, or Blobby
(s/w)).
Creation Options
Type
Select one of the following types.
- Omni-directional
-
Sets the type of emitter
to be an omnidirectional point emitter. This emits particles in
all directions.
- Directional
-
Sets the type of emitter
to be a directional point emitter.
- Rate
-
Set the rate at which particles
are emitted. The rate is particles per unit of time.
- Speed
-
Set the speed multiple
of the emission. The velocity of the emitted particles is multiplied
by this amount.
You can enter a value
of 0 or greater.
- Spread
-
Set the spread angle
for the emitted particles, along the specified emission direction.
Particles are randomly distributed within the spread angle and around the
base of a cone between 0 and 360 degrees. This option is valid for
directional emitters only.
You can enter a value
between 0 and 1. A value of 1 means 180 degrees.
- Min Dist
-
Set the minimum distance
from the emitter at which emission starts. You can enter a value
of 0 or greater.
Particles get emitted
at a random distance uniformly distributed between the Min
Distance and Max Distance.
- Max Dist
-
Set the maximum distance
from the emitter at which emission ends. You can enter a value of
0 or greater.
- Particles
-
Turn on Per Emitter to
create a separate particle shape for each emitter. Turn this option
off to share one particle shape between all emitters. Per
Emitter must be turned on to paint Particle Attr or Render Type.