Synchronizing the sequences


Load two sequences

The first step in synchronizing the video sequences for motion capture is to load both sequences into MatchMover.

NoteYou can bypass this section of the lesson by opening Load_sequences.mmf. This file can be found in the Tutorials/Mocap directory. You can then proceed to Synchronize the sequences.

To load the image sequences

  1. Select File > Load Sequence or click the Load Sequence icon.

    The Load Sequence window appears.

  2. In the Load Sequence window, browse to the location of the MatchMover Tutorials/Mocap directory, and select Motion1_00.jpg, which is the first image in the first sequence.
  3. In the Load Sequence window, set the following:

    • In the Sequence Options section, select Lower field first from the Interlace drop-down list.
    • In the Camera Setting section, set Motion to Fixed.

      This setting will impose a constraint attached to the camera, representing a static camera.

    • Set Frame Rate to 25.
  4. Load the second sequence by repeating steps 1 to 3.

    In the Load Sequence window, browse to the location of the MatchMover Tutorials/Mocap directory, and select Motion2_00.jpg, which is the first image in the second sequence.

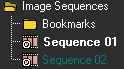
    The two sequences are represented by different colors in the Track View and Project windows.

Synchronize the sequences

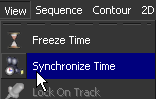
Because you need to adjust these sequences to the same time reference, you will synchronize them by specifying a synchronization tick. To do this, you need to identify a visible event that you can easily see in both image sequences. For example, while you are shooting the sequences, you can use a specific device, such as a flash or a clapperboard, to create the event.

NoteYou can bypass this section of the lesson by opening Synchronize_sequences.mmf. This file can be found in the Tutorials/Mocap directory. You can then proceed to Creating motion tracks.

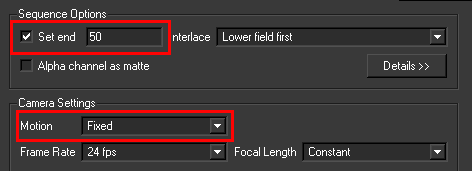
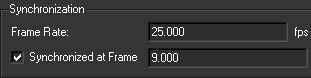
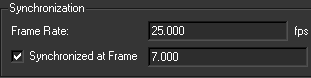
For this lesson, you can use the instant the actor's left foot begins to touch the floor. In Sequence 01, it occurs at frame 9 (9/50) and for Sequence 02 it occurs at frame 58 (7/50). You can see this information displayed on the top-left corner of the image viewport.

To synchronize the sequences

  1. In the Project window, click Sequence01.
  2. In the Parameters window, in the Synchronization section, turn on Synchronized at Frame and set it to 9.

  3. Repeat steps 1 and 2 for Sequence02, setting the Synchronized at Frame to 7.

    Notice that in the Project window the sequence icons have changed, indicating that they each have a specified synchronization frame.

  4. To change the workspace viewport so that you can see both sequences at the same time, from the Toolbar, click icon and select Two Side by Side from the list.
  5. Right-click the left viewport and select Synchronize Time from the pop-up menu.

    The information displayed in the top-left corner of this viewport is now displayed in bright green, meaning it will update its own time using the synchronization information specified.

  6. Right-click the right viewport and select Synchronize Time from the pop-up menu.
  7. With the right viewport still active, select any frame between 51 and 101 in the Time line.

    You can now play the sequence from this point in the Time Line to check that the sequences are synchronized.

    Click the icon to play the sequence.

    When you look at the start of Sequence 02 at frame 51 in the right viewport, notice in the left viewport that Sequence 01 is at frame 2. It is this difference that allows us to have a good synchronization between the sequences.