In this section of the lesson, you create a motion track of the actor’s movements.
The first step in this process is to create a new point track group that you will use to place the actor's tracks.
To create a new point track group
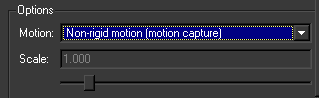
This option specifies that the point track belonging to the new group will be for the motion of non-rigid objects.
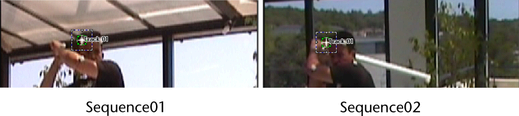
In this section of the lesson, you place track point on markers that are attached to the actor. There are 18 markers attached to the actor, but for this section of the lesson, you use only six for your tracking points. When creating a motion track, you must place your track points on the same marker in both sequences. For example, if you place Track 01 on the white marker located on the right side of the actor’s head in Sequence01, you must also place Track 01 on the same marker in Sequence02.
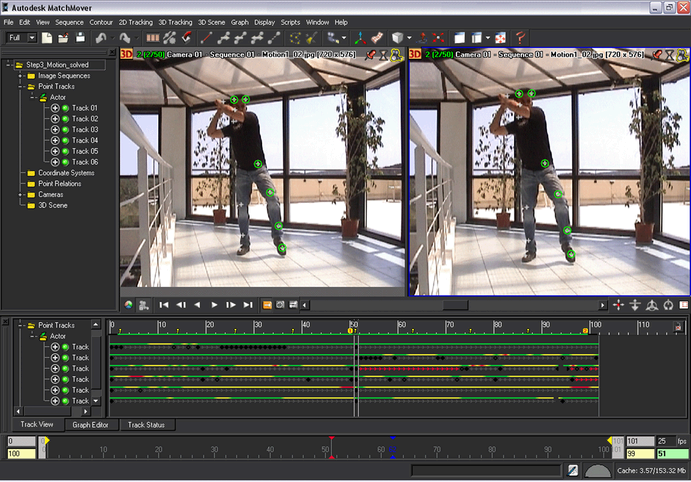
Be aware that some tracks may need manual adjustment as can be the case when using supervised tracking. For example, in a few of the frames, MatchMover confuses the motion of the actor's saber with the motion of the markers on the actor's leg and includes the saber’s motion in the track.
The easiest markers to track in both sequences are located on the actor's head and on the legs. In all cases, try to choose the most visible markers in your sequences.
For information about supervised tracking, see Lesson 2: Using supervised tracking.
The left viewport now displays the first frame of Sequence 01and the right viewport now displays the first frame of Sequence 02.
When you drag the cursor over the Workspace, it changes to cross-hairs.
Use the Magnifier window view below the Project window to help you precisely position the location of the new point.
Use the locations shown in the image below as a guide.
Your project should look similar to the one in image below.
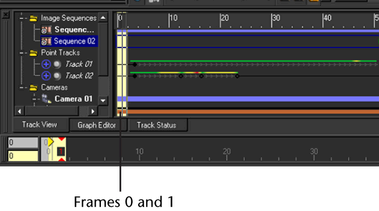
Before you can perform the camera solve, you must remove the two-frame shift between the two sequences.
The first two frames (0-1 in the Time Line) only appear in Sequence 01, and the last two frames (100-101 in the Time Line) only appear in sequence Sequence 02. Since no 3D information can be derived for these frames, you need to specify that the frames are not solved.
For Sequence 02, select the time interval of the last two frames in the sequence (100-101).


