Once your shot has been solved, you will need to check the quality of the solving. Is it accurate enough to fit your needs or are there some frames that are not solved correctly? MatchMover provides several ways to check the tracking.
Checking the computation quality in the Track window
The quickest and simplest method is to examine the colored line in the Track window graded ruler that corresponds to the residual value for a given frame (the average of all the track residuals present at that frame). See The Track View.
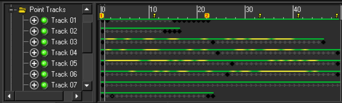
This colored line indicates the quality of the tracking according to the residual value thresholds set in the Preferences window. See Configuring the tracker.
Gray lines indicate frames that are not computed and black lines are ignored since these frames were set to “do not solve” before the camera solving process. Green lines mean good solving, through yellow (fair) to red (bad). So, you have an instant feedback of the average quality of all your frames. It’s almost the same for all the track points.
You can really easily spot out the bad areas, a bad time range, or bad tracks, if any, and concentrate on them. Anyway, for further inspection, MatchMover provides the other solutions detailed in the next sections.
Checking the position of 3D Helpers
Another quick and simple
method of checking the results involves using a 3D
View. When working in the 3D View, each
reconstructed track is displayed using a 3D helper. The tracks are
displayed by a default 3D cone, but can be changed to a pyramid,
or a cross in the Preferences window. So if you
look through the computed camera (using Lock on Camera)  , you should
easily see if orientation and relative depth of the helpers fit
the real footage. By playing the sequence, you’ll also be able to
check how accurate the 3D helpers reproject on the background. Accurate
tracking results in natural and synchronized helper motion. Mobile
points are displayed with a different customizable color, and are
animated while sequence is played.
, you should
easily see if orientation and relative depth of the helpers fit
the real footage. By playing the sequence, you’ll also be able to
check how accurate the 3D helpers reproject on the background. Accurate
tracking results in natural and synchronized helper motion. Mobile
points are displayed with a different customizable color, and are
animated while sequence is played.
You can easily change the 3D helper size, either in the global parameter window, which is displayed when nothing is selected (just hit Esc), or in the Preferences window (press P).
Examining the computation quality in the Track Status View
The Track Status View shows a graphical representation of the pixel residuals for each track in a frame. Use this to isolate quickly the tracks or frames with a high-pixel residual. See The Track Status View.
Examining the computation quality in the Survey Window
Use the Survey Window to analyze the results of 3D tracking and to isolate specific frames or points where adjustment may be necessary.
Select Window > Survey Window.
The Survey Window shows values of the distance in pixels between a 2D point and the projection of a 3D point on the camera. These are called the residuals. Numeric information is shown for the points and/or frames and their average error values.
By default the Survey Window shows two columns, the points and the 3D residuals, but you can display a maximum of four columns.
Selecting Points mode allows you to double-click a track in the first column to select the track in all views. Selecting Frames or Points and Frames allows you to double-click in the first column to change the current time.
By default, the data is sorted for the Points column in ascending order.
To sort the data in the 3D Residual column:
A sort can be done for other columns by repeating the above procedure substituting the required header.
Inserting 3D objects and using them as references
The next method involves inserting virtual objects in a 3D View and producing a preview of the composed sequences in any output format. See Working with 3D objects.
The virtual objects are fixed in space (with respect to the tracked rigid object) and rendered using the estimated camera parameters. The process is successful when the motion of the virtual objects in the composed sequence is consistent with that of the real scene. Previewing allows you to study the results of the tracking process and make any modifications, if necessary.


