In MatchMover, you can load one matte for each sequence. The matte, however, must have the same resolution and number of frames as those of the sequence.
The matte can be loaded simultaneously with the loading of the actual film sequence if it is included in the alpha channel. In the File > Load Sequence or File > Load Images window, check the option “Use alpha channel as matte”.
Alternatively, to load a matte sequence:
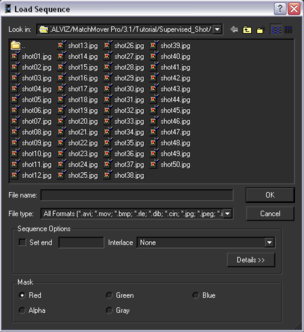
MatchMover loads the matte sequence into the Workspace.
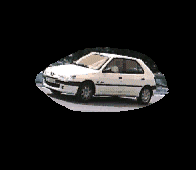
The example shows a black matte that serves to focus the points on a moving car.
Following the child-parent hierarchy, the matte is listed in the Project window and Track window in the Image Sequences folder under the sequence it covers.
Displaying, hiding, and deleting mattes
If mattes are displayed, all the areas masked out are shown with the matte color and transparency in the 2D Mode. You can hide or show mattes by doing one of the following:
The check mark beside the Matte option signifies that the matte is shown. Click the option to deselect it and hide the matte. You will see the full video footage.
To delete a matte, right-click the matte in the Project window and select Delete Matte from the pop-up menu.
The Parameters Window lists the matte properties.
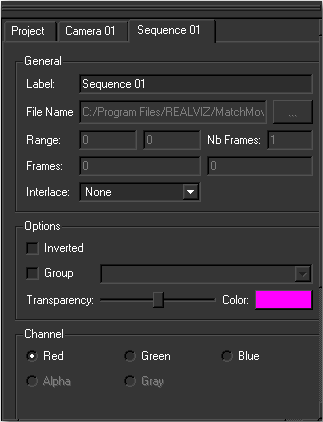
You can also select the channel being used by the matte sequence. Red, Green, Blue, Alpha, and Gray (for grayscale images) channels. However, if a matte has only certain channels, the other channels are grayed out.
Checking the option Inverted to invert the area that is masked. Optionally, right-click the matte in the Project window and select Invert to check the option.
Each matte is displayed using alpha blending, with customizable transparency and color for each. Mattes also can be tagged as “Group” with a label, and are therefore used to design a coherent rigid mobile object. While autotracking, each object is handled separately, and a group of the specified label is created with its tracks in it, and is calibrated as a separate moving object.
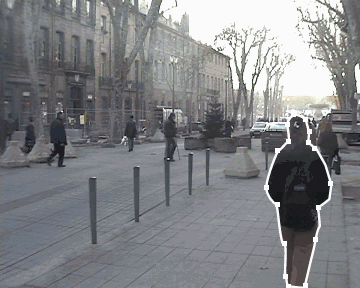
MatchMover’s Matte Drawing Tool allows you to draw binary mattes to identify areas. These areas can be excluded from the automatic tracking process, or used to identify rigid moving objects. Mattes are the result of compositing one or several contours, which are closed, 2D polygons, defined using control points and animated over time.
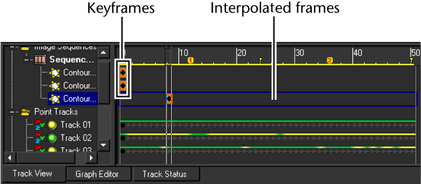
The Matte Drawing Tool allows you to place control points and, therefore, define contours. For any given frame, once you edit a contour, the frame is called a “keyframe” and the contours are interpolated in between keyframes.
You do not need to define a matte for each frame. Defining a matte for some keyframes is sufficient to exclude the required area from the tracking process. MatchMover interpolates the matte in the frames between the keyframes.
You can apply several contours to the same image sequence, either at the same frame or at different frames.
The matte drawing workflow is described as follows:
When you draw a contour, the last point that was added or edited is the active point. For an open curve, the active point must be the last point of the curve. The active point is highlighted red.
MatchMover enters the Contour
Drawing mode, creates a new empty contour and selects
it. The pointer changes to  .
.
A keyframe is created for the current contour and a new contour is added to the Contours folder in the Project window.
When you create a new contour, you create a new matte. The new matte is listed in the Project window as a child of the sequence to which it belongs.
In the Track window, contours are shown as children of the sequence mask.
The Track window shows for each contour:
In the Contour Drawing mode in the 2D View, you can select:
 nd the
point becomes the active point.
nd the
point becomes the active point.
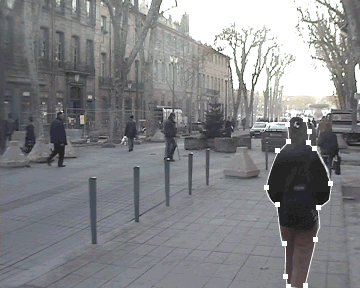
When you select a contour in the Contour Drawing mode, it is represented by a thick outline and control points.
Other contours in the selected frame are represented by thin outlines and control points.
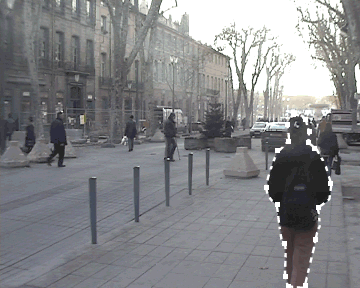
If the selected contour is inactive for the current frame, it is represented by a dashed line.
Changing a contour’s properties
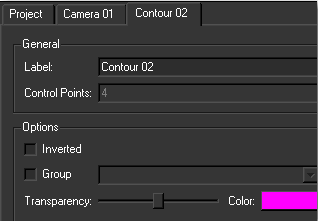
The image below shows the contour’s Parameters window.
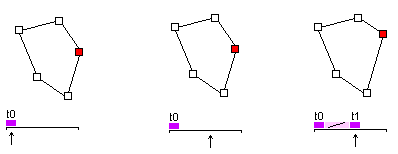
About keyframes and interpolating the contour
A keyframe is created for each closed contour. When you change the current time, the contour shown in the Workspace depends on the content of the contour at this frame.
Editing the curve at the current frame creates a new keyframe at the current frame and interpolates it between the other keyframe from which it was copied.
To add a keyframe, do one of the following:
MatchMover creates a keyframe for the selected contour at the current frame using either the interpolated curve, if any, or the displayed curve.
If the new keyframe is between existing keyframes, then the interpolated curve is used. Otherwise a copy of the contour at the nearest keyframe is used. This ensures that the domain of definition of a contour is always an interval.
For example, a keyframe is defined at the time t0. When the time is changed to t1, the former curve is still displayed. When the curve is edited at t1, a new keyframe is created and interpolation of the curve will be performed between t0 and t1.
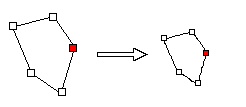
Once you have created a contour, you can edit it to define the shape of your required matte.
Deleting a point from a contour
To delete a point from a contour:
The active point is removed from the contour and the preceding point becomes the active point. The point is deleted for all keyframes of the contour.
The contour and its control points are translated and a keyframe is created at the current frame.
![]()
 . Drag
the pointer anywhere in the 2D View.
. Drag
the pointer anywhere in the 2D View.
This action rotates all the control points defining the current curve by a constant angle around a given 2D point, determined by the original position of the pointer at the time of the click, and creates a keyframe at the current frame.

 . Drag
the pointer horizontally in the 2D View.
. Drag
the pointer horizontally in the 2D View.
The center of the scale is the original position of the pointer at the time of the click. The scale factor increases toward the right, decreases towards the left.
You can copy and paste a contour at one keyframe only using the Copy and Paste commands.
To make a copy and paste a keyframe of a contour:
MatchMover creates a copy of the contour at the current keyframe and stores it into a buffer.
To duplicate all keyframes of a selected contour.
Select a contour then do one of the following:
MatchMover creates an exact copy of the current contour featuring all keyframes. The contour is interpolated between this new keyframe and the existing ones.


 . Click
the mouse button.
. Click
the mouse button.