Learning Resources > Tutorials > Getting Started with Maya > nParticles > Lesson 1: Creating nParticles >
Adjusting nParticle collision
attributes
nParticle Collisions attributes determine the behavior of nParticles when they collide each other and with other Nucleus objects. In this section of the lesson, you make the nParticles sticky like candy by adjusting the Friction and Stickiness attributes.
To adjust nParticle Collisions attributes
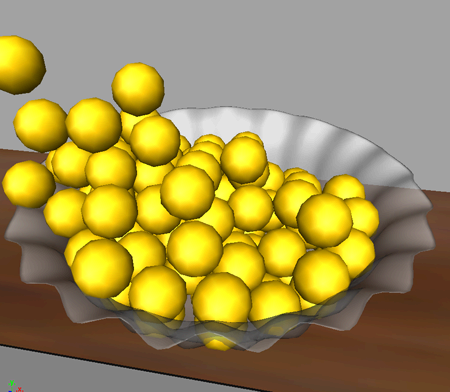
Notice that the nParticles are now sticking each other and piling up at the edge of the bowl.
Friction and Stickiness are similar attributes in that Friction is a force acting in the tangent direction, while Stickiness is an adhesion force in the normal direction. When Nucleus objects collide, the affect of their Friction and Stickiness values are additive. For example, if the Stickiness value of the nParticles and the bowl are 0.5, the overall Stickiness acting on both objects is equal to 1.0.
Notice that the nParticles have greater tendency to stick to the surface of the bowl. This is because of the additive effect of the Friction and Stickiness attributes.

For more information see Friction and Stickiness.
The particles now stick to one another and to the bowl like candies.
Adjusting nParticle self collisions
When you play back the simulation, the nParticles are piling up as they fill the bowl. This is because the nParticles are self-colliding with each other. For some nParticle effects, such as liquid simulations, lava flows, and splatters, you do not want the nParticles to self-collide. You can turn nParticle self-collisions on and off by setting the Self Collide attribute.
To turn off nParticle self-collisions
Notice that the nParticles no longer pile up, but blend and overlap with each other.
Each nParticle has an outer boundary that determines the distance between the nParticle and an object at collision. The Collide Width Scale attribute sets the collision distance between the nParticles and other Nucleus objects. The Self Collide Width Scale attribute sets the collision distance between self-colliding nParticles.
By default, Collide Width Scale and Self Collide Width Scale are set to 1 for normal collisions. Turning off Self Collide is like setting the Self Collide Width Scale to 0.
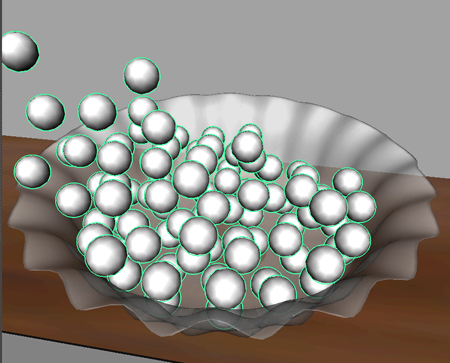
Notice that the nParticles appear to collide with each other when they fill the bowl, but they don't touch one another. The gaps between the nParticles are due to the increased Self Collide Width Scale.
In the next step, you will display the current Self Collision Width Scale by turning on the Solver Display.
The nParticles now appear with their Self Collision Thickness displayed in yellow. You can make adjustments to the Self Collide Width Scale and see how the thickness affects the space between colliding nParticles.