Lesson 5: Setting up Sliding deformation


You now have a working muscle rig for the leg mesh. The Muscle skin deformer provides even more quality in the rigging with Sliding weights. The Sliding deformer lets you create muscle and bone sliding under the skin. Combined with the Relax weights you will set in a later lesson, you can achieve very effective skin pulling and sliding effects.

Open the scene for the lesson

  1. Load the file you worked on in the previous lesson or load the DragonLeg_Sliding_Start.mb file.

    This file has the leg properly skinned and weighted with bones and muscles using Sticky weights.

Enable Sliding deformation

  1. Select the skin mesh, and in the Channel Box under INPUTS click the cMuscleSystem1 node to display its attributes.

    Each main section of the deformer is broken down by label headings. For now, use the ones listed under SLIDING. The Sliding deformer can be turned on and off for faster interaction and playback.

  2. Turn on Enable Sliding and leave quality set to Full.

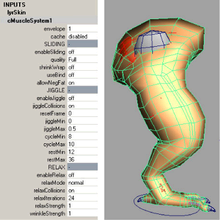
    Later you can adjust the quality attribute as needed. See Sliding attributes for further information.

Paint Sliding weights

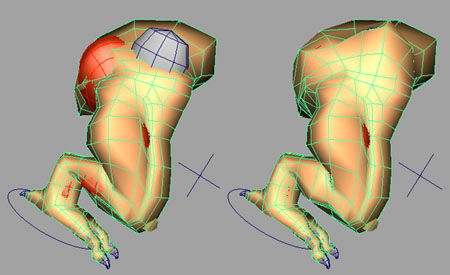
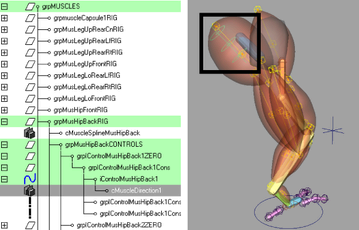
Start by painting weights for the hip blade bone.

  1. Select the skin mesh, then select Muscle > Paint Muscle Weights.

    The Muscle Paint window appears.

  2. In the Weights drop-down menu, select Sliding.
  3. Set the Weight value to 1.0 and turn on Replace.
  4. In the Influence list, select boneBlade.
  5. Paint weights where the blade bone might push out.

    TipIt's important to paint only the area around the bone for speed purposes, and also so points on distant parts of the mesh aren’t affected by the blade bone.

    As you paint, you can see the Sliding deformation start to happen. Note that the slide is not accurate because there is not enough detail in the mesh relative to the bone. This is a good example of a situation where you may want more skin detail for areas where smaller or thinner bones or muscles cause the sliding.

Set a Fat offset

For areas where a muscle or bone often penetrates the skin when sliding, you can set a Fat value to create an offset between the muscle or bone and the skin. Each muscle or bone object has this Fat attribute on its cMuscleObject shape node.

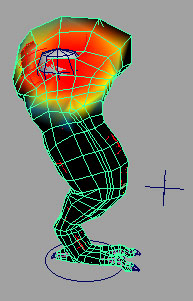
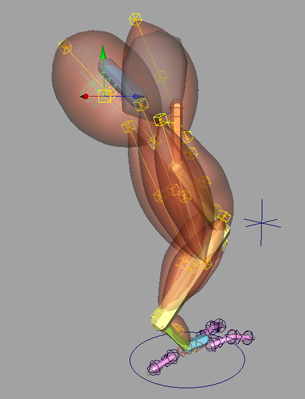
A good example is the MusHipBack muscle, since the skin often penetrates the muscle on the back. The image below shows that muscle painted with Sliding weights, and a fat offset on the muscle set to 0.55.

To define an offset from the skin mesh to the bone blade

  1. Select the bone blade object.
  2. In the Attribute Editor, select the cMuscleObject_boneBlade1 tab to view the cMuscleObject shape node attributes for the bone blade.
  3. Set the Fat value to 1.0.

    The skin is now offset from the bone blade.

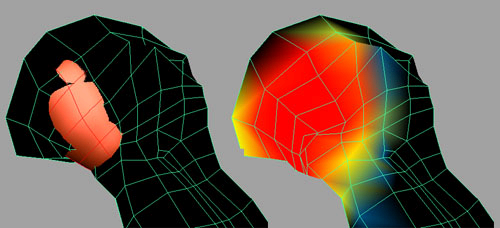
Notice that right now the Sliding only affects a few points, is somewhat sharp, and is causing some self penetration in the muscle. In the next steps, you will use Direction weights to improve the sliding.

Create a Direction node

  1. Make sure nothing is selected, close the Muscle Paint window, then select Muscle > Direction > Make Muscle Direction.

    By default, a vector type direction node is created at the origin. It has an arrow that points in the direction the Sliding will attempt to work once it is connected to the Muscle skin deformer.

    In this case, since nothing was selected, a new cMuscleDirection shape node is created.

    TipSince you may often want to have radial direction nodes created based on the center line of your mesh, and since capsules are typically used for bones that run down the centerline, you can easily convert any capsule to also function as a cMuscleDirection node. Simply select the capsule, then select Muscle > Direction > Make Muscle Direction. The capsule will be converted to be both a capsule and a radial muscle direction simultaneously. You can then connect the capsule to the deformer as a capsule muscle object and/or a muscle direction and use it both ways.
  2. In the Channel Box or Attribute Editor, set the cMuscleDirection node’s Type attribute to radial.

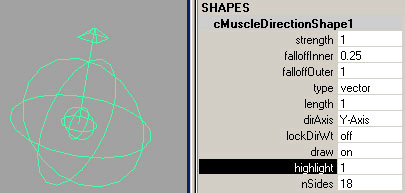
    This creates a radial-type push out along an axis. The Length and Falloff Outer attributes control how far this axis goes.

    Next, you connect the direction object to the Muscle deformer.

Connect the Direction node

  1. Select the direction object and the skin mesh.
  2. From the main menu, select Muscle > Direction > Connect selected Muscle Directions.

    The Direction object is connected, although there is no visible change on the mesh because you have not yet painted Direction weights.

  3. Move the Direction object to align it with the rear hip muscle.

  4. Parent the Direction object to the first hip muscle cube mover.

  5. Set the Length attribute to 3.0.

    Leave the Falloff Outer attribute set to 1.0, as it only changes the length at the tips. The actual effect of the direction node comes only from weighting. The Inner/Outer Falloff values are primarily for visual feedback.

Paint Direction weights

  1. Select the skin mesh, then select Muscle > Paint Muscle Weights.
  2. In the Muscle Paint window, select Direction in the Weights drop-down menu.

    This lets you set and paint Direction weights for any connected direction nodes.

  3. Paint Direction weights around the hip, in the same area where you painted Sliding weights.

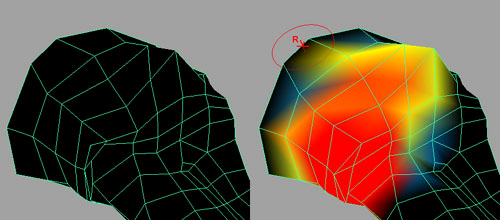
    The Sliding direction is now corrected so that it pushes out radially from the center line of the muscle direction node. This corrects the penetration problem.

  4. Scrub the timeline to see the animation.
  5. In the Channel Box under INPUTS, click the cMuscleSystem1 node.
  6. Toggle the Enable Sliding option on and off to compare how the mesh looks with Sliding enabled and disabled.
  7. Continue to paint weights and create direction nodes as needed, or open DragonLeg_Sliding_End.mb to see a finished example.

Beyond the lesson

In this lesson you learned how to: