


Lesson 4: Painting Sticky
weights to simple muscle
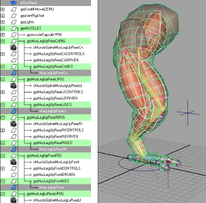
In the previous lessons, you created muscles and bones and set skin weights for the bone capsules. In this lesson, you add weights for simple muscles. This is the same process as weighting for bones, except with muscle weights, the mesh deforms not only when the muscle moves as a whole, but also when its surface moves or jiggles. Since the skin mesh is effectively attached to the muscle surface with Sticky weights, when the muscle jiggles or bulges, so does the skin that is weighted to it. This step alone can give a high level of additional realism and interest to your rigs.
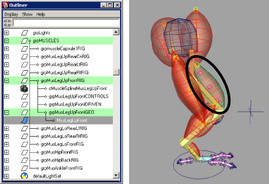
Just as you connected the bones in an earlier lesson, you first need to connect the muscles to the Muscle skin deformer. Since they were created with the Muscle Builder, they are already rigged with the cMuscleObject shape node and can be immediately connected.
Visualize the Sticky Bind distance
Unlike weighting to bones, when weighting to muscles the skin mesh points are bound to the surface of the muscle. Setting this operation up takes some time, so when the muscles are first connected, a Sticky Bind operation is calculated from the skin to the muscle. In order to speed up this calculation, only points within a certain distance from the center of the muscle are calculated. For example, a muscle for a character’s left arm typically does not need to be weighted to points on the character’s right leg. Sticky Bind ensures that only points close to the muscle are calculated.
To control this, once you attempt to connect a simple muscle, a window appears asking you what Sticky Bind distance to use. Typically, using the Auto-Calculate value is sufficient, but there may be cases where you want to preview the effect of this value. As an example, we can take a muscle and visualize the Sticky Bind distance for it.
Any points within the Sticky Bind distance are calculated, and can be weighted to the muscle properly. Any points outside this distance are ignored. Note that this process is simply setting whether the point is allowed to be weighted, it does not actually do any weighting. Any points outside the distance can have weights set, but usually deform incorrectly. If you set the distance too low, you can always go back and re-bind Sticky (even to the entire mesh) later.
To visualize the Sticky Bind distance
A yellow visualization sphere appears around the selected muscle.
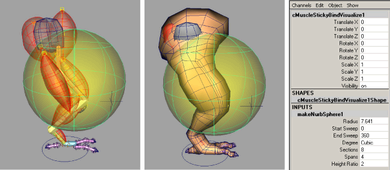
The radius of the sphere can help you visualize the Sticky Bind distance.
The Sticky Bind Maximum Distance window appears. For more information see Sticky Bind Maximum Distance dialog box.
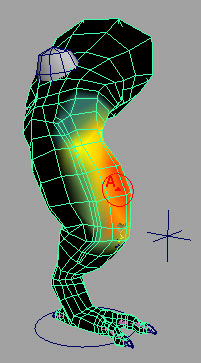
Each muscle is connected to the Muscle skin deformer and set up to allow for Sticky weights. When this process is complete, you can paint muscle weights the same way you painted bone/capsule weights.
The Muscle Paint window appears. Just like painting the capsule weights, you can use this window to paint or set Sticky weights for the muscles.
A good way to paint muscle weight is to slowly add up weight from the bones onto the muscle.
You can find the completed file for this lesson, DragonLeg_Sticky_End.mb, in the Maya Muscle Advanced Techniques folder. This file also has an adjusted animation to display muscle deformation.
 -click
the
-click
the