


Preparing to solve
Are there enough track points for you to solve the camera movement? Follow these instructions to see how you make this decision.
To decide if you are ready to solve for the camera movement
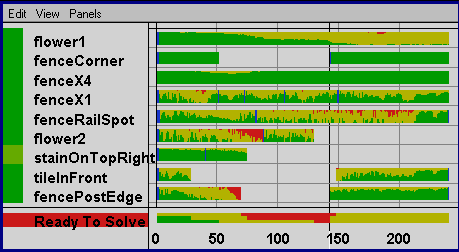
In the middle frames, such as frame 135, there is less track data. However, on this frame and all frames in the middle, there are at least four.
Small areas of red are okay. A track point’s graph does not have to be completely green in order to solve. In general, if you do find a large area of red for a point, either retrack over the region or select it in the Track Summary graph and choose Edit > Delete Region.
A blue tick mark indicates you moved the track box for that frame. You may have moved it accidentally—for example, if you clicked on the track box to select it. Click on the blue tick mark to go to that frame. Then, in the pointCenteredCamera view, compare the frames next to this frame. A shift as small as one pixel can cause problems when you solve.
If you see a sudden shift between the frames, go to that region in the Track Summary graph, select two or three frames (you can simply estimate), and choose Edit > Delete Region.
It’s mostly green and yellow, with little red. The red area is mostly in the middle because there is less track data there. However, since you meet the minimum number of points, it’s worth trying to solve. You can always add more track points later.