


Learning Resources > Tutorials > Getting Started with Maya > Live > Lesson 2: Solving with
survey data >
Evaluating the solution
with imported geometry
The best evaluation of your solution is to set an object in front of the solved camera and see if it matches the background as you play the animation. In this case, we will import a fence modeled in Maya.
Before you load the modeled fence, do the following steps to add one more survey constraint. You add a Point constraint to orient the solution so fenceCorner is at the origin. You need fenceCorner at the origin because the fence model has its corner at the origin and you want the two to match exactly.
To reorient the solution with fenceCorner at the origin
You will now import a fence that has been modeled to exactly match the fence that was filmed.
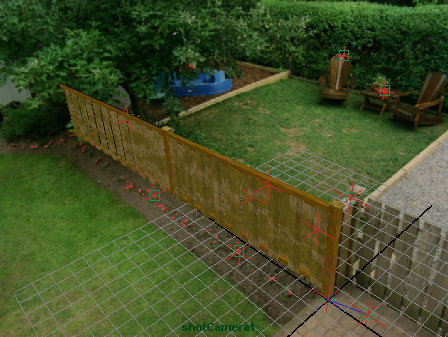
In frame 1, you can see that the modeled fence accurately matches the fence that was filmed. To quickly see if it matches well in the other frames, you can scrub through the shot in the Time Slider.
The fence model does not appear to slip in relation to the background, so this confirms that the solution is accurate. If you rendered a sequence of the camera moving around the modeled fence, you could composite the sequence with the original background and they would exactly match.
Although scrubbing tends to skip frames, it gives a preliminary confirmation that the fence model matches the background in all frames.
The Playblast movie is an approximation of how the rendered sequence will appear. In this movie, you can look for subtle mismatches between the model and the background, such as momentary jitter.