Learning Resources > Tutorials > Getting Started with Maya > Character Setup > Lesson 1: Skeletons and
kinematics >
Creating joints
A skeleton is made of bones and joints. When you create a skeleton in Maya, you create a series of joints in the skeletal locations where you want the character to bend or twist.
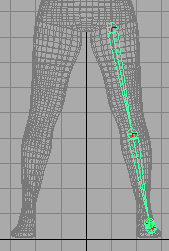
A common technique for creating a skeleton is to create several independent joint chains—one for each arm, one for each leg, one for the spine/head—then group the chains together to create a single skeletal hierarchy. In the steps that follow, you create the joints for the legs.
This displays the joints smaller when you create them in the next steps. At the default size, 1.0, the size of the joints makes them hard to position accurately for this character.
The Hypergraph is a convenient place to select, rename, and parent objects. It is similar to the Outliner, but it has features tailored for character setup. For example, it depicts all parent-child relationships in an easy-to-read indented format.
The Hypergraph shows the default names given to the joints just created: joint1, joint2, and so on. The joints have a hierarchical relationship. Joint1 is the parent of joint2, which is the parent of joint3, and so on. Joint1 is the root of the hierarchy. If you reposition joint1, you reposition the whole joint chain.
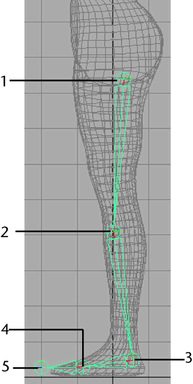
In the scene view, joints are represented by spherical icons. Bones separate the joints, and are represented by elongated pyramid icons. The narrow part of a bone points in the downward direction of the hierarchy.
The reason you create the hip joint first and the toe joint last is to have the hip at the top of the hierarchy and the toe at the bottom. You’ll usually want the toe (and other joints) to move whenever you move the hip, but not necessarily vice versa. In general, joint chains emanate from the interior of the character outward.
As mentioned before, when you move a joint, all joints lower in the hierarchy move with it. If you press Insert (Windows and Linux) or Home (Mac OS X) while a joint is selected, you can move the joint without moving joints below it in the hierarchy. (To exit this mode, press Insert or Home again.)
 . In
the options window, turn on YZ for Mirror Across.
. In
the options window, turn on YZ for Mirror Across.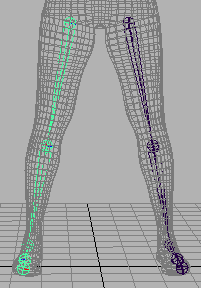
Jackie’s legs straddle the YZ plane, so mirroring the joint chain across the YZ plane positions the duplicate joint chain in the desired location. This operation illustrates that Jackie’s original position affects the ease with which you can create the skeleton. Had Jackie been positioned away from the origin, you would not have been able to use Mirror Joint conveniently to duplicate the leg’s joint chain.
The Replacement names for duplicated joints feature automatically replaces the names of all duplicate joints with the specified joint prefix.
The right leg bones and joints appear in a mirrored position.
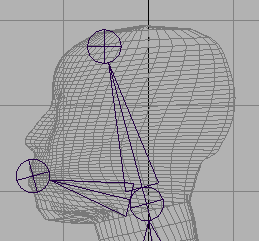
In the next steps, you create a joint chain for the spinal column. You also extend a joint from the upper neck region of the joint chain so that you can animate the jaw.
To create joints for the spine and jaw
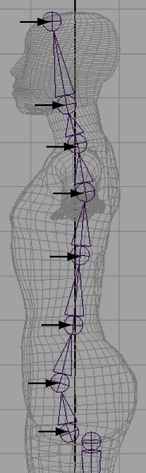
With the exception of the joints at each end of the joint chain, the joints are located where the character is likely to bend or twist at the spine and neck.
The S-shaped curvature of the joint chain resembles Jackie’s spinal curvature. This makes it easier to animate the character’s torso and neck naturally.
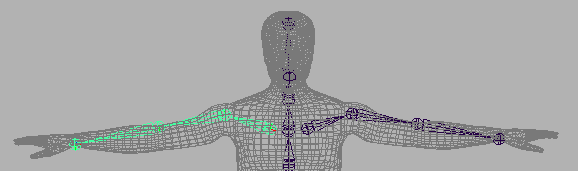
Creating joints for the arms is similar to creating joints for the legs.
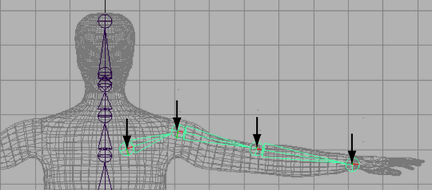
Moving the joint to the back of the arm creates a bend at the elbow. This will make it easier to animate the character’s arm in the direction an arm naturally bends.

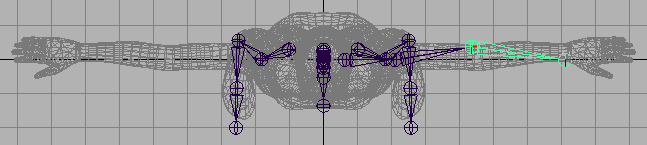
The right arm bones and joints appear in a mirrored position.