


Learning Resources > Tutorials > Getting Started with Maya > Rendering > Lesson 2: Shading surfaces >
Assigning textures
For an orange, one color may be all that you need. In this section, you will go a step further by making a logo stamp appear on the orange skin. For this and other color effects, you need to apply a texture to your material.
In visual arts, a texture is any kind of surface detail, both visual and tactile. In Maya, a texture is a collection of attributes that creates surface detail. Textures have a more specialized display purpose than materials. For example, you can use textures to create the appearance of a marbled pattern, bumps, or a logo image on the side of a can.
In the Maya Help, a texture is also referred to as a texture node. A node is a collection of attributes (or actions) with a common purpose. A shader is sometimes called a shader node or material node.
To display a texture on a surface, you apply a texture node to an attribute of the surface material. In the next steps, you apply a texture to the Color attribute of the Phong E material.
To apply a texture to a material

The Create Render Node window displays a list of the textures you can apply. The texture names and their icons help you to decide which texture is appropriate for the effect you want.
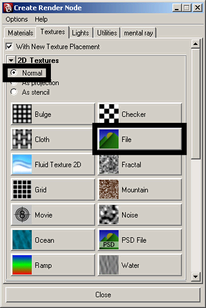
To create the logo stamp effect, you will use the File texture. A File texture uses an image file that you or someone else created separately, such as a drawing from a paint program. For this lesson, you’ll use an image we created for you.
The Normal option means Maya will stretch the texture evenly around the surface. The other settings—Projection and Stencil—are other ways you can apply a texture. You will learn about these settings at the end of the lesson.
At this point the system may prompt you with the warning that “The IPR file does not have enough information to support your most recent change”. Select “Close the IPR file and stop tuning”. The file1 node appears in the Attribute Editor.
The file texture also causes the sphere to turn white in the scene view and black in a rendered view. This is a temporary color until you specify the actual file name of the file texture.
Maya looks for source images in a default sourceimages directory. However, Maya can use file texture images anywhere on your workstation or local network. For example, you could have them on a central disk drive that is shared among your coworkers.
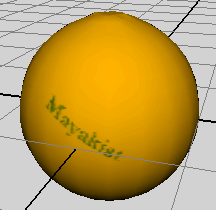
The file texture with a Mayakist logo now appears on the sphere. The logo is somewhat jagged, which will simulate the look of an ink stamp on rough orange skin.

The place2dTexture1 tab is a node with attributes that control the texture’s position on the surface.
If you select another object and the Attribute Editor no longer displays the file texture attributes, it’s easy to restore the display. Right-click the sphere, select Material Attributes, and click the texture map icon next to the Color attribute.
In this case, the texture placement needs almost no adjustment. For the ease of this lesson, we created a file texture that conforms to the sphere’s shape by default. In practice, placing file textures requires more adjustment. For details, see Preparing for the lessons.