User Guide > Rendering and Render Setup > Shading > Shading Windows and Editors > Hypershade > Hypershade toolbars >
Hypershade main
toolbar
These are the buttons on the Hypershade main toolbar. For more information about Hypershade, see Hypershade window.


These work just like Back and Forward page commands in a web browser. As you graph and work with networks in the Work Area, Hypershade remembers the networks that have been shown. Use Show Previous Graph to step back through the networks. Use Show Next Graph to move forward through the networks.
The hot keys for the Show Previous Graph and Show Next Graph operations are "[" and "]" respectively.
You can also access these functions from the Graph menu of the Hypershade menu bar.

Clears the current Hypershade layout.
You can also access this function from the Hypershade menu bar ( Graph > Clear Graph).

Rearranges the nodes in the current layout to display all nodes and networks.
You can also access this function from the Hypershade menu bar ( Graph > Rearrange Graph).

Displays the Hypershade layout of nodes and, or shading networks for the selected objects.
You can also access this function from the Hypershade menu bar ( Graph > Graph Materials on Selected Objects).

Displays only the input connections of selected nodes. See also Input Connections.
For more information on render node connections, see Render node connections.
You can also access this function from the Hypershade menu bar ( Graph > Input Connections).

Displays the input and output connections of the selected nodes. See also Input and Output Connections.
For more information on render node connections, see Render node connections.
You can also access this function from the Hypershade menu bar ( Graph > Input and Output Connections).

Displays only the output connections of selected nodes. See also Output Connections.
For more information on render node connections, see Render node connections.
You can also access this function from the Hypershade menu bar ( Graph > Output Connections).

Removes the selected container node from the Hypershade. Connections to and from nodes inside of the container node are unaffected.
When the container node is nested within one or more other container nodes, the nodes within the container being removed are moved into the parent container node one level up in the hierarchy.

Increases the display size of the selected container node(s) to display all of the nodes within.
See Assemble nodes into logical groupings using container nodes in the Hypershade for more information on how to use container nodes.
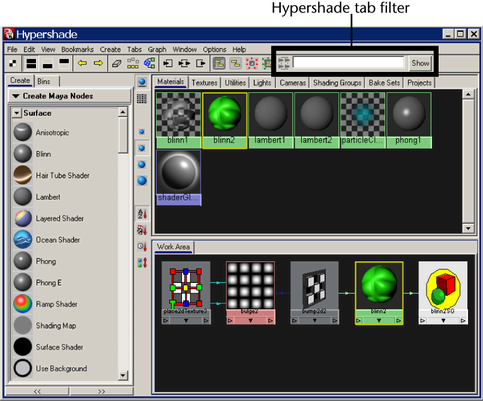
Every scene tab (also called an Asset tab) in Hypershade has controls for filtering the nodes displayed in the tab (similar to the ones in HyperGraph).
By default, each scene tab has an implicit filter that is determined by the tab type specified when the tab was created (or by the default tabs when the scene was first created). The tab only displays nodes that pass this filter, and you cannot disable this filter. For example, a Materials tab shows only material nodes.
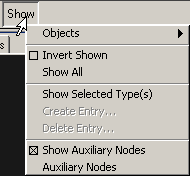
However, you can filter the nodes in a tab by name (in the text box) or by type (with the Show button).
At any given time, one or more of these filters can apply to each scene tab. Only nodes that pass all of the applied filters are displayed. You can clear filters at any time.