


User Guide > Rendering and Render Setup > Shading > Shading Nodes > Material nodes - Maya software > Surface materials >
Common surface material
attributes
The following attributes are common to most surface materials.
For material-specific specular shading attributes, see the particular material. For example, for information on the specular shading attributes of the Anisotropic material, see Anisotropic.
The material’s basic type (such as Blinn or Phong).
When you change a material’s type, only those attributes common to both types retain their previous values or settings. For example, if you change the material type from Blinn (which has a Color attribute and a Specular Color attribute) to Lambert (which has a Color attribute but no Specular Color attribute), the Color setting is preserved, but the Specular Color setting is lost.
A material’s color and level of transparency. For example, if the Transparency Value is 0 (black), the surface is totally opaque; if the Transparency value is 1 (white), the surface is totally transparent.
To make an object semi-transparent, set the Transparency color to a shade of grey or to the same color as the material Color. The default value is 0 (black).
If you change Transparency from the default black (0), the background of the material’s Hypershade swatch becomes a checkered pattern. This is a visual aid and is not rendered.
For more information, see Transparency.
Set to black by default, which means it does not affect the material’s Color. As the Ambient Color becomes lighter, it affects the material’s Color by lightening it and blending the two colors. If there are ambient lights in the scene, the color and brightness of those lights is used to control how much the ambient color contributes to the final color of the material.
Makes the surface appear rough or bumpy by altering surface normals (during rendering) according to the intensity of the pixels in the bump map texture. A bump map does not actually alter the surface. A silhouette of the surface appears smooth.
For more information about bump mapping, see About surface relief.
Gives the material the ability to reflect light in all directions. The Diffuse value acts like a scaling factor applied to the Color setting—the higher the Diffuse value, the closer the actual surface color is to the Color setting. The valid range is 0 to infinity. The slider range is 0 (no light is reflected in all directions) to 1, but you can type in a higher value. The default color value is 0.8.
Gives the material the ability to transmit and diffuse light. Light falling on a translucent surface is first absorbed beneath the surface, and then diffused in all directions. If set to 0, the default, no light shows through the object. If set to 1, all the light shows through. The default value is 0.
Simulates the way light diffusely penetrates through translucent objects. For example, when light shines on one side of the object, the other side is partially illuminated. This can be used for effects such as clouds, fur, hair, marble, jade, wax, paper, leaves, and so on. (To see this effect, turn on raytraced shadows for the light shining on the object.)
Translucence depth is based on worldspace. If it is set to 0 (the default), no light shows through the object. If set to 10, light penetrates through the surface, 10 units past the point where the object is in shadow.
The Translucence Focus value controls how much translucent light is scattered depending on the direction of the light.
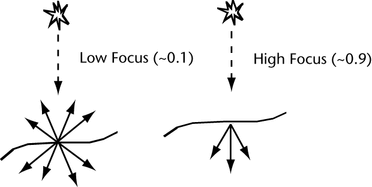
For example, use a high value for very thin materials, such as wax paper or steam, where most of the light is scattered over a small angle relative to the light’s direction. The object looks brightest with the light source directly behind it.
![]()
Use a mid-range focus value for items such as leaves. The leaves glow when backlit, but do not wash out when lit from the front.
![]()
Use a low focus value for thicker objects, such as wax. To compensate for the added light and avoid a washed out result, lower the diffuse value, or lower the overall color (which also affects ambient lighting).
![]()