


Learning Resources > Tutorials > Getting Started with Maya > Rendering > Lesson 1: Rendering a scene >
Rendering using the Maya
software renderer
You are nearly ready to render the entire animation to disk. You must first switch camera views so you can render the scene from the point of view of the camera that was animated for this lesson. When animating a camera it’s a good practice to create a second camera to animate, rather than animating the default persp camera. In that way you can return to the default perspective view should it become necessary.
Rendering the entire animation can take a lot of time, so it is useful to first use Maya’s software renderer to test render a few frames to your monitor and examine the results.
Once you are satisfied with the quality of a few rendered frames, you can render the entire animation to disk.
To switch camera views and playback the animation
The view updates to display the scene as seen through the lens of the apple_camera.
During playback, the animated camera tracks and tumbles about the apple.
To test render the current frame of animation
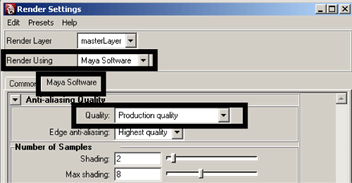
This setting provides high quality results by smoothing any jagged surface edges in the rendered image.
This menu item uses the software renderer to render a single frame of the scene that you rendered with IPR previously but from the point of view of the animated apple_camera.
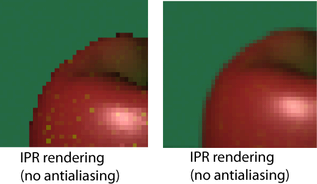
You might not see a big improvement in quality as compared to the IPR-rendered image. If you dolly the camera closer to the apple and render once with IPR and once with the software renderer, you will see an improvement at the edges of the apple as shown below:
Ensure that the rendered image looks good at this frame also.
Now that you’ve checked a pair of rendered frames that represent the entire animation, you are ready to render the entire animation sequence. In your own projects, you might want to test render several frames, particularly where new shading and lighting elements occur in the animation.