Show in Contents

Add to Favorites

Home: Autodesk Maya Online Help

Surface Approximation settings (Attribute Editor)

Rendering Windows and Editors

Render Settings

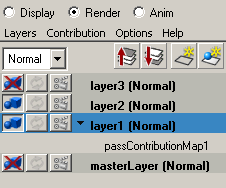
Render Layer Editor
From the Render
Layer Editor, you can create, manage, and delete layers, layer
blends, and layer overrides. You can also create render pass
contribution maps for your render layers. A render pass
contribution map is a subset of the objects in your render layer
that you can create render passes for.
NoteThe multi-render
pass feature is supported for the mental ray renderer. The rendering
API allows other 3rd party renderers and custom renderers to support
it moving forward.
You can open the Render
Layer Editor in a separate window or view it in the same
docked area as the Channel Box. To open the Render
Layer Editor in a new window, select Layers >
Floating Window.
The general workflow
for using the Render Layer Editor is as follows:
Create layers
Click the icons at the
top to create a new layer  , or
create a layer and assign selected objects
, or
create a layer and assign selected objects  .
.
Ordering of layers
Render layers are ordered
based on their compositing order. The bottom of the list are the
background elements, and the top of the list are the front most elements.
The render layer compositing order can only be edited from the Render
Layer Editor.
Use the up  and down
buttons
and down
buttons  to move
render layers up and down. The buttons are only active if a single
render layer is selected. You can also use the middle mouse button
to drag the layers up and down.
to move
render layers up and down. The buttons are only active if a single
render layer is selected. You can also use the middle mouse button
to drag the layers up and down.
Per layer overrides
Follow these guidelines
to perform per layer overrides:
Previewing layers
- Select a blend mode for each layer from
the drop-down list.
- The Render All Layers option (Options
> Render All Layers) selects whether all layers are
composited and rendered to the Render View, or whether just the
selected layer is rendered. In the options for this command (Option
> Render All Layers >
 ), you
can further select whether to show the composite image, the composite
image and the individual rendered layers, or just the individual
rendered layers.
), you
can further select whether to show the composite image, the composite
image and the individual rendered layers, or just the individual
rendered layers.
- Click the
 icon
next to each layer to set whether a layer is renderable or not.
icon
next to each layer to set whether a layer is renderable or not.
Render pass contribution
maps
You
can create render pass contribution maps for each render layer.
For example, if your render layer consists of 5 objects and 2 lights,
you can create a diffuse pass, an ambient pass, and a specular pass
for only 3 of the objects and 1 of the lights. To do so, create
a pass contribution map containing the 3 objects and the light that
you would like to create your diffuse, ambient and specular pass
for. You can create multiple pass contribution maps for each render
layer. You can also share pass contribution maps between render layers.
Click the  icon
to expand or collapses the list of pass contribution maps associated
with the selected layer. This icon appears after you have associated a
pass contribution map with the layer.
icon
to expand or collapses the list of pass contribution maps associated
with the selected layer. This icon appears after you have associated a
pass contribution map with the layer.
Render Layer Editor menus
Layers menu
- Create Empty Layer
-
Creates a new render
layer, depending on the selection in the pull-down menu, with a
default name, for example layer1.
- Create Layer from Selected
-
Creates a new render
layer and populates it with the selected objects.
Copy Layer >
Duplicates the selected
layer.
There are two options
available with this feature:
- With membership and overrides
-
Select this option to
copy both the objects and render layer properties to the new layer.
- With membership
-
Select this option to
copy only the objects to the new layer and create new overrides
for the duplicated layer.
- Select Objects in Selected
Layers
-
Selects the objects contained
in the selected layer(s).
- Remove Selected Objects
from Selected Layers
-
Removes selected objects
from the selected layer(s)
- Membership
-
Opens the Relationship
Editor for removing or adding objects to layers.
- Attributes
-
Opens the Attribute
Editor for the selected layer(s). There are some attributes
in the Attribute Editor not available
through the Edit Layer window.
- Delete Selected Layers
-
Deletes the selected
layer(s), but not the objects in the layer.
- Delete Unused Layers
-
Delete layers if they
have no content.
- Floating Window
-
Select this option to
open a separate, floating Render Layer Editor window.
Contribution menu
You can create your render
pass contribution maps using this menu.
- Create and Associate Pass
Contribution Map
-
Create a new pass contribution
map and associate it with the selected layer.
- Associate Existing Contribution
Map
-
The submenu provides
a list of pass contribution maps available in the scene. Select
the desired contribution map to associate it with the current layer.
- Copy Pass Contribution Map
-
Duplicate your selected
contribution map.
- Select Objects in Selected
Pass Contribution Maps
-
This option indicates
which objects belong in the selected pass contribution maps. All
objects in the pass contribution map are selected.
- Add Selected Objects
to Selected Pass Contribution Maps
-
Use this option to add
the selected objects to the selected pass contribution maps.
- Remove Selected Objects
from Selected Pass Contribution Maps
-
Use this option to remove
objects from the selected pass contribution maps.
- Delete Selected Pass Contribution
Maps
-
To remove a pass contribution
map or multiple pass contribution maps, select the map(s) and then
choose this option.
- Delete Unused Pass Contribution
Maps
-
Pass contribution maps
that do not have geometries and lights assigned to them are removed
with this option.
- Membership
-
Opens the Relationship
Editor window.
- Attributes
-
Opens the pass contribution
map Attribute Editor.
Options menu
You can set the following
binary options:
- Make New Layers Current
- Add New Objects to Current
Layer
- Auto Overrides
- Show Namespace
- Render All Layers
-
Renders all the layers
in the scene based on the default Render All Layers Options.
Render All Layers >
Select one of the following
options:
- Composite layers
-
Renders a composited
result of all layers and displays it in the Render
View. This is the default for Render All Layers.
- Composite and keep layers
-
Renders all your layers
as individual images, but displays a composited result.
- Keep layers
-
Renders all your layers
as individual images.
NoteUsing Keep
layers significantly increases memory usage in Maya.
Consecutive use populates the Render View with
more and more images. You must clear out images manually as needed.
Auto Overrides
The Auto
Overrides option simplifies the workflow for creating
layer overrides for attributes such as Casts Shadows, Receive
Shadows, and Visible in Reflections.
The Auto
Overrides option is applicable to the following attributes:
- Under the Render Stats section
(of the Attribute Editor) of the object's shape
node:
- Casts Shadows
- Receive Shadows
- Motion Blur
- Primary Visibility
- Visible In Reflections
- Visible In Refractions
- Under the Display section
(of the Attribute Editor) of the object's
transform node:
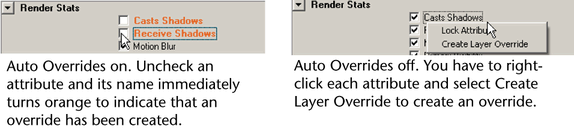
When the Auto
Overrides option is on, you can simply click on each
of these attributes and an override will be created for the selected
layer. Upon being unchecked, the attribute name immediately turns
orange to indicate that a layer override has been created. This
eliminates the need to right-click the attribute and select Create
Layer Override.
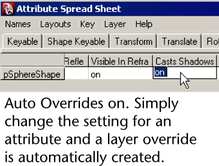
TipIf your scene contains
a lot of surfaces, you can also use the
Attribute Spread Sheet to
create a layer override. As in the case of the
Attribute
Editor, when the
Auto Overrides option
is on, you can simply change the setting for each of the attributes
and a layer override is automatically created.
This feature is most
useful when there are multiple objects/layers in the scene for which
overrides need to be created. This feature simplifies the workflow by
eliminating the need to select Create Layer Override.
- Show Namespace
-
When using namespaces,
object names can sometimes get very long. This can make it difficult
to differentiate objects by name. Turning off the display of namespaces
replaces the namespace portion of a node’s name (if any) with “...:”.
The shortened name makes it easier to distinguish between different
objects in your scene.
NoteNamespaces are the
preferred method for managing naming when working with file references
in Maya. It is not recommended that you employ Maya's renaming prefix
convention when using file referencing. While the DAG path or long
name of a node may make it unique when using renaming prefixes,
they do not work consistently within file referencing and complicate the
hierarchical DAG changes, which may cause problems later on.
Render Layer Editor
Context-sensitive menus
Context-sensitive menu
for render layers
The following commands
are available when you right-click a layer:
- Add Selected Objects
/Remove Selected Objects
-
Add or remove objects
from a render layer.
- Select Objects in Layer
-
Selects objects that
belong to the current layer.
- Empty Render Layer
-
Removes all objects from
a layer, leaving it empty.
- Copy Layer
-
- Delete Layer
-
- Overrides
-
Expand the submenu to
select the desired override.
- Remove Render Setting Overrides
-
- Remove Render Flag Overrides
-
Removes any render flag
(layer attributes) overrides for the current layer. For more information,
see
Work with layer overrides.
- Remove Material Override
-
Removes the current material
override for the select object(s) on the current layer. For more information,
see
Work with layer overrides.
- Create New Material Override
-
- Assign Existing Material Override
-
Allows you to select
an existing material override for the current layer. For more information,
see
Work with layer overrides.
- Pass Contribution Maps
-
Expand the submenu to
choose among one of the following options.
- Create Empty Pass Contribution
Maps
-
Create a new empty contribution
map for the selected layer.
- Create Pass Contribution
Maps and Add Selected
-
Create a new contribution
map for the current layer containing the selected objects.
- Associate Existing Pass Contribution
Maps
-
The submenu provides
a list of pass contribution maps available in the scene. Select
the desired contribution map to associate it with the current layer.
- Add New Render Pass
-
Allows you to add a new
render pass to your layer. Expand the submenu to choose among one
of the available render passes.
- Membership
-
Opens the Relationship
Editor for removing or adding objects to layers.
- Attributes
-
Opens the Attribute
Editor for the selected layer(s). There are some attributes
in the Attribute Editor not available
through the Edit Layer window.
Context-sensitive menu
for pass contribution maps
The following commands
are available when you right-click a render pass contribution map.
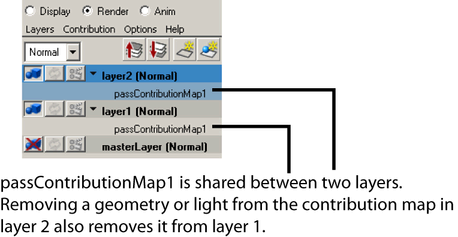
NotePass contribution
maps can be shared between several render layers. In this case,
removing a geometry or light from a pass contribution map in one layer
also removes it from the same contribution map in the other layers.
Therefore, you should exercise caution if you change the membership
of a pass contribution map that is shared between layers. To avoid
this problem, create separate pass contribution maps for each render
layer.
- <pass contribution map name>
-
Select the pass contribution
map name to display its Attribute Editor.
- Add Selected Objects / Remove
Selected Objects
-
Add or remove objects
from both the render layer and the
current pass contribution map.
- Select Objects in Pass Contribution
Map
-
This option indicates
which objects belong in the current pass contribution map. All objects
in the pass contribution map are selected.
- Remove Pass Contribution
Map from Layer
-
Remove render pass contribution
map from the current layer.
- Empty Pass Contribution
Map
-
Remove all objects from
render pass contribution map.
- Delete Pass Contribution
Map
-
Removes render pass contribution
map from all layers.
- Active
-
Sets the pass contribution
map as active so that it is respected when render passes are created.
- Add New Render Pass
-
Allows you to add a new
render pass to your render pass contribution map. Expand the submenu
to choose among one of the available render passes.
- Membership
-
Opens the Relationship
Editor for removing or adding objects to layers.
 between
red and green to re-render the layer or to recycle the previously
rendered image. To reuse the last rendered image for this layer,
toggle this icon to green
between
red and green to re-render the layer or to recycle the previously
rendered image. To reuse the last rendered image for this layer,
toggle this icon to green  .
.