Paint different ways in 3D


When you drag in a scene with the Paint Effects Tool, Paint Effects creates a curve and attaches a stroke and new brush to it which define the appearance and behavior of the paint applied along the stroke path.

Whether you paint in the scene view or the scene painting view, you can paint strokes on the grid plane of the perspective view, directly on objects, and on the view plane.

Paint in the scene view

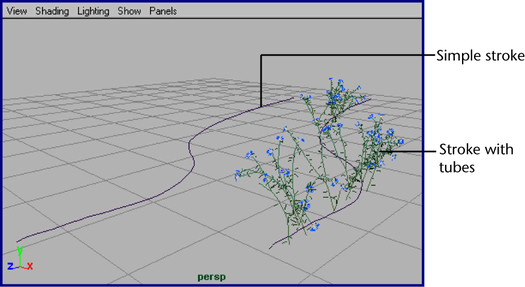
When you paint in the scene view, simple strokes display as curves. Strokes with tubes display as wireframe representations of the rendered stroke. Paint is not applied to the strokes until you do a post-process render, which makes painting in the scene view very quick. It provides immediate feedback in enough detail to see what you’re doing. To improve redraw speed, you can adjust the display quality of the wireframe strokes, just as you can adjust the display quality of objects displayed as wireframe.

Paint in the scene view when speed is an issue, but the final appearance of the strokes is not (for example, when you want to move strokes, or when you are painting many strokes with the same brush).

NotePainting in orthogonal views gives unexpected results. Paint in the Perspective view instead.

Render strokes as you paint

To preview the rendered look of the strokes as you paint, click on the Draw As Mesh option in the Paint Effects panel.

Alternatively, you can render the strokes as you paint them in the Paint Effects scene painting view. The scene painting view is a snapshot of the scene view. You can zoom, tumble, track, and dolly this view, and the scene painting view will update accordingly. You can render all the Paint Effects strokes or render them individually (no other objects in the scene render).

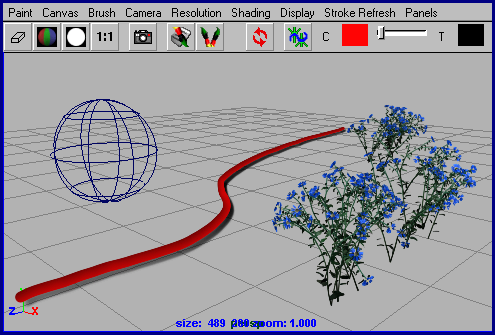
Paint in the scene painting view when you need to see what the strokes look like, but you don’t want to do a final render (for example, when you are defining new brush presets). You cannot use the transform tools, or any modeling tools in this view. Although you can select objects in the scene painting view and transform them in the Attribute Editor or Channel Box, it is best to use the scene view for non-painting tasks.

To display the scene painting view

  1. On the view menu bar, select Panels > Panel > Paint Effects to open the Paint Effects panel. The Paint Effects Tool is automatically selected.
    TipAs a shortcut, press the 8 hotkey to open the Paint Effects panel in the workspace. For information on other Paint Effects hotkeys, see Use default Paint Effects hotkeys.

    You can open the Paint Effects panel as a separate window by selecting Window > Paint Effects.

  2. Select Paint > Paint Scene. The Paint Effects scene painting view displays.

    For information on changing the display resolution of the scene and displaying the RGB display, alpha, and luminance planes, see Painting in the Paint Effects Panel. These features are common to both canvas and scene modes of the Paint Effects panel.

Refresh the scene painting view

Zooming, tumbling, tracking, or dollying the scene painting view takes a new snapshot of your scene, rendering strokes according to the options you select on the Stroke Refresh menu. These options include:

Off

Strokes display as wireframe at their display quality when you zoom, tumble, track, or dolly the view.

Wireframe

Strokes display as wireframe at 100% display quality when you zoom, tumble, track, or dolly the view.

Rendered

All strokes render when you zoom, tumble, track, or dolly the view.

Selected Only

Only selected strokes render when you zoom, tumble, track, or dolly the view. Unselected strokes display as Wireframe (100% display quality).

To render all strokes in the scene

  1. Do one of the following:
    • Click the Redraw button on the toolbar.
    • Select Stroke Refresh > Rendered.
      TipIf you have complex strokes in the scene that are taking a long time to redraw, press the Esc key on your keyboard to stop the redraw.

Change the scene painting view camera

By default, the scene painting view uses the perspective camera (persp). Just like you can change the camera in the scene view, you can change the camera for the scene painting view.

To change the scene painting view camera

  1. From the Camera menu, select the camera name (persp, front, side, top). Changing the camera causes the view to redraw (the strokes are rerendered).

To change the camera for the scene view, you select a camera from the Panels > Orthographic submenu.

NoteIn this release of Paint Effects, only the perspective view (persp) produces predictable results.

Change the resolution of the scene painting view

Because the scene painting view is a snapshot of the scene view, you can set its display resolution. With lower resolutions, you will see pixelated effects, but the strokes will render more quickly when you refresh the view.

To change the resolution of the scene painting view, select the desired resolution from the Resolution menu. The final render is not affected by these settings.

Full

Fits the view to the available space and displays it at maximum pixel size (no zoom).

75%, 50%, 25%, 15%

Displays the view at the selected percentage of the full resolution, occupying the same the screen area by increasing the zoom level.

Actual Size

Displays the view at its actual pixel size (no zoom). You can also use the 1:1 button on the toolbar.

Change object shading in the scene painting view

Use the commands on the Object Shading menu to change the shading of objects in the scene painting view. These options include:

Wireframe

Draws edges for polygon meshes and isoparametric curves for surfaces. This is the default shading quality.

Shaded

Renders all surfaces, meshes, and particles as smooth-shaded objects.

Textured

Displays a hardware rendition of the texture applied to a material shading an object.

Use Default Lighting

Surfaces appear fully illuminated by the Paint Effects default light.

Use All Lights

Surfaces appear illuminated by all lights in the scene.

Display fog

In the real world, the atmosphere contains fine particles (fog, smoke, or dust). These particles affect the appearance of the atmosphere and the appearance of objects in the atmosphere.

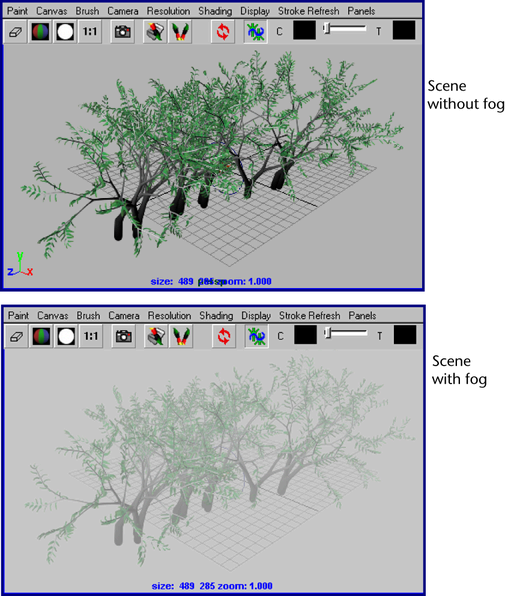
In Maya, you can simulate the effect of atmospheric particles using environment fog. If you use Physical Fog in your scene, you can display it in the scene painting view to see how the Paint Effects strokes look in a rendered fog environment. For information on using Physical Fog, see the Shading guide.

To display fog in the scene painting view

  1. Select Object Shading > Display Fog.

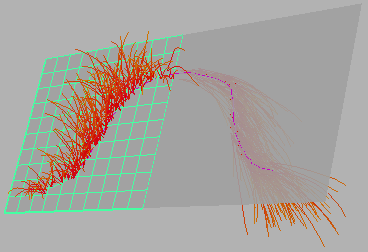
Paint on the grid plane of the perspective view

When you paint on the grid of the perspective view, the stroke lies on that plane.

To paint on the grid plane of the perspective view

  1. Select Paint Effects > Paint on Paintable Objects.
  2. Ensure there are no paintable objects in the scene. To do this, in the scene view, deselect all objects by clicking anywhere on the scene that is not an object, then select Paint Effects > Make Paintable.
  3. In the Visor ( Paint Effects > Get Brush), or on a shelf, click the brush preset you want to paint with.
  4. Modify stroke settings, if necessary ( Paint Effects > Paint Effects Tool > ). For information on modifying stroke settings, see Define default stroke settings.
  5. Modify brush attributes, if necessary ( Paint Effects > Template Brush Settings, or use the Ctrl-b (Linux and Windows) or Control-b (Mac OS X) hotkey combination. For information on modifying brush attributes, see Define template brush settings.
    TipYou can use hotkeys on the canvas to interactively change the Global Scale (set ModifyUpperRadius, default hotkey, b), the Brush Width only (set ModifyLowerRadius), and Stroke Offset (set ModifyDisplacement, default hotkey, m) under Brush Tools in the Hotkey Editor. For information on other Paint Effects hotkeys, see Use default Paint Effects hotkeys.
  6. In either the scene view or the scene painting view, drag across the plane.

    For information on the scene painting view, see Render strokes as you paint. For information on working in the scene painting view, see Automatically paint multiple strokes on a surface.

Paint on objects

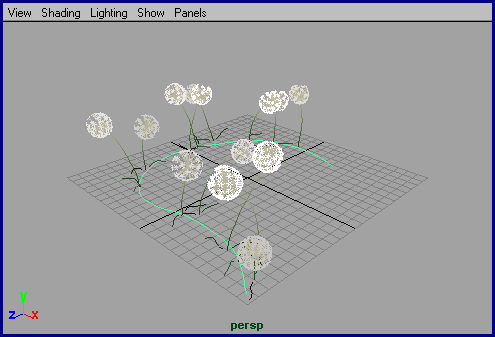
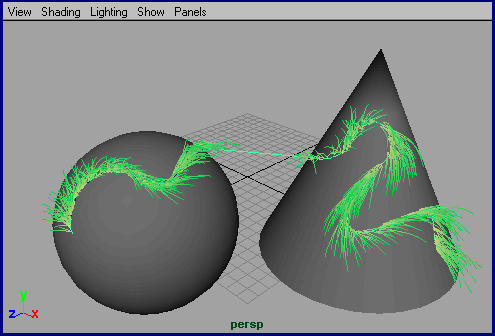
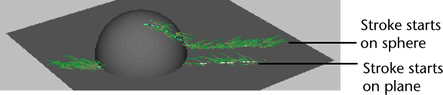
To paint on NURBS or polygonal objects, you must first make the objects paintable. When you paint directly on a paintable object, Paint Effects creates a curve on the surface along the stroke path and attaches the stroke and new brush to it. When you translate the object, the stroke moves with it. You can offset the brush from the surface.

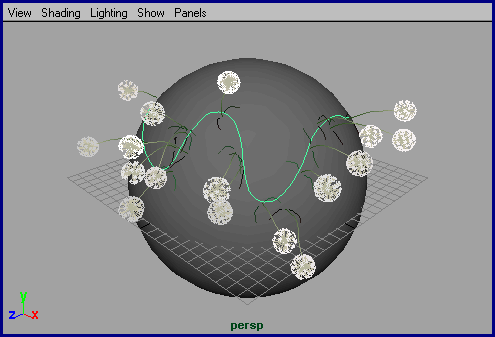
As you paint, the stroke does not leave the surface unless you paint over another object that is paintable. If you do paint across another paintable object during the stroke, the stroke will continue on the other object, bridging the two objects.

NoteYou can only paint on NURBS or polygonal objects.

Note
  • Because the stroke attempts to stay on the surface, the result may be unexpected. For example, suppose you have a sphere intersecting a plane. If you start painting on the sphere, once the brush leaves the sphere, it looks for another surface to continue on, the plane in this case. However, if you start to paint on the plane, the brush never leaves the surface, so the stroke doesn’t continue on the sphere.

  • When you paint across the joined edges of a surface (for example, the center line on a face created by duplicating half the face and attaching it to the first half), your brush stroke may appear to “leak” through the join. To remedy this, make the surface periodic in U and V.
  • Duplicating objects with strokes does not duplicate the strokes.

To paint on objects

  1. Select the NURBS or polygonal object(s) you want to paint on. If you are in the scene painting view, Ctrl-click (Windows and Linux) or Control-click (Mac OS X) on an object to select it.
  2. Select Paint Effects > Make Paintable.
    Note
    • When you select Make Paintable, only the currently selected objects are paintable. Any objects previously made paintable become unpaintable.
    • When you save and retrieve the scene, any paintable objects become unpaintable. To paint on these objects, you must make them paintable again after retrieving.
  3. Select Paint Effects > Paint on Paintable Objects.
    NoteIf there are no paintable objects in the scene, your strokes will lie on the grid plane of the perspective view.
  4. In the Visor ( Paint Effects > Get Brush), or on a shelf, click the brush preset you want to paint with.
  5. Modify stroke settings, if necessary ( Paint Effects > Paint Effects Tool > ). For information on modifying stroke settings, see Define default stroke settings.
  6. Modify brush attributes, if necessary ( Paint Effects > Template Brush Settings). For information on modifying brush attributes, see Define template brush settings.
    Tip
    • You can use hotkeys on the canvas to interactively change the Global Scale (set ModifyUpperRadius, default hotkey, b), the Brush Width only (set ModifyLowerRadius), and Stroke Offset (set ModifyDisplacement, default hotkey, m) under Brush Tools in the Hotkey Editor. For information on other Paint Effects hotkeys, see Use default Paint Effects hotkeys.
    • You can set a hotkey to reverse the surface normal when you paint strokes on mirrored surfaces. For details, see Reverse surface normals.
  7. In either the scene view or the scene painting view, drag across the plane.

    For information on the scene painting view, see Render strokes as you paint. For information on working in the scene painting view, see Automatically paint multiple strokes on a surface.

    TipTo paint on the grid plane of the perspective view after painting on objects, in the scene view, deselect all objects by clicking anywhere on the scene that is not an object, then select Paint Effects > Make Paintable.

Paint on the view plane

The view plane is the plane ortho-normal to the camera. You can think of painting on the view plane as painting on a sheet of glass that is facing the camera and fixed to it. When you change the view (for example, when you tumble), the view plane changes (the sheet of glass moves with the camera).

You can only paint on the view plane in the scene painting view—not the scene view. When you paint on the view plane in the scene painting view, each stroke renders on the view plane, as you would expect. However, the wireframe representation of each stroke displays between 0 and 1 in world space on the XY plane (near the origin). Although the wireframe representation of the strokes appear to overlap in this area, the rendered strokes display where you painted them.

NotePainting on the view plane while in the scene view gives unexpected results. Use the Paint Effects panel to paint on the view plane instead.

To paint on the view plane

  1. Select Paint Effects > Paint on View Plane.
  2. Open the Paint Effects panel (Panels > Panel > Paint Effects) and switch to the scene painting view (Paint > Paint Scene).
    TipAs a shortcut, press the 8 hotkey to open the Paint Effects panel in the workspace. For information on other Paint Effects hotkeys, see Use default Paint Effects hotkeys.

    You can open the Paint Effects panel as a separate window by selecting Window > Paint Effects.

  3. In the Visor ( Paint Effects > Get Brush), or on a shelf, click the brush preset you want to paint with.
  4. Modify stroke settings, if necessary ( Paint Effects > Paint Effects Tool > ). For information on modifying stroke settings, see Define default stroke settings.
  5. Modify brush attributes, if necessary ( Paint Effects > Template Brush Settings, or use the Ctrl-b (Linux and Windows) or Control-b (Mac OS X) hotkey combination). For information on modifying brush attributes, see Define template brush settings.
    TipYou can use hotkeys on the canvas to interactively change the Global Scale (set ModifyUpperRadius, default hotkey, b), the Brush Width only (set ModifyLowerRadius), and Stroke Offset (set ModifyDisplacement, default hotkey, m) under Brush Tools in the Hotkey Editor. For information on other Paint Effects hotkeys, see Use default Paint Effects hotkeys.
  6. Drag across the plane.

    For information on working in the scene painting view, see Automatically paint multiple strokes on a surface.

    NoteYour stroke renders on the view plane, however, the wireframe representation of the stroke appears on the XY plane between 0 and 1 in world space. To see this press the Alt (Linux and Windows) or Option (Mac OS X) key on your keyboard.

Reverse surface normals

When you paint a stroke on a paintable object, the tube growth is relative to the surface normal. You may find yourself painting on surfaces with reversed normals (for example, if you are painting on a model where one side is a mirror of the other), in which case the tubes will grow in the opposite direction.

To remedy this, switch the Opposite flag for the surface before you paint on it (turn it on or off). Switching the flag for the surface after painting a stroke will have no effect on the existing stroke.

To switch the Opposite flag

  1. Create a hotkey for Toggle Opposite Flag of Selected Shapes (select Window > Settings/Preferences > Hotkey Editor then click the Paint Effects category). For details on creating hotkeys, see the Basics guide.
  2. Select the surface.
  3. Press the hotkey to switch the flag.