


Learning Resources > Tutorials > Getting Started with Maya > Animation > Lesson 4: Nonlinear animation
with Trax >
Redirecting the motion
within a clip
Motion capture data can be used in a variety of ways. You can redirect the motion of a character using the same motion capture data. The Redirect tool allows you to alter the original animation for a character by modifying its path or orientation at any time during its animation. The Redirect tool does this by offsetting the translation and rotation attributes for the selected character.
For example, you can change the start or end point of a character’s animation by redirecting the character’s starting position or by redirecting its motion during the animation. You can redirect a character in an existing animation sequence in the scene or a character associated with a clip within the Trax Editor.
In the steps that follow, you redirect the skeleton to turn to the right while walking. The workflow for the redirection is as follows:
To create a redirection control for the skeleton
This frame is where the ball of the skeleton’s right foot is planted on the ground plane. Use this frame as the location where the skeleton will turn to the right.
 .
.
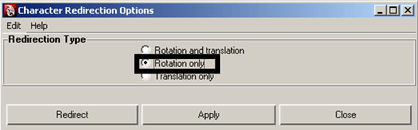
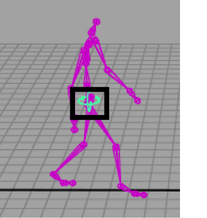
A Rotation redirection control appears between the hips of the skeleton, where the root joint for the skeleton’s hierarchy is.
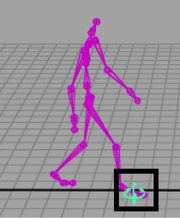
You want the skeleton to pivot (rotate) while standing on the ball of its right foot. To do this, you need to move the redirection control to the ball of the right foot of the skeleton.
To move the redirection control to the ball of the foot
The Move tool manipulator appears on the redirect manipulator.
Pressing the v key while using the Move Tool momentarily enables the Snap to Points tool.
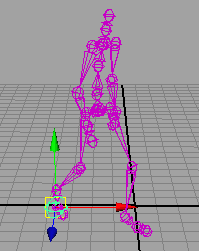
The redirection control is now positioned to redirect the skeleton’s walking motion. To complete the redirection process, you need to set keyframes while setting the redirection control so the redirection of the skeleton can occur.
To keyframe the redirection control
A red tick appears in the Time Slider at frame 36 indicating the keyframe. Setting a keyframe establishes the starting rotation for the redirection rotation of the skeleton.
The skeleton updates to a position where its left foot is planted on the ground plane. This is the location where you want the skeleton to be rotated to its new direction of travel.
Setting a second keyframe establishes when the redirection rotation for the skeleton ends.
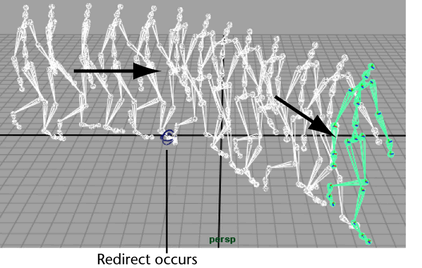
The skeleton takes two steps and then turns to its right after it reaches the redirection control, and continues walking in the new direction of travel and stops when it completes its walk cycle.
Now that you’ve redirected the character to a different direction of travel during the walk cycle, you can reuse some of the motion from the original source clip you created earlier in the lesson and saved to the Outliner/Visor.
You insert the source clip from the clip Library in Trax. The clip Library keeps track of the source clips and poses for the current character set. When the source clip is inserted from the Library, a copy of the source clip is created in a new track.
Once you import the source clip and make a copy of it, you trim the duplicate clip to make the character stop walking and then sit in a different location than the original motion capture.
A duplicate copy of the WalkSitSource clip is created, and inserted onto a new track.
The track view area updates to display all clips in their entirety.

The muted track dims to indicate it is inactive. When the walk cycle track is muted, the character updates to appear in the Da Vinci pose at the origin based on the original source clip.
The skeleton updates in the view and the redirection that was applied also occurs. Remember that the redirection occurs for the character, and not the clip.

The WalkSit clip is trimmed and the portion of the clip before frame 98 is discarded.

The dimmed track becomes active again. The skeleton however has updated to an incorrect pose near its previous position. This occurs because the two active clips overlap, and the character is receiving conflicting positional information as a result. (That is, double translation and rotation information.)
The pose for the skeleton is updated to the correct position.

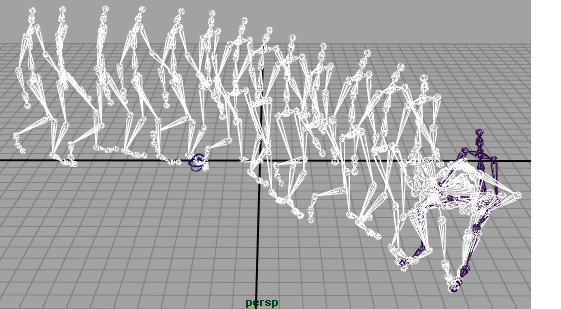
The skeleton takes two steps and then turns to its right after it reaches the redirection control, and continues walking in the new direction of travel, stops, and then sits.
A small jump cut occurs during the transition between the two clips. The jump cut occurs because the poses for the skeleton do not match from the end of the first clip and the beginning of the second. In your own work, try to anticipate how motion will blend between clips when working in Trax. You can correct the jump cut in this particular example by extending the WalkCycle clip.
To extend the WalkCycle clip to correct the jump cut
The number becomes highlighted indicating you can edit the number.
The new Frame Out number for the WalkCycle clip becomes 126. It now overlaps in time with the WalkSit clip.


The jump cut is less noticeable than before.
You have completed this lesson. Before leaving this lesson, reset the joint size back to its default setting.