Muscle Paint tool


The Muscle Paint tool lets you paint or set all weights for the main Muscle deformer. It operates as a painting tool or as a point-based editor. It provides much of the same functionality as the usual Maya artisan tools, but also provides true color feedback and painting of each weight type that Maya Muscle allows.

Related topics

The options and features in the Muscle Paint tool are described below:

Geo

Sets what geometry is currently being painted.

TipRight-click the Geo field to load meshes that have the Muscle deformer applied.
Node

Displays which Muscle deformer is currently being used on the given geometry.

TipRight-click the Node field to enable or disable the entire deformer to temporarily get faster weight painting feedback.
Brush profiles

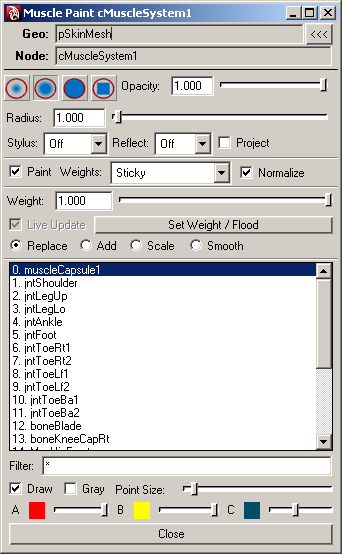
There are four brush profiles: Gaussian, Soft, Solid and Square. The first two provide a soft falloff around the edge of the brush. This results in smoother weighting, but the values on each point may not match exactly the value you specified. The Solid and Square brushes always provide exact values, but without the softer edge.

Opacity

Sets the opacity of the brush. Mostly useful when doing a Smooth operation. This can set the strength of doing a Smooth paint. In other modes this acts as a multiplier of the actual weight. For example, if weight is set to 1.0, but you set opacity to 0.5, the actual weight being painted is 0.5.

TipRight-click the Opacity field to select a preset weight value.
Radius

Sets the size of the brush.

TipRight-click the Radius field to bring up several common brush sizes.
Stylus

Allows the usual Maya Artisan tablet support. Stylus pressure can affect brush opacity, radius, or both.

Reflect

Mirrors painting onto the opposite side of the mesh while you paint. The weight is set to the same muscle/bone that is selected, but is painted on both sides. You can choose which axis to mirror the brush over. This is useful for painting per-point skin Jiggle or Relax weights, to get a mirrored effect.

Project

When checked, the paint brush is circular and projected from the current camera view. When off, the brush profile is perpendicular to the surface you are painting on.

Paint

When on, you can paint directly on the mesh. If points are selected when you open the Muscle Paint tool, or when the Paint checkbox is turned on, only those points are paintable and this “masks” the rest of the mesh. If no points are selected, the entire mesh is paintable.

When off, you can directly select points on your surface and set the weight by adjusting the slider or clicking Set Weight/Flood. When off, the tool works more like a component editor.

Weights

Sets what weight you are painting on the deformer. For weights that are not tied to a bone/muscle, such as Relax or Jiggle weights, the influence list is empty.

Normalize

Automatically turns on/off and in general does not need to be changed. Sets whether the painted weights are normalized to a value of 0 to 1 across all muscle/bones. For example, when painting on Bone A, if Bone B has weight, the value between the two always adds up to one. This is on for Sticky weights, so that your mesh moves 100% when you move your skeleton. For most other weights, this is off.

Weight

Sets the weight to paint with, or if Paint mode is off, sets the weight of the currently selected points.

TipRight-click the Weight field to select a preset weight value.
Live Update

When Paint mode is off and you are directly setting component weights, this specifies if the changes to the slider are updated immediately or if you have to click Set Weight/Flood. If on, any changes to the weight take place immediately. If off, then you must click Set Weight/Flood to set the weight change. In addition, when on, the Weight value displays the average weight to the current muscle/bone for all selected points. If off, the weight does not update when the point selection changes.

Set Weight/Flood

When in Paint mode, this floods the current value and operation across all points or masked points you are painting on. When Paint mode is off, this sets the weight specified on the selected points.

Replace/Add/Scale/Smooth

When in Paint mode, this sets the paint operation you are doing.

Replace

Changes the weights to the value you set when you paint on each point.

Add

Adds the weight value to each point.

Scale

Scales the weight down by the given value.

Smooth

Smooths the weight across the points.

NoteWhen doing a Smooth operation, make sure you have "HOLD" enabled in the Influence list for most of your bones/muscles to ensure that weights do not get smoothed onto undesirable influences.

Influence list

Shows all the currently selected Muscle Objects, or other nodes tied into the deformer when painting weights. For example, when painting Direction, it shows the Muscle Direction objects that are connected. You can select which influence you want to paint weights for from this list, and then paint or set weights. If more than one object is chosen, only the top one is used.

To select multiple objects, Ctrl-click when selecting to toggle them.

Right-click the list to view additional options.

Select All/Select None

Lets you easily select all or none of the objects in the list. This can be used, for example, if you want to enable or disable Lock Weights for the entire list.

Select Points from Highlighted Nodes

Selects the points that have a weight other than 0 from the selected node. If you are painting a single weight type, any point that is weighted over zero is selected. This can be useful to obtain a mask, or to simply debug and see what nodes are affecting what points on the mesh.

Highlight Nodes from Selected Points

Works the opposite way. You can select one or more points on your mesh, and this option highlights the items in the influence list that are affecting that point. This provides a way to debug what is affecting the point.

NoteIf you are filtering the list, only the nodes listed are highlighted even if another node is affecting the point. This can be a good way to obtain a filter. For example, you can select a point, highlight the nodes that are affecting it, then right-click the Filter field to set the visible list to only show these influences.

Finally, you can Enable or Disable Lock/Hold weights for the influences. When an influence has HOLD applied, the weights that object has cannot be changed.

For example if you weight Bone A to have a 0.75 weight on a point, "HOLD" Bone A, and attempt to replace the weight to Bone B with 1.0, Bone B only gets 0.25, since that is the only weight not currently locked off. When doing Smooth or Scale operations it is usually a good idea to "HOLD" all influences except the ones you are currently adjusting to ensure that extra weight does not go to other objects.

TipResize the Muscle Paint tool to get a longer list of objects.
Filter field

Lets you limit the items shown in the Influence list by name/wildcard. You can filter one or more wildcards or explicit names. For example, setting the field to “*Lf*” only shows objects that have “Lf” somewhere in the name. Setting it to “Head* Neck*” shows only objects that start with Head or Neck.

If you right-click the field, you can reset the list to all by entering “*”. In addition, you can filter to selected nodes. If you have highlighted one or more items in the list, you can filter to show only those explicit nodes.

Draw

When on, the current weight values on the points are drawn on the mesh. For polygon mesh objects, this displays on the surface of the mesh. For all other objects, this displays individual point colors on each vertex. When off, the color display is turned off.

Gray option

Overrides the current colors of the weight painting and sets the weights to draw from white to black as the value goes from 1 to 0.

Point Size slider

Sets the size of the points displayed when the Draw option is on for NURBS or subdivision surfaces. This has no effect when painting on polygon meshes.

Color A/B/C sliders

Let you customize the colors used when painting. The colors range from A to B to C as the weight goes from 1.0 to 0.5 to near 0.0. Any color that is exactly at 0 is black. It is recommended that you set the C color to something other than black so that you can detect small weight values.

Close button

Closes the Muscle Paint tool and turns off color and Paint mode.

NoteThe Muscle Paint tool creates a Muscle Display shape on the mesh. You can manually delete this node when not painting. Restarting the Muscle Paint tool automatically recreates this node if needed. It can also create a polyColorPerVertex node which you can also remove.