


Learning Resources > Tutorials > Getting Started with Maya > Subdivision Surfaces > Lesson 1: Modeling a subdivision
surface >
Creating a crease in a
subdivision surface
One of the unique features of subdivision surfaces is that it’s easy to create a crease or ridge on a smooth surface. You’ll do this in the next steps.
To crease the edge of the fingernail
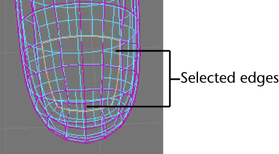
Once you crease an edge, it displays with a dashed line as a visual reminder that the edge has been creased. If you change your mind, you can remove the crease using Subdiv Surfaces > Uncrease Edge/Vertex.
 . In
the Tool Settings window, click Reset
Tool, and then close the window.
. In
the Tool Settings window, click Reset
Tool, and then close the window.
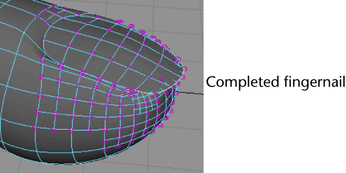
You might also want to add an additional level of vertices at the edges. (With the appropriate vertices selected, select Subdiv Surfaces > Refine Selected Components.)
After you crease the edges and add the extra vertices, you can make the nail’s edge overhang the skin below it by dragging the vertices at the nail tip out and away from the finger. Then tuck the row of vertices below the overhanging vertices in the opposite direction.
An example of a completed nail follows:
. In
the Tool Settings window, click Reset
Tool, and then close the window. This returns the Move
Tool to its default settings. This will avoid confusion
in future lessons.