Learning Resources > Tutorials > Getting Started with Maya > Rendering > Lesson 4: Global Illumination >
Render the scene using
raytracing
To better understand the differences in a rendering performed using direct lighting methods vs. global illumination, you begin by rendering the scene using the mental ray for Maya renderer without using Global Illumination.
You start by performing some preparatory setup and then render the scene. In this section you:
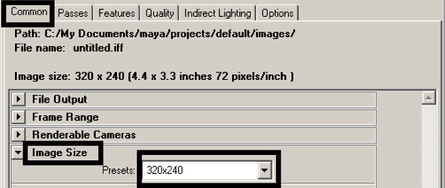
When performing repeated test renders, a good practice is to render small images so the tests render quickly.
Using the mental ray for Maya renderer
To use the Global Illumination feature in Maya you must render using the mental ray for Maya renderer.
To render using the mental ray for Maya renderer you need to change the rendering type from Maya to mental ray for Maya. You initially render the scene without using Global Illumination.
To change the renderer to mental ray for Maya

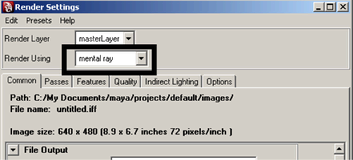
When you render an image it will now use the mental ray for Maya renderer.
When you perform repeated test renderings for a particular scene, consider the time it takes for each render to complete. If you reduce the time it takes to render each test image, the testing process proceeds much faster.
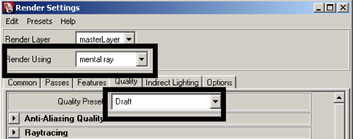
Setting render settings for raytracing
For the first rendering test, you render the scene to see how the scene appears without Global Illumination. The testing process proceeds faster if the quality level for the image is initially set low.
The Draft setting ensures low anti-aliasing settings are used and reduces the rendering time compared to other preset settings. This is a good practice when evaluating the lighting and basic material properties in your test renderings.
Setting the image size for rendering
You set the size that an image is rendered in the Render Settings window. For this lesson, you render the image at a size that allows you to evaluate the Global Illumination effect.
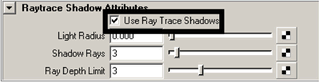
Shadows add realism to a scene, and in this lesson, help to demonstrate how a scene rendered using Global Illumination differs from a scene rendered using direct illumination.
To turn on shadows for the spotlight

When you render an image, all of the objects, lighting, shading materials, and image quality settings are used to calculate the image, based on the particular camera view that is set.
To render an image using mental ray for Maya

The Render View window appears and the fruit bowl scene renders using the mental ray for Maya renderer.

Keeping the image allows you to compare it to any subsequent test renders you produce. In this lesson you compare each rendered image to the previous ones to understand how the changes you make in various settings affect the rendered image.
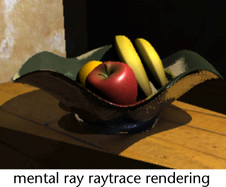
The rendered image shows the fruit bowl lit from the right of the frame. The upper and lower portions of the image are in shadow where the edges of the wall prevented the spotlight from lighting those portions of the scene. The shadow areas appear dark and do not show any detail of the floor or walls. This illumination effect is typical of an image produced with a single light source and direct illumination.