Learning Resources > Tutorials > Getting Started with Maya > Rendering > Lesson 4: Global Illumination >
Render the scene using Global
Illumination
To render using Global Illumination you need to turn on specific settings or attributes. There are two areas that you must initially set.
You initially render the scene using the attributes at their default settings to see how they affect the rendered image and then compare it to the previous raytrace rendering. As you gain more experience rendering with Global Illumination you will better understand what settings to initially use.
To turn on Global Illumination rendering attributes

This turns on preset attribute settings that enable and control the quality of the Global Illumination. You initially render the scene using the default settings. Once you’ve rendered an image and observed their effect, you return to the Render Settings window and modify the settings accordingly.
Global Illumination uses photons to simulate the light inter-reflection effects in a scene. Photons are small packets of energy emitted from a light source into the scene that bounce off surfaces to determine the intensity of light for those areas not receiving direct illumination. The renderer keeps track of the illumination that results from this photon emission in a file called a photon map.
In addition to having the spotlight emit light you need to set the spotlight to also emit photons for the Global Illumination simulation to occur. The overall illumination for the scene will be determined from a combination of the light’s intensity and photon illumination from this single spotlight.
To turn on Global Illumination lighting attributes
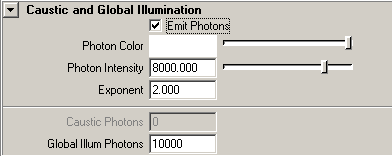
The spotlight emits photons into the scene when you next render an image. Photon Intensity sets the brightness of the Global Illumination. Global Illum Photons sets the number of photons that get emitted into the scene.
Setting a panel layout for rendering
The process of producing a rendered image usually involves rendering and evaluating successive test images to achieve the desired final image. This process involves adjusting many render quality, shading, and lighting settings in specific windows and panels. Opening and closing the various windows can become tedious.
Displaying the most frequently used windows and panels for rendering allows you to work more efficiently without having to open and close them repeatedly.
To set a panel layout for rendering
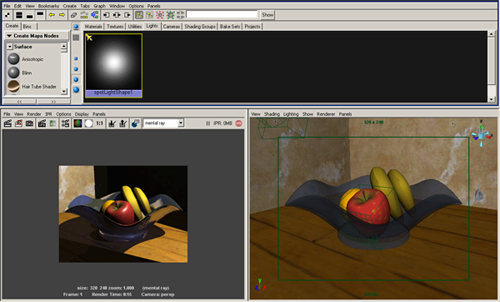
The panel layouts update to display the Hypershade window, Render View window, and Perspective view simultaneously. This allows you to easily work with these windows without having to open and close them repeatedly.
If the image in the Render View window appears pixelated as a result of the new panel layout, do the following:
Rendering the scene with Global Illumination
Now that the lights are set to emit photons and the Global Illumination preset is selected, you’re ready to render an a test image using Global Illumination.
To render the scene using Global Illumination

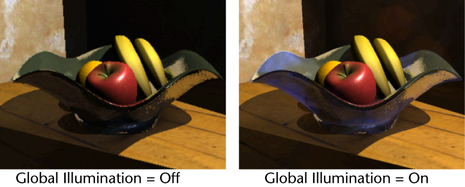
In this rendering, the shadow areas of the scene appear less dark as a result of Global Illumination. The bowl also appears more transparent than in the previous rendering.
The effect you want to achieve is to have the shadow regions receive indirect light; that is, you want to be able to view more detail in the shadow areas as a result of the Global Illumination. To do this, you must adjust the Global Illumination photon attributes. After you change an attribute, test render the scene to see the effect of this change in the rendered image. These repeated test renderings or iterations allow you to work systematically towards the goal of creating the desired final image.
In the next steps you use the Attribute Editor to increase the Photon Intensity to increase the overall Global Illumination for the scene.
Increasing the brightness of Global Illumination
Increasing the Photon Intensity setting increases the brightness of Global Illumination. The goal is to provide more visible detail and brightness in the shadow areas of the scene in the next test image.
To increase the Global Illumination lighting
Increasing the Photon Intensity increases the illumination in the areas affected by Global Illumination.

The brightness of the illumination in this image has increased as a result of increasing the Photon Intensity. This is indicated by the increased brightness and details seen in the shadow areas of the scene. However, some circular spots have also appeared in the image along the dark wall behind the bowl. These spots are the result of low photon quality settings.
Adjusting the quality of Global Illumination
The quality of Global Illumination is primarily affected by three attributes:
In the next steps, you return to the Render Settings window and the Attribute Editor to increase the quality attributes that affect the Global Illumination effect.
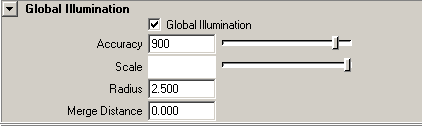
To increase the Global Illumination quality settings
The Accuracy setting determines how many photons will be evaluated to determine the Global Illumination intensity at a given sampling point. Radius determines the size of the region surrounding the particular sampling point. The more photons that get sampled, the more even the Global Illumination will appear in the final image.
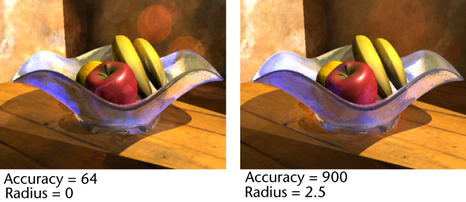
When the Accuracy and Radius values are increased, the resulting rendered image shows the circular spots have almost fully disappeared and the Global Illumination is much more uniform when compared to the previous rendering. Increasing the number of Global Illumination photons should aid in making the Global Illumination more uniform.
In the next steps, you increase the number of photons to provide a more uniform Global Illumination in the scene.
To increase the Global Illumination photons
When you increase the number of Global Illumination Photons you are increasing the resulting density of the photon map that gets produced at the beginning of the render process. The more photons, the smoother the resulting Global Illumination. Increasing the number of photons also increases the rendering time.
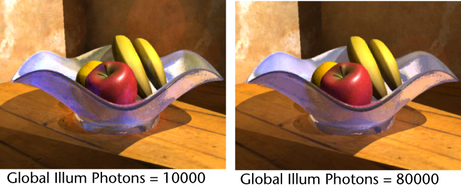
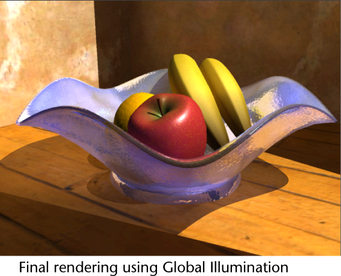
In this image, the circular spots that were seen in the previous renderings have disappeared. You can observe other Global Illumination effects compared to the original raytrace rendering:
Now that you’ve tested and refined the Global Illumination for a small image you can render a final image for the scene at a larger image size and increase the rendering quality settings.
To increase the image size and antialiasing
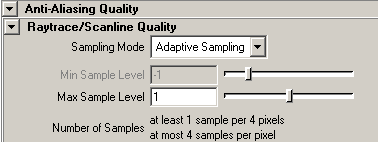
Sampling is the process for determining the amount of anti-aliasing that occurs. The Sample Level attribute sets minimum and maximum limits for the amount of sampling that will occur for a given pixel area in the image. Modifying the anti-aliasing Sample Level settings will ensure that the surfaces in the rendered image appear smooth.
A Max value of 1 should provide the correct amount of anti-aliasing sampling for this particular image at this image size.