


Edit NURBS > Surface
Fillet > Fillet Blend Tool
Creates a fillet surface between two existing surfaces.
Edit NURBS > Surface
Fillet > Circular Fillet > 
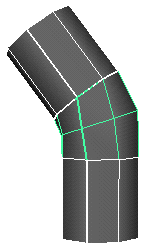
Turns on automatic orientation of the blended surface’s junctures with the original objects. If off, you must choose the surface orientation. For example, suppose you create the following fillet-blended surface (the middle object) from a pair of planes:
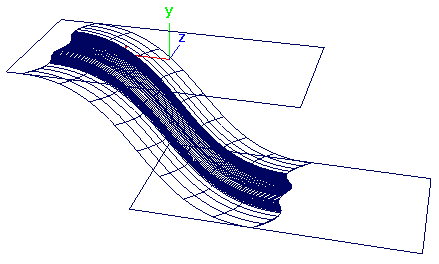
Where the blended surface meets the top plane, notice how the curvature curls towards the left-most part of the plane. If you rotate the top plane 180 degrees around its z-axis, the curvature still curls towards the same part of the plane.
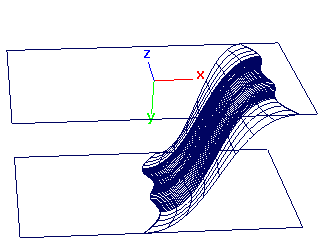
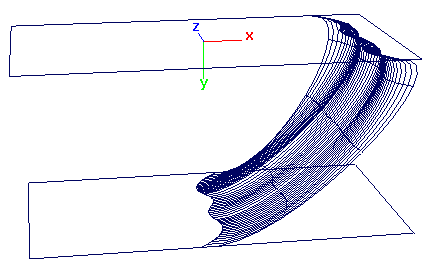
If Auto Normal Dir is off, the curl of your surface may point in the opposite direction after the rotation. In the above example, the blended surface would curl toward the left end (former right end) of the top plane.
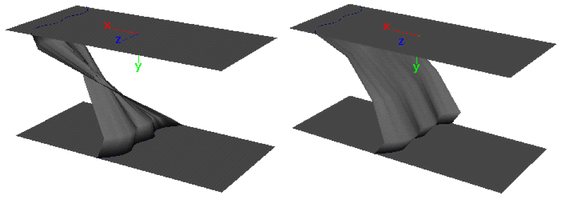
In most cases, turning on Auto Normal Dir creates the desired orientation automatically when you rotate the surfaces.
Auto Normal Dir is called Auto Normal in the Channel Box and Attribute Editor.
When on, Maya creates the blended surface with multiple knots at each knot position. This displays the surface with greater precision. Be aware that using multiple knots might break the tangency between the blended and original surfaces as you deform the surface. For example, you might see a sharp break in curvature on the surface as you deform it.
If you’re uncertain how to set this option, leave it off. If you will not be deforming the blended surface, turn this option on to create a better fit with the surfaces. Also, if you select Bezier as the output geometry, you can leave this option on because the conversion creates multiple knots anyway.
Note that the number of multiple knots increases with a lower Positional Tolerance number. For more information, see Use Tolerance.
If Auto Normal Dir is off, you can turn on Reverse Normal Left or Reverse Normal Right to correct a situation where the blended surface curls towards one of the original surfaces improperly. Reverse Normal Left reverses the curl towards the first surface you selected when you used the Fillet Blend tool. Reverse Normal Right reverses the curl towards the second surface.
If you’re uncertain about how to use these settings, use the Attribute Editor to experiment with different settings for Left or Right (or both) until you get the desired result.
The Reverse Normal Left/Right attributes are named Flip Left/Right Normal in the Channel Box and Attribute Editor.
If Auto Normal Dir is off, you can use these options to correct a blended surface that has an undesired twist after creation. If you turn on either of these options, the blended surface responds as though you were reversing the direction of a curve that joins the blended shape to the surface. (The curves are not actually reversed.) By experimenting with these settings in the Attribute Editor, you can untwist the blended surface.
The Reverse Direction Left/Right attributes are named Reverse Left/Right in the Channel Box and Attribute Editor.
This option prevents a blended surface from twisting when you rotate the original surface. The Auto Closed Rail Anchor option is relevant mainly for working with a blended surface created from periodic curves.
For instance, suppose you’ve created a blended surface from a pair of cylinders as shown in the following figure. The blended surface is the curving cylinder sandwiched between the top and bottom cylinders:
If Auto Closed Rail Anchor is off and you rotate the top or bottom cylinder around its Y-axis, the blended surface (middle cylinder) twists as if it’s glued to the cylinders:
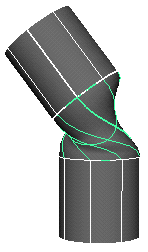
If Auto Closed Rail Anchor is on and you rotate the top or bottom cylinder, the middle cylinder slides along the bordering rings. No twisting occurs, so the middle cylinder retains its original shape. The middle cylinder will rotate if you rotate the top or bottom cylinders.
The Auto Closed Rail Anchor attribute is named Auto Anchor in the Channel Box and Attribute Editor.
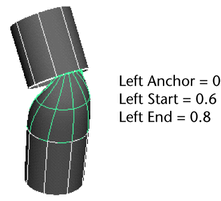
Left/Right Anchor sets an anchor position (in U) for the curve from which the blended shape was created. This is used with the Left/Right Start or Left/Right End to specify a range of curve length along which the blended surface joins the adjacent surfaces. Note that you also can use the Show Manipulator Tool to adjust this option. Be aware that twisting will still occur when you rotate the adjoining surfaces.
Global tolerance causes Maya to use the Positional and Tangential values from the Settings part of the Preferences window.
Local tolerance lets you enter a new value in the options window to override the values in the Preferences window.
Positional tolerance sets how snugly the blended surface fits the original surfaces. Tangential tolerance sets how precisely the tangency at the edges of the blended surface merge with the tangency at the edges of the original surfaces.
For Positional and Tangential tolerance, lower values increase accuracy at the expense of longer rendering time.
Unless you’re modeling for manufacturing output, it’s probably unimportant to display the surfaces in the workspace with perfect fit. They’ll still likely render well. To enhance the rendering quality, you can adjust the Tessellation options of the blended surface shape node.