


Create and edit nCloth constraints
See nDynamic Collisions and Creating an Exclude Collide Pairs constraint.
Creating an nCloth Transform constraint
You can create a Transform constraint to hold specific nCloth components in place or move them through XYZ space. For example, you can make a Transform constrained nCloth follow its animated passive object through its scene by parenting its Transform constraint locator to the passive object.
To create an nCloth Transform constraint
If you select edges or faces, then all their vertices will be Transform constrained.
 .
.
The nCloth object or components you selected are now constrained to their current positions in XYZ space, and a Transform constraint locator is created for the selected nCloth object or components.
The nCloth object or components you selected are also now connected to the nCloth’s Maya Nucleus solver through a dynamicConstraint node.
The preset properties on the dynamicConstraint node determine the constraint’s type (in this case, a Transform constraint) and how it behaves. For example, you can create a Transform constraint with the following attribute settings:
Creating an nCloth Component to Component constraint
You can create a Component to Component constraint to attach nCloth components (vertices, edges, or faces) to other nCloth or passive object components. For example, you can constrain the vertices from the top of an nCloth cape to the shoulders of a passive object character, so that the cape hangs from the characters shoulders and moves with the character.
To create an nCloth Component to Component constraint
.
The Create Component to Component Constraint Options Box window appears.
The nCloth components you selected are now constrained to the target vertices you selected, and they are now connected to the nCloth’s Maya Nucleus solver through a dynamicConstraint node.
The preset properties on the dynamicConstraint node determine the constraint’s type (in this case, a Component to Component constraint) and how it behaves. For example, you can create a Component to Component constraint with the following attribute settings:
Creating an nCloth Point to Surface constraint
You can create a Point to Surface constraint to attach nCloth components (vertices, edges, or faces) to a target surface (an nCloth surface, or a passive collision object). For example, you can use a Point to Surface constraint to hold the waistband of a pair of nCloth pants to the hips of a passive object character.
To create an nCloth Point to Surface constraint
 -select the
target surface to which you want to constrain the nCloth components.
-select the
target surface to which you want to constrain the nCloth components.
The target surface can be a different nCloth object that is part of the same system, one of the nCloth’s passive objects, or a non-nCloth object.
.
The Create Point to Surface Constraint Options Box window appears.
The nCloth components you selected are now constrained to the target surface you selected, and they are now connected to the nCloth’s Maya Nucleus solver through a dynamicConstraint node.
The preset properties on the dynamicConstraint node determine the constraint’s type (in this case, a Point to Surface constraint) and how it behaves. For example, you can create a Point to Surface constraint with the following attribute settings:
Creating an nCloth Slide on Surface constraint
You can create a Slide on Surface constraint to attach nCloth components (vertices, edges, or faces) to a target surface (another nCloth surface, or a passive collision object), and allow the constrained nCloth components to move or slip along the surface to which it is constrained. You can use a Slide on Surface constraint instead of collisions, and in most cases it works faster than collisions. For example, you can Slide on Surface constrain all the vertices in an nCloth shirt to a character model instead of making the character a passive object.
To create an nCloth Slide on Surface constraint
-select the
target surface to which you want to constrain the nCloth components. The
target surface can be a different nCloth object that is part of
the same system, one of the nCloth’s passive objects, or a non-nCloth
object.
.
The Create Slide on Surface Constraint Options Box window appears.
The nCloth components you selected are now constrained to the target surface you selected, and they are now connected to the nCloth’s Maya Nucleus solver through a dynamicConstraint node.
The preset properties on the dynamicConstraint node determine the constraint’s type (in this case, a Slide on Surface constraint) and how it behaves. For example, you can create a Slide on Surface constraint with the following attribute settings:
Creating a Weld Adjacent Borders constraint
You can create a Weld Adjacent Borders constraint to constrain nCloth border edges or vertices together in a non-springy manner. For example, you can use a Weld Adjacent Borders constraint to make separate nCloth meshes behave as if they are a single nCloth object. See also Weld Adjacent Borders constraint.
To create a Weld Adjacent Borders constraint
.
The Create Weld Adjacent Borders Constraint Options Box window appears.
If you selected a single nCloth object, its adjacent border edges are constrained using the Weld constraint method.
If you selected two adjacent nCloth objects, the nearest border edges of the nCloths are constrained using the Weld constraint method. If the nCloths you selected do not have the same number of vertices at their borders, their points are constrained instead.
If you selected vertices from two separate nCloths, the points are constrained using the Weld constraint method.
The nCloth objects or border vertices you selected are also now connected to the nCloth’s Maya Nucleus solver through a dynamicConstraint node.
The preset properties on the dynamicConstraint node determine the constraint’s type (in this case, a Weld constraint) and how it behaves. For example, you can create a Weld constraint with the following attribute settings:
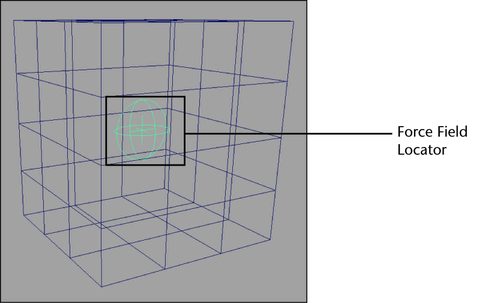
Creating a Force Field constraint
You can create a Force Field constraint to push nCloth components or objects away from the center of the constraint, in a radial field with spherical volume bounds. For example, you can push out nCloth that gets stuck within the elbow joint of a character by placing a Force Field constraint on the joint. Conversely, you can use it to suck in or contain nCloth within the bounds of the constraint.
To create a Force Field constraint
.
The Create Force Field Constraint Options Box window appears.
The Force Field locator appears inside the mesh of the selected object, and the dynamicConstraint node appears in the Attribute Editor.
The preset properties on the dynamicConstraint node determine the constraint's type (in this case, a Force Field constraint) and how it behaves. For example, you can create a Force Field constraint with the following attribute settings:
The location, size and rotation of the locator determines the size, shape and volume of the force field constraint.
Creating an Attract to Matching Mesh constraint
You can create an Attract to Matching Mesh constraint to attract the vertices of an nCloth object to the corresponding vertices of a mesh with matching topology. For example, use this constraint to create a specific end shape for a garment falling off of a character that must land in a specific shape, or orientation in the scene.
To create an Attract to Matching Mesh constraint
.
The Create Attract to Matching Mesh Constraint Options Box window appears.
Constraint links between the nCloth object and the target nCloth mesh appear, and the dynamicConstraint node appears in the Attribute Editor.
The preset properties on the dynamicConstraint node determine the constraint’s type (in this case, an Attract to Matching Mesh constraint) and how it behaves. For example, you can create a Attract to Matching Mesh constraint with the following attribute settings:
The Strength attribute determines how closely your nCloth object resembles your target nCloth mesh.
Creating a Tearable Surface constraint
You can create a Tearable Surface constraint to make an nCloth object rip or shatter when it collides with passive objects or other nCloth objects. For example, you can use a Tearable Surface constraint to make a piece of nCloth silk tear when it catches on a pointy passive object.
.
The Create Tearable Surface Constraint Options Box window appears.
The current nCloth is made tearable or shatterable by separating all of its faces, generating new edges and vertices, merging the nCloth’s vertices, softening the nCloth’s edges, and constraining the nCloth’s points (tear) or edges (shatter) together using the Weld constraint method. As a result, the topology of your nCloth’s output mesh will no longer match that of its input mesh.
The nCloth object you selected is now also connected to a dynamicConstraint node.
The preset properties on the dynamicConstraint node determine the constraint’s type (in this case, a Tearable Surface constraint) and how it behaves. For example, you can create a Tearable Surface constraint with the following attribute settings:
Creating a Disable Collisions constraint
You can create a Disable Collision constraint for nCloths, passive objects, or vertices to prevent them from colliding with all other nCloths, passive objects, or vertices. This constraint is useful when you want to improve the performance of your nCloth or you want to avoid collision geometry crossovers.
To create a Disable Collisions constraint
The nCloth objects, passive objects, or vertices you selected no longer collide with any other objects or components that share the same Maya Nucleus solver.
Creating an Exclude Collide Pairs constraint
You can create an Exclude Collide Pairs constraint for nCloths, passive objects, or vertices to prevent them from colliding with specific nCloths, passive objects, or vertices. This constraints is useful when you want to improve the performance of your nCloth or you want to avoid collision geometry crossovers.
To create an Exclude Collide Pairs constraint
If you selected two nCloth objects, they no longer collide. If you selected an nCloth object and a passive object, they no longer collide. If you selected a group of vertices from one nCloth, and then another group of vertices from a different nCloth, then the vertices you selected no longer collide.
See also nConstraint > Exclude Collide Pairs.
Editing nCloth constraint membership
You can add, remove, or replace the components that are used in your nCloth constraint by editing constraint membership. You cannot, however, add an object to an existing constraint by editing constraint membership.
To edit constraint membership, you can use the Replace Members, Add Members, and Remove Members options, or the nConstraint Membership Tool.
To see the members and links of a selected constraint
The component members and links of the selected constraint highlight in the scene view.
To edit nCloth constraint membership
For example, if you want to edit the membership of a Component to Component constraint that links vertices, you would use Vertex selection mode.
-click
the constraint you want to edit.
 -click
the select the dynamicConstraint node of the constraint you want
to edit.
-click
the select the dynamicConstraint node of the constraint you want
to edit.
You can now edit the selected constraint’s membership by selecting nConstraint > Add Members, nConstraint > Remove Members, or nConstraint > Replace Members.
To use the nConstraint Membership Tool to edit dynamic constraint membership
 to complete
the replace, add, or remove dynamic constraint members operation.
to complete
the replace, add, or remove dynamic constraint members operation.
Paint constraint property maps
To create nCloth constraint vertex maps
-select the
constraint your want to paint vertex properties for, to include
it in the paint operation.
The Paint nComponent Attribute Tool becomes the current tool, and its settings appear in the Tool Settings panel. This tool is a modified version of the Paint Attributes Tool. See Artisan Tool Settings.
The painted vertex properties are automatically saved to the selected nCloth’s vertices.
To create nCloth constraint texture maps
The 3D Paint Tool becomes the current tool, and its settings appear in the Tool Settings panel. This tool is a modified version of the 3D Paint Tool. See 3D Paint Tool.
The painted nCloth constraint texture map is saved as a file texture to the \maya\projects\default\3dPaintTextures directory by default.
To convert an nCloth constraint vertex map to a texture map
The selected constraint property’s values are saved to disk as a texture map (file texture) and the property’s values on the nCloth’s vertices are not removed.
To convert an nCloth constraint texture map to a vertex map
The selected constraint property’s texture map (file texture) is converted to per-vertex property values, those values are then stored on the selected nCloth’s vertices, and the texture map is not deleted from disk.