Show in Contents

Add to Favorites

Home: Autodesk Maya Online Help

Assigning a Paint Effects brush to the hair

Lesson 2: Creating a dynamic non-hair simulation

Rendering the curtain scene

Setting up constraints
In
these next steps you tie up the middle section of the beaded curtain
by first modeling the Start curves into a bound position and then
creating a constraint to hold the curves in that position during
playback. With a Hair to Hair constraint the hair curves stick together
at the constraint locator, but also dynamically move from root to
tip when forces or collisions occur.
To model the curtain into a tied-back
position
- Dolly and tumble in the scene until you
are facing the curtain directly.
- Drag to select all the hair curves and
then select
Hair > Convert Selection >
To Start Curves.
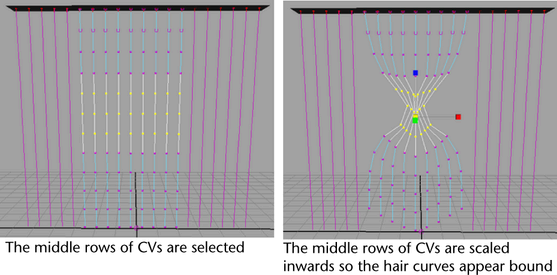
- Select a block of Start curves in the
middle of the curtain.
- Select
Hair > Modify Curves >
Lock Length. This ensures the entire curve is modified when you
transform CVs in the next steps.
- Click the
 button
on the Status Line to display the
CVs on the curves.
button
on the Status Line to display the
CVs on the curves.
- Select the middle three rows of CVs on
the selected hair curves and then, using the Scale
Tool, scale the CVs inwards so the hairs are pulled together.
To constrain the curtain in the tied-back
position
- Click the
 button
on the Status Line to display the
Start curves (not the CVs).
button
on the Status Line to display the
Start curves (not the CVs).
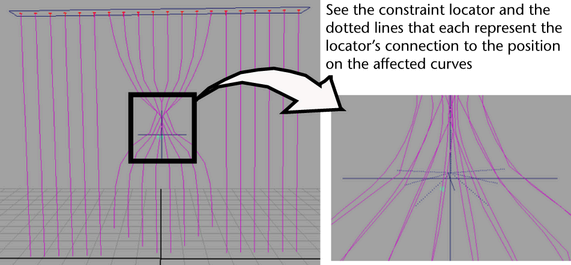
- With the bound hair curves still selected,
select
Hair > Create Constraint >
Hair to Hair.
A constraint locator is created and
connected to the selected curves.
- In
the hairConstraintShape tab in
the Attribute Editor, set the constraint attributes
as follows:
- Stiffness to
0.5 (default)
- Glue Strength to 1.0 (default)
- Point Method to Nearest
(default) (Since the constraint locator is created in
the middle of the bound hair, the locator is “nearest” the bound
area to be constrained.)
- Change the hair display to the Current
Position (
Hair > Display >
Current Position).
- Rewind to the start frame and play the
simulation.
When the sphere passes
through the bound curtain it collides with all the bound hairs.
The bound part of the
curtain relaxes within the first several frames, but in the next
steps you reset the position of those Start curves so they look more
natural at the beginning of the simulation.
To reset the Start position
- Display the Start curves and the Current
Position (
Hair > Display >
Current and Start).
- Rewind to the start frame and play the
simulation.
- Stop the simulation as soon as the curves
relax below the constraint, but before the collision occurs.
- Select the bound Start curves (these
are the bound curves that are not blue) and then select
Hair > Set Start Position >
From Current.
You may have to repeat
steps 2 to 4 a few times until you are happy with the look of the
bound curtains at the beginning of the simulation.