Learning Resources > Tutorials > Getting Started with Maya > Hair > Lesson 1: Creating a basic
hairstyle >
Styling the hair
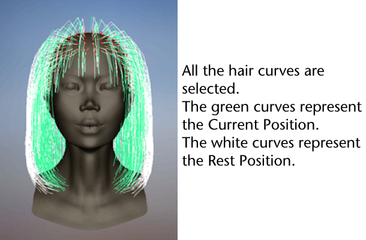
To style the hair you manipulate either the Start or Rest curves to achieve the look you want. In these next steps you first edit the Start curves to create the basic hair shape. Then you set an initial Rest position for the hair and style the hair by editing the Rest curves.
To edit the Start curves to create the basic hair shape
 button
and choose All Objects Off from the drop-down
menu that appears.
button
and choose All Objects Off from the drop-down
menu that appears.
 icon
to restrict the selection to curves.
icon
to restrict the selection to curves.
 in the Status
Line to display the curves’ CVs.
in the Status
Line to display the curves’ CVs.
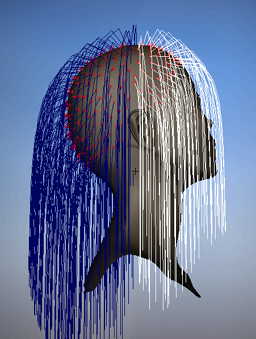
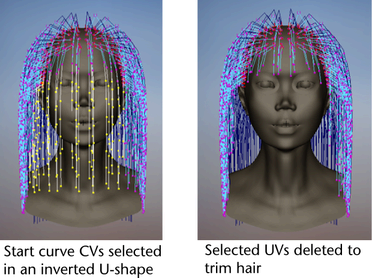
 , select
CVs in an inverted U-shape around the front of Marion’s face, as
shown in the following image.
, select
CVs in an inverted U-shape around the front of Marion’s face, as
shown in the following image.
 button
to display the curves and then drag around Marion’s head to select
all the Start curves.
button
to display CVs and then, using the Select Tool, select
the CVs in the bottom half of all the curves.
button
to display the curves and then drag around Marion’s head to select
all the Start curves.
button
to display CVs and then, using the Select Tool, select
the CVs in the bottom half of all the curves.
 .
.
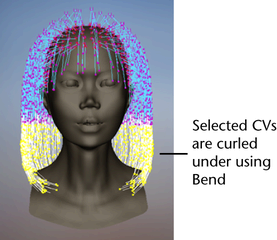
The selected CVs are bent under towards Marion’s neck. To fix any unruly hairs, you could select them and then select Hair > Modify Curves> Smooth.
button
to display the curves.
 button
to play the hair simulation.
button
to play the hair simulation.
Even though you styled the Start curves, notice how they fall straight and lose the bend at the end. Start curves only define the position of the hair at the Start frame of the simulation; once the simulation is started the Start curves are affected by the dynamic forces applied to the hair system. To “hairspray” a hairstyle, you need to style Rest curves and adjust dynamic hair system settings. In the next steps you create Rest curves from the Start curves.
 button
to stop the simulation.
button
to stop the simulation.
To create and modify the Rest curves to achieve a hairstyle
 , drag
to select all the Start curves and then select
Hair > Set Rest Position>
From Start.
button
to play the simulation. Watch how the Current position hairs flop
down because the Gravity value is quite high
(2.5).
, drag
to select all the Start curves and then select
Hair > Set Rest Position>
From Start.
button
to play the simulation. Watch how the Current position hairs flop
down because the Gravity value is quite high
(2.5).
If some Rest curves won’t relax and stabilize, increase Length Flex and Iterations in the hairSystemShape1 tab.
button
to stop the simulation.
 button
to rewind to the beginning of the simulation.
button
to rewind to the beginning of the simulation.