Show in Contents

Add to Favorites

Home: Autodesk Maya Online Help

Lesson setup

Lesson 1: Creating a basic hairstyle

Styling the hair

Creating hair on a surface
When
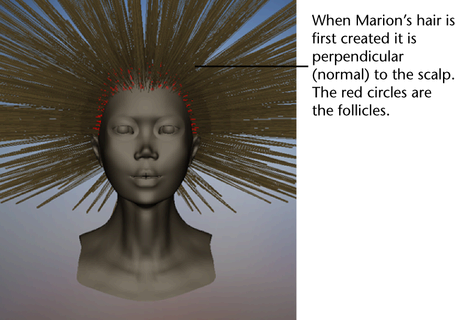
you first create hair it appears sticking out normal to the surface.
For a more natural look, play the hair simulation to see the hair
react to gravity and then you can set a more realistic Start position
for the hair. In these steps you create hair on a NURBS model and
set a Start position after playing the simulation. You use Interactive
Playback to play the simulation while adjusting dynamic hair system
attributes and see how your changes affect the simulation.
NoteBefore continuing
with the procedures below, make sure the End Time and Playback End
Time in the Range Slider are both set to 10000.
To create hair on a model
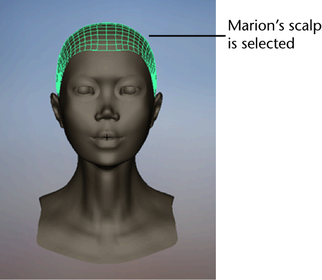
- Select Marion’s scalp, as shown in the
image below.
- Select
Hair > Create Hair >
 and
in the Create Hair Options window, specify
the following:
- Set Output to Paint
Effects.
- Set
the U count to 26 and the V
count to 22. These determine how many hair curves within
each UV range.
- Set the Passive fill to
0. No passive curves will be used in this lesson. The behavior of
passive curves is interpolated between neighboring active curves.
For more information, see
Passive hair curves in
theHair guide.
- Set
the Randomization to 0.5. A value
of 1 represents total randomization of placement of hair curves
on the surface, whereas a value of 0 represents no randomization.
- Set the Points per hair to
10. This sets the number of segments per hair. More segments are
needed to make long hair look natural or to create complex short
hairstyles. As you increase the number of segments, you decrease
the performance (speed) of the simulation.
- Set
the Length to 10. This value is
relative to the world space units.
- Both
the Create Rest Curves and Edge
Bounded options should be turned off.
- Turn
the Equalize option on. This ensures
the hair curves are evenly distributed over the surface.
- Click Create Hairs.
The hair is attached to the scalp and sticks
out perpendicular to the surface. You are looking at the Current
Position of the hair, which is also referred to as the
“dynamic” position. Do not edit the hair curves in this view; edit
only in Start Position or Rest Position.
To
play the hair simulation
- Click the Play
 button
to play the simulation.
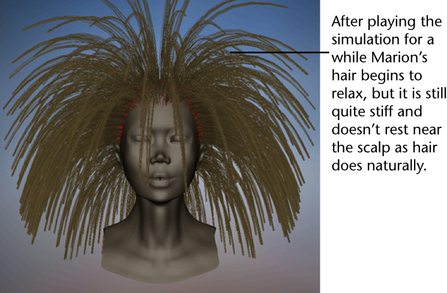
The hair falls due to default dynamic forces,
such as gravity, which are found in the hair system attributes.
However the hair takes a while to fall, which is as a result of
a high Display Quality setting.
- Click the Stop
 button
to stop the simulation when the hair is relaxed as it is in the
following image.
Notice the hairs are
quite stiff and stick out from the scalp instead of naturally falling
closer to the scalp. To make the hair appear less stiff you can either
increase the number of Points Per Hair (segments), which increases the
simulation and render time, or you can reduce the Stiffness value
in the hair system’s Dynamic attributes.
In the next part of the
lesson you adjust dynamic settings of the hair system, including Stiffness and Gravity,
to achieve more naturally behaving hair.
To
improve playback performance and modify dynamic settings
- In the Attribute Editor (
 + a)
select the hairSystemShape1 tab and change Display
Quality to 2. This affects how many hairs display in the
scene view, but has no effect on how much hair appears in the software
render. By reducing the Display Quality,
this speeds up the playback of the hair simulation.
- In
the Dynamics section the default
value for Stiffness is 0.10. Since the hair
is quite stiff, reduce the Stiffness value
to 0.07.
- Select
Solvers > Interactive Playback to
play the simulation. Watch the hair begin to relax more.
- With
the simulation still playing go to the Dynamics section
of the hairSystemShape1 tab and change the Gravity value
to 2.5. Watch the hair relax even more and rest closer to the scalp,
as hair does naturally.
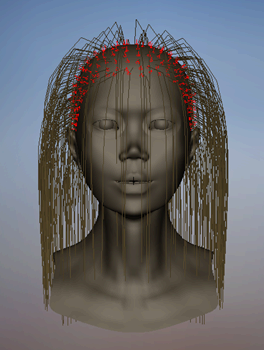
- Click the Stop
 button
when the hair has relaxed as in the following image.
To set the position of the hair for
the start frame
- When you are playing the hair simulation,
by default you are viewing the Current position curves.
To select all the Current position curves, click
any hair curve and then select
Hair > Convert Selection >
to Current Positions.
- To set the start frame of the hair simulation
to how the hair appears now, select
Hair > Set Start Position > From
Current.
- Select
Hair > Display>
Start Position to view the Start curves and see that they took on
the Current Position.
- Click
the
 button
to rewind to the start frame.
The position of the hair
at the start frame is now relaxed.

 and
in the Create Hair Options window, specify
the following:

 button
to play the simulation.
 button
to stop the simulation when the hair is relaxed as it is in the
following image.
 + a)
select the hairSystemShape1 tab and change Display
Quality to 2. This affects how many hairs display in the
scene view, but has no effect on how much hair appears in the software
render. By reducing the Display Quality,
this speeds up the playback of the hair simulation.
 button
when the hair has relaxed as in the following image.
 button
to rewind to the start frame.