Show in Contents

Add to Favorites

Home: Autodesk Maya Online Help

Use PSD Networks as textures in Maya

Use Adobe Photoshop files in Maya

Display the alpha of a PSD file in the scene view

Create a PSD file with
layer sets from within Maya
When
you create a PSD file from within Maya, you select the channels
to be painted in Adobe Photoshop.
These channels are then
represented in Adobe Photoshop as layer sets, and you can add, edit,
or delete any layer within a layer set (see also
Use PSD Networks as textures in Maya).
Any changes you make in Adobe Photoshop are piped back into the
appropriate channels in Maya when you update the PSD node (see
Update PSD Networks).
NoteAn optional UV snapshot
works as a guideline to help you paint the texture with greater
accuracy. You can create a UV snapshot when you create a layered
PSD file in Maya (see
To create and use a layered PSD file in Maya).
To create and use a layered PSD file
in Maya
- Make sure UVs fit within the 0 to 1 texture
space (see the online documentation for details) and select the
required material (like Phong, for
example).
- Select the object you want to paint.
- Select
Texturing > Create PSD Network.
The Create
PSD Network Options window opens.
- Type the name of the Adobe Photoshop
file to be created, and set any of the options (or use the default).
For information on the
options, see
Texturing > Create PSD Network.
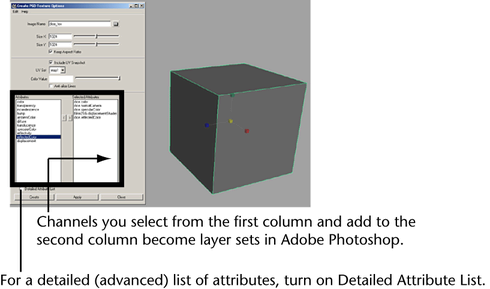
- In the list of Attributes,
double-click an attribute you want to paint to add it to the list
of Attributes. Repeat for additional
attributes you want to include. If you want to paint an attribute
not shown in the list, turn on the Detailed Attribute List.
- Select Create.
An empty PSD file is
created by Maya with layer sets for the selected attributes you
want to paint. The background colors are taken from the material.
- Locate the PSD file in the sourceimages
directory of your project.
- Open the file in Adobe Photoshop.
- Each attribute to be painted is represented
by a layer set, and you can add or delete as many layers as you
want within a given layer set. Maya treats each layer set as a separate
flattened image, and the material’s base color is used.
- If you opted to include a UV snapshot,
it is inserted on the topmost layer as reference for painting. (This
layer does not contribute to the render.)
- Paint the layers in Adobe Photoshop,
then save the file.
- In Maya, select
Texturing > Update PSD Networks.
Each of the PSD image
file’s layer sets are represented by a separate node attached to
the PSD file node.